GRLLR Connect Storage Unit: Assembly and Operation Manual
Step-by-step instructions for assembling and maintaining the GRLLR Connect Storage Unit. It includes detailed assembly steps and maintenance tips to ensure the unit's longevity and proper function.
Product Information
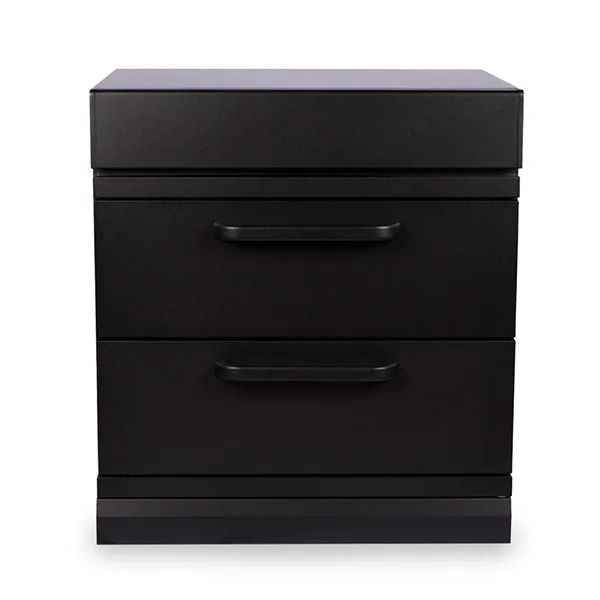
GRLLR Connect Storage Unit
Complete your outdoor kitchen setup with the GRLLR Connect Storage Unit, featuring a durable stainless steel matte worktop and two spacious drawers. Designed for practical use, this unit offers the perfect place to store BBQ essentials like tools, spices, and accessories—keeping everything within arm’s reach while you grill. Seamlessly integrate it with other modules in the GRLLR Connect-series to build your ideal outdoor cooking station.
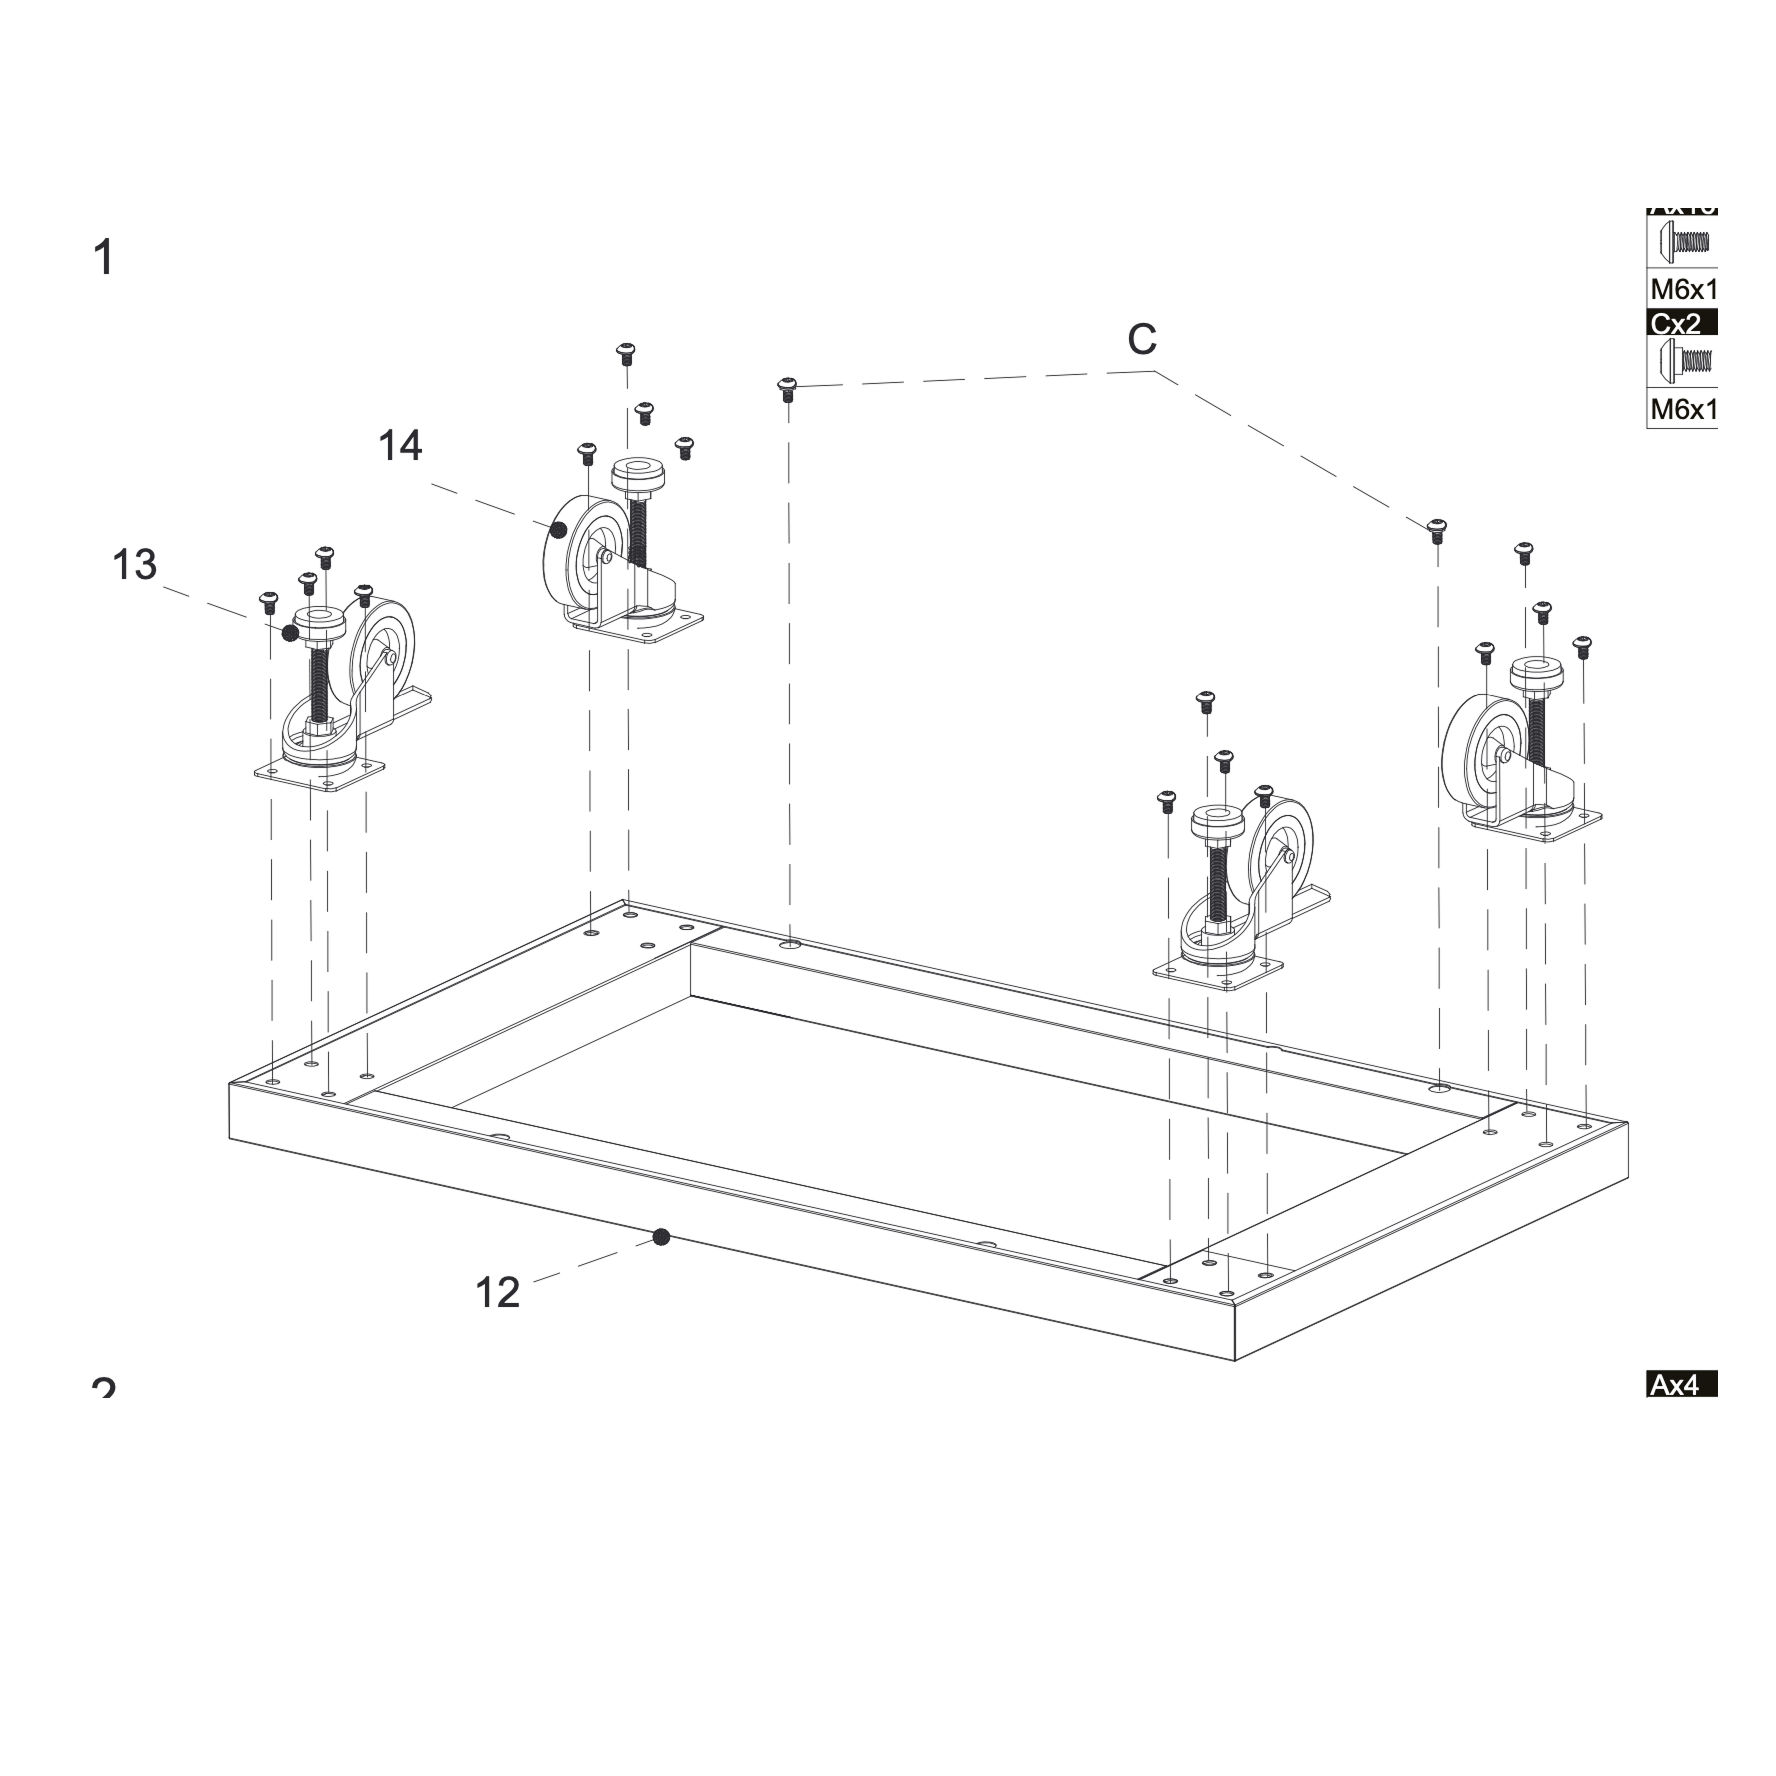
Attach 2 lock casters (13) and 2 casters (14) to the corners.
Secure each with M6×10 screws (A).
Fix the plint with 2 M6×12 step screws (C).
Parts used:
Bottom Panel | 12 | 1×
Lock Caster | 13 | 2×
Caster | 14 | 2×
M6×10 bolt | A | 16×
M6×12 Step Screw | C | 2×
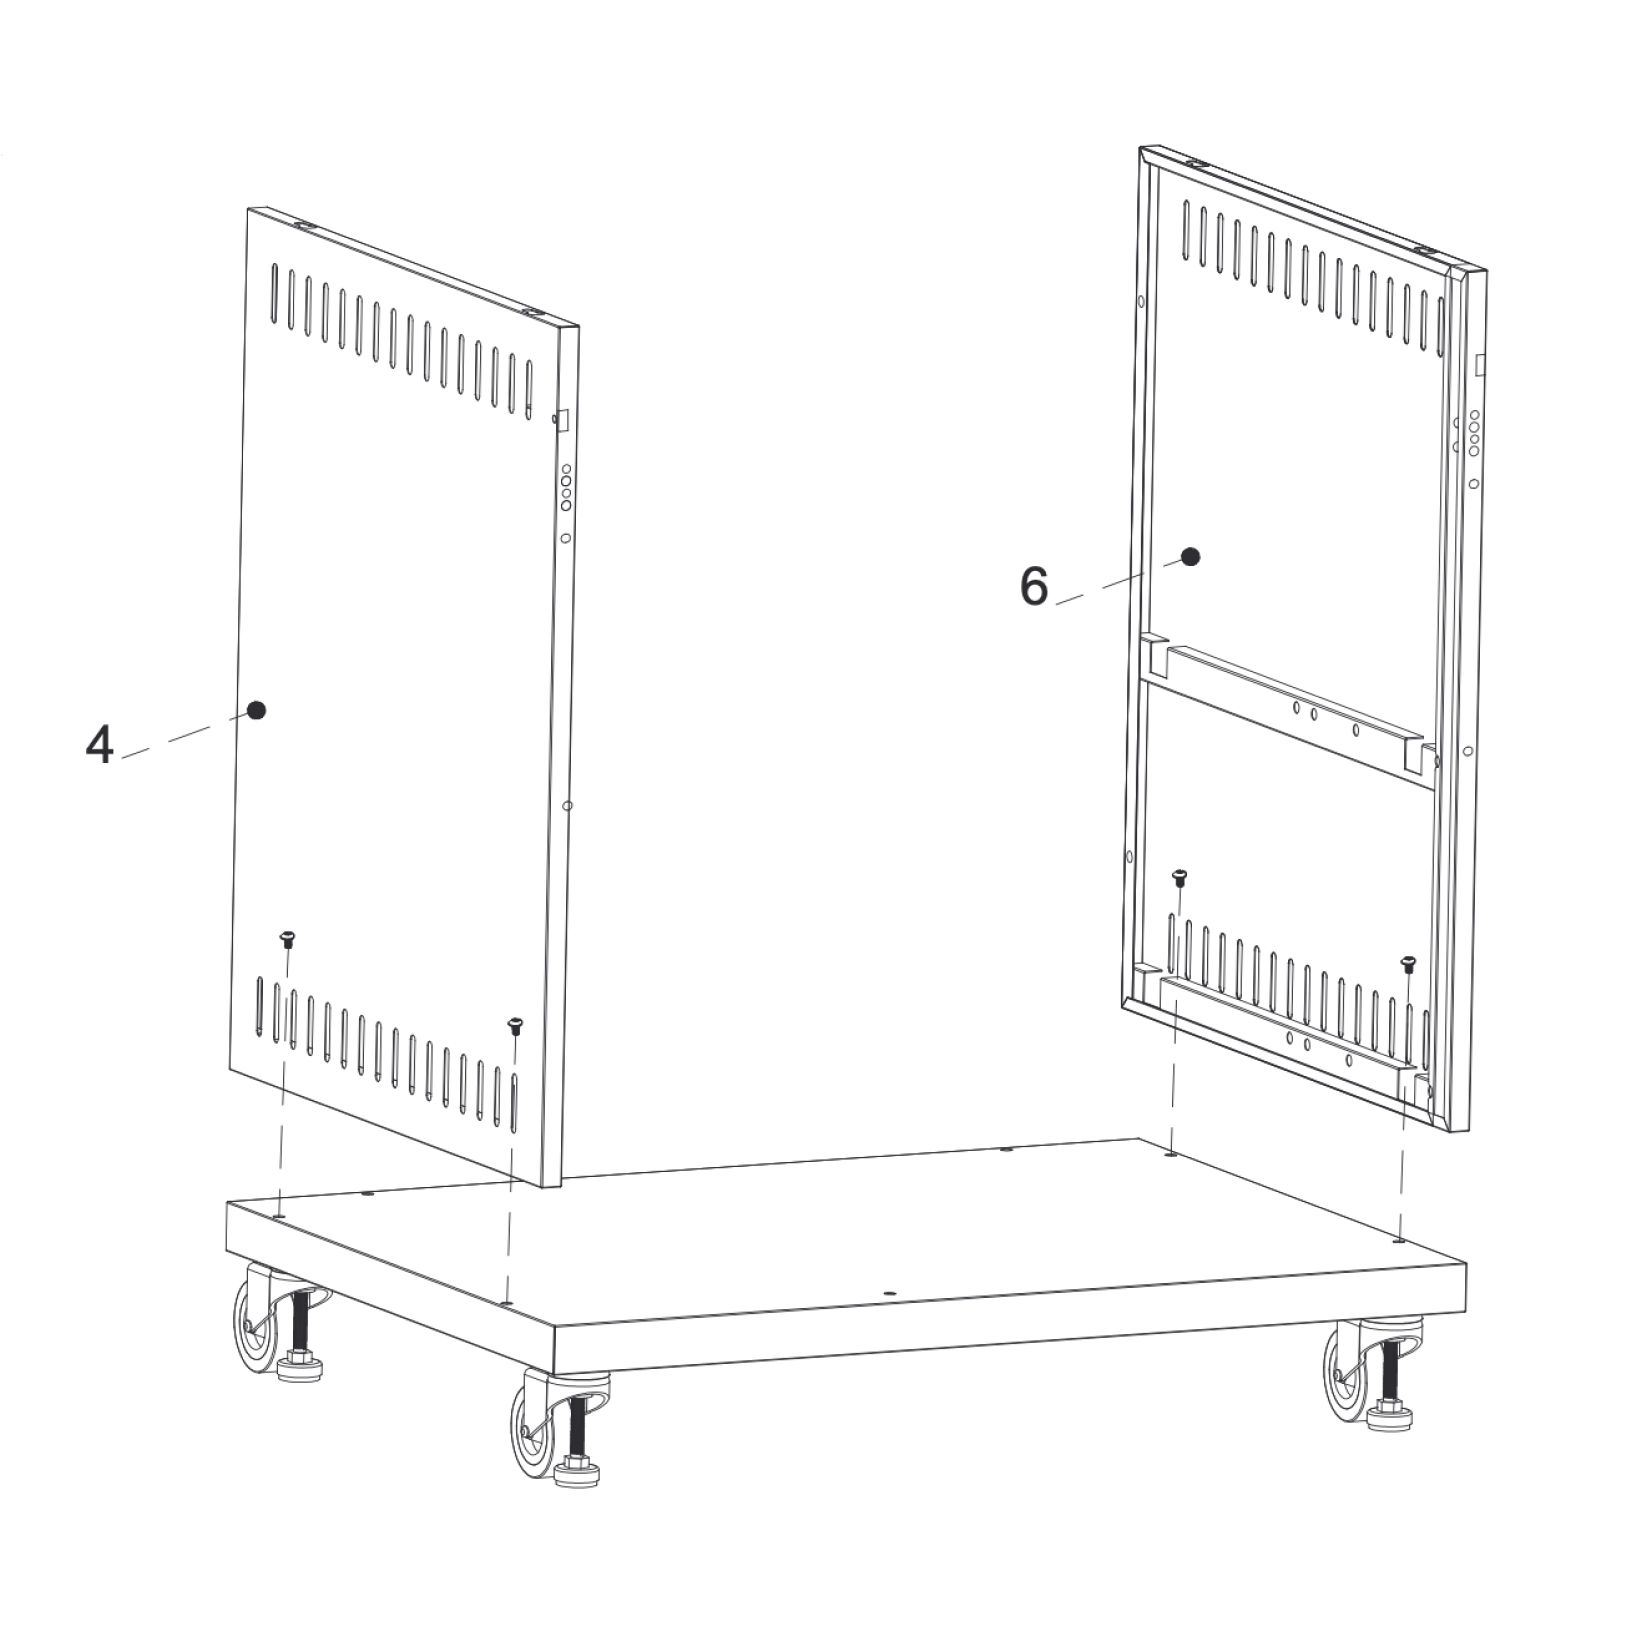
2. Fix side panels to the base
Position the Left Side Panel (4) and Right Side Panel (6) upright on the Bottom Panel (12).
Secure each panel using M6×10 bolts (A).
Parts used:
Left Side Panel | 4 | 1×
Right Side Panel | 6 | 1×
M6×10 bolt | A | 4×
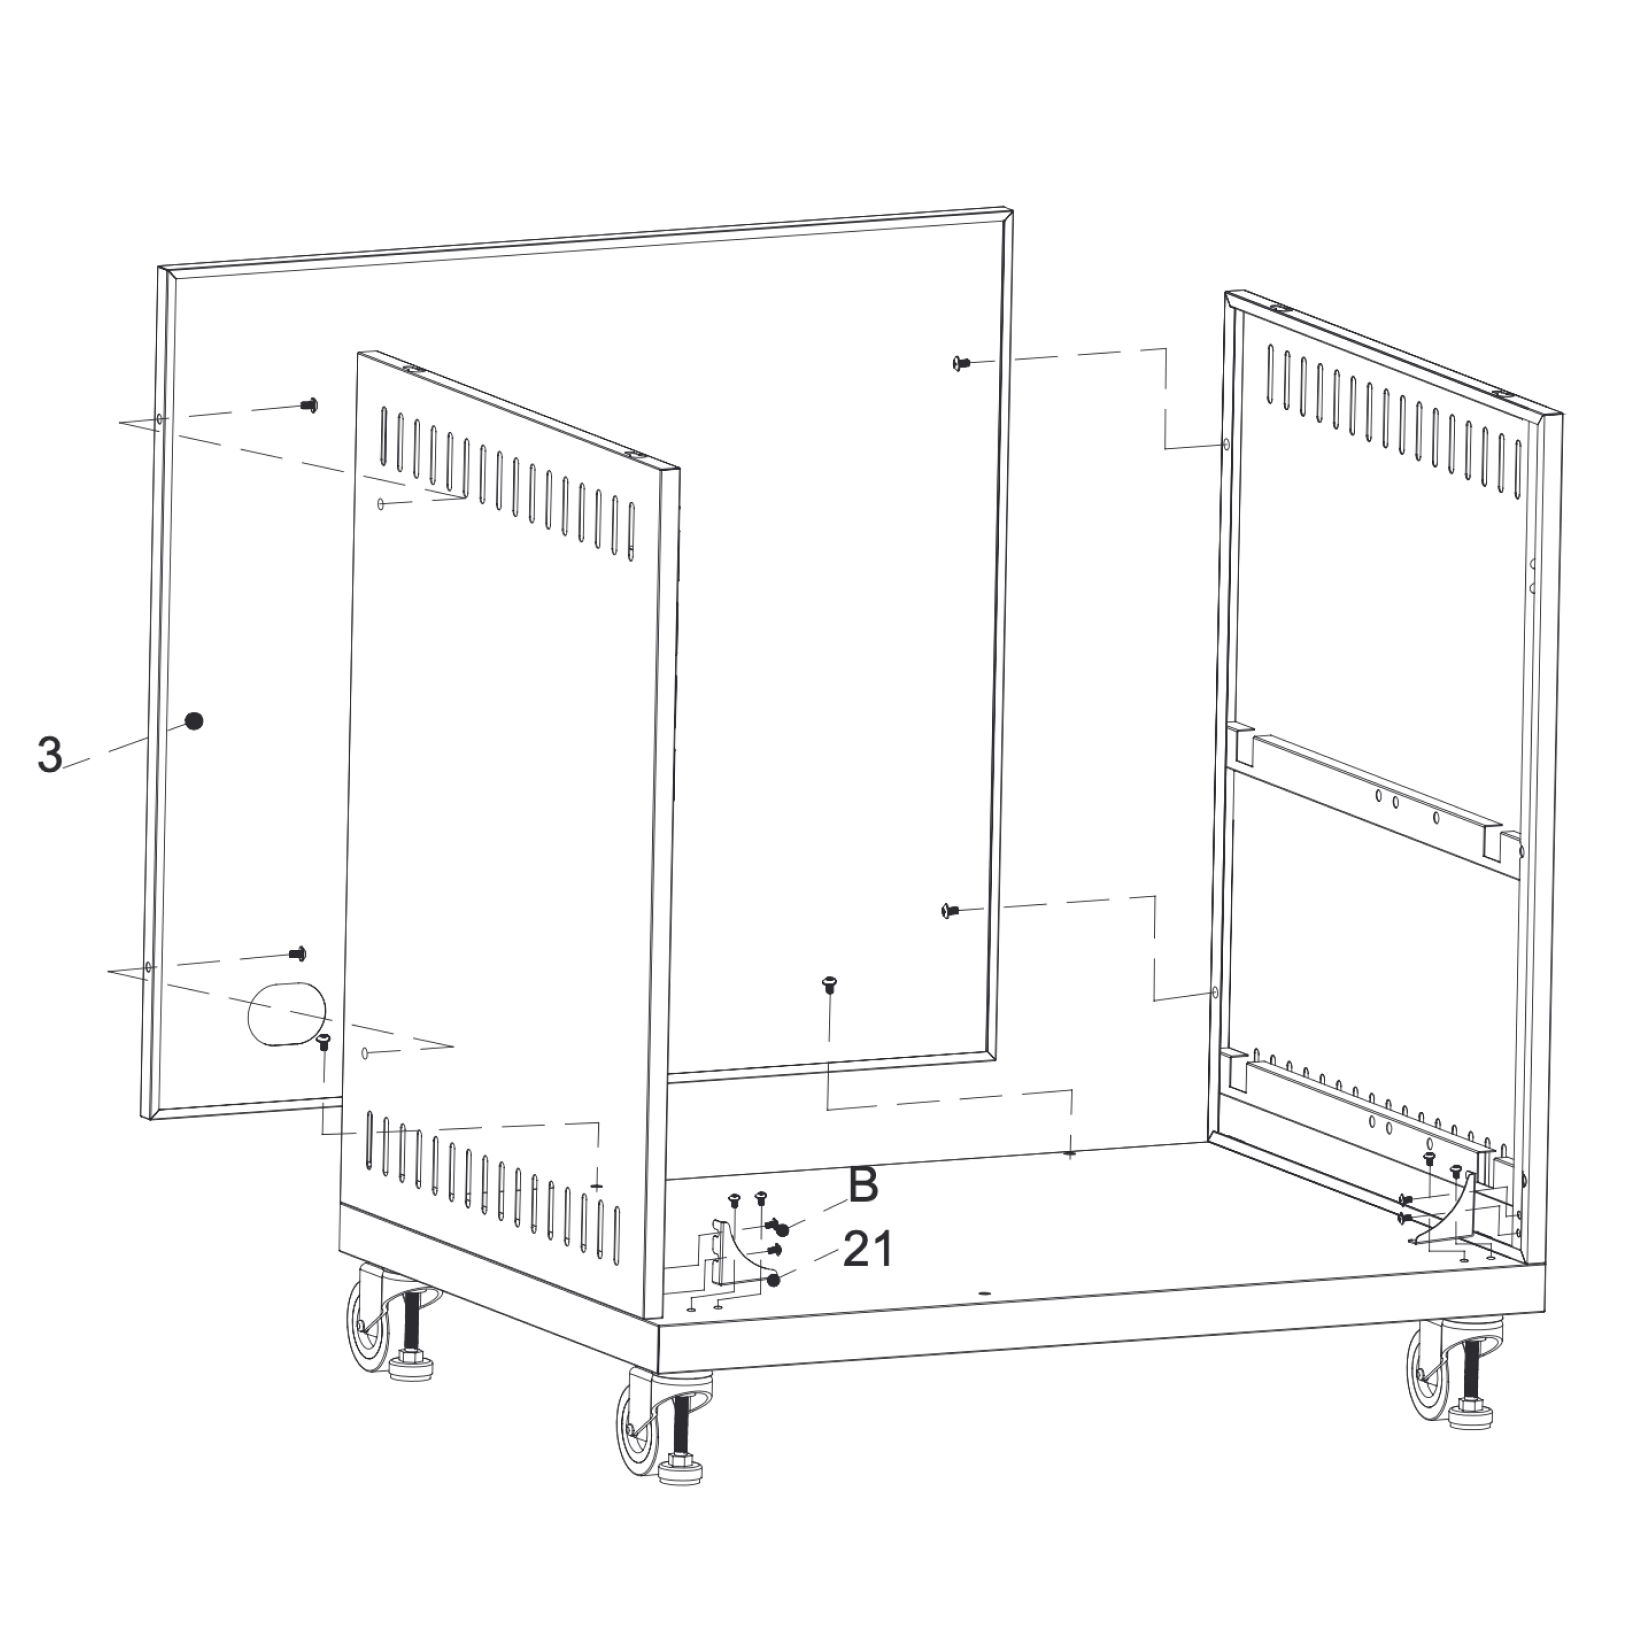
3. Attach rear panel and connect brackets
Fit the Rear Panel (3) between the side panels.
Secure it with M6×10 bolts (A).
Install the Connect Brackets (21) at the lower corners to reinforce the structure.
Secure them with M5×12 bolts (B).
Parts used:
Rear Panel | 3 | 1×
Connect Bracket | 21 | 2×
A6×10 bolt | A | 6×
M5×12 bolt | B | 8×
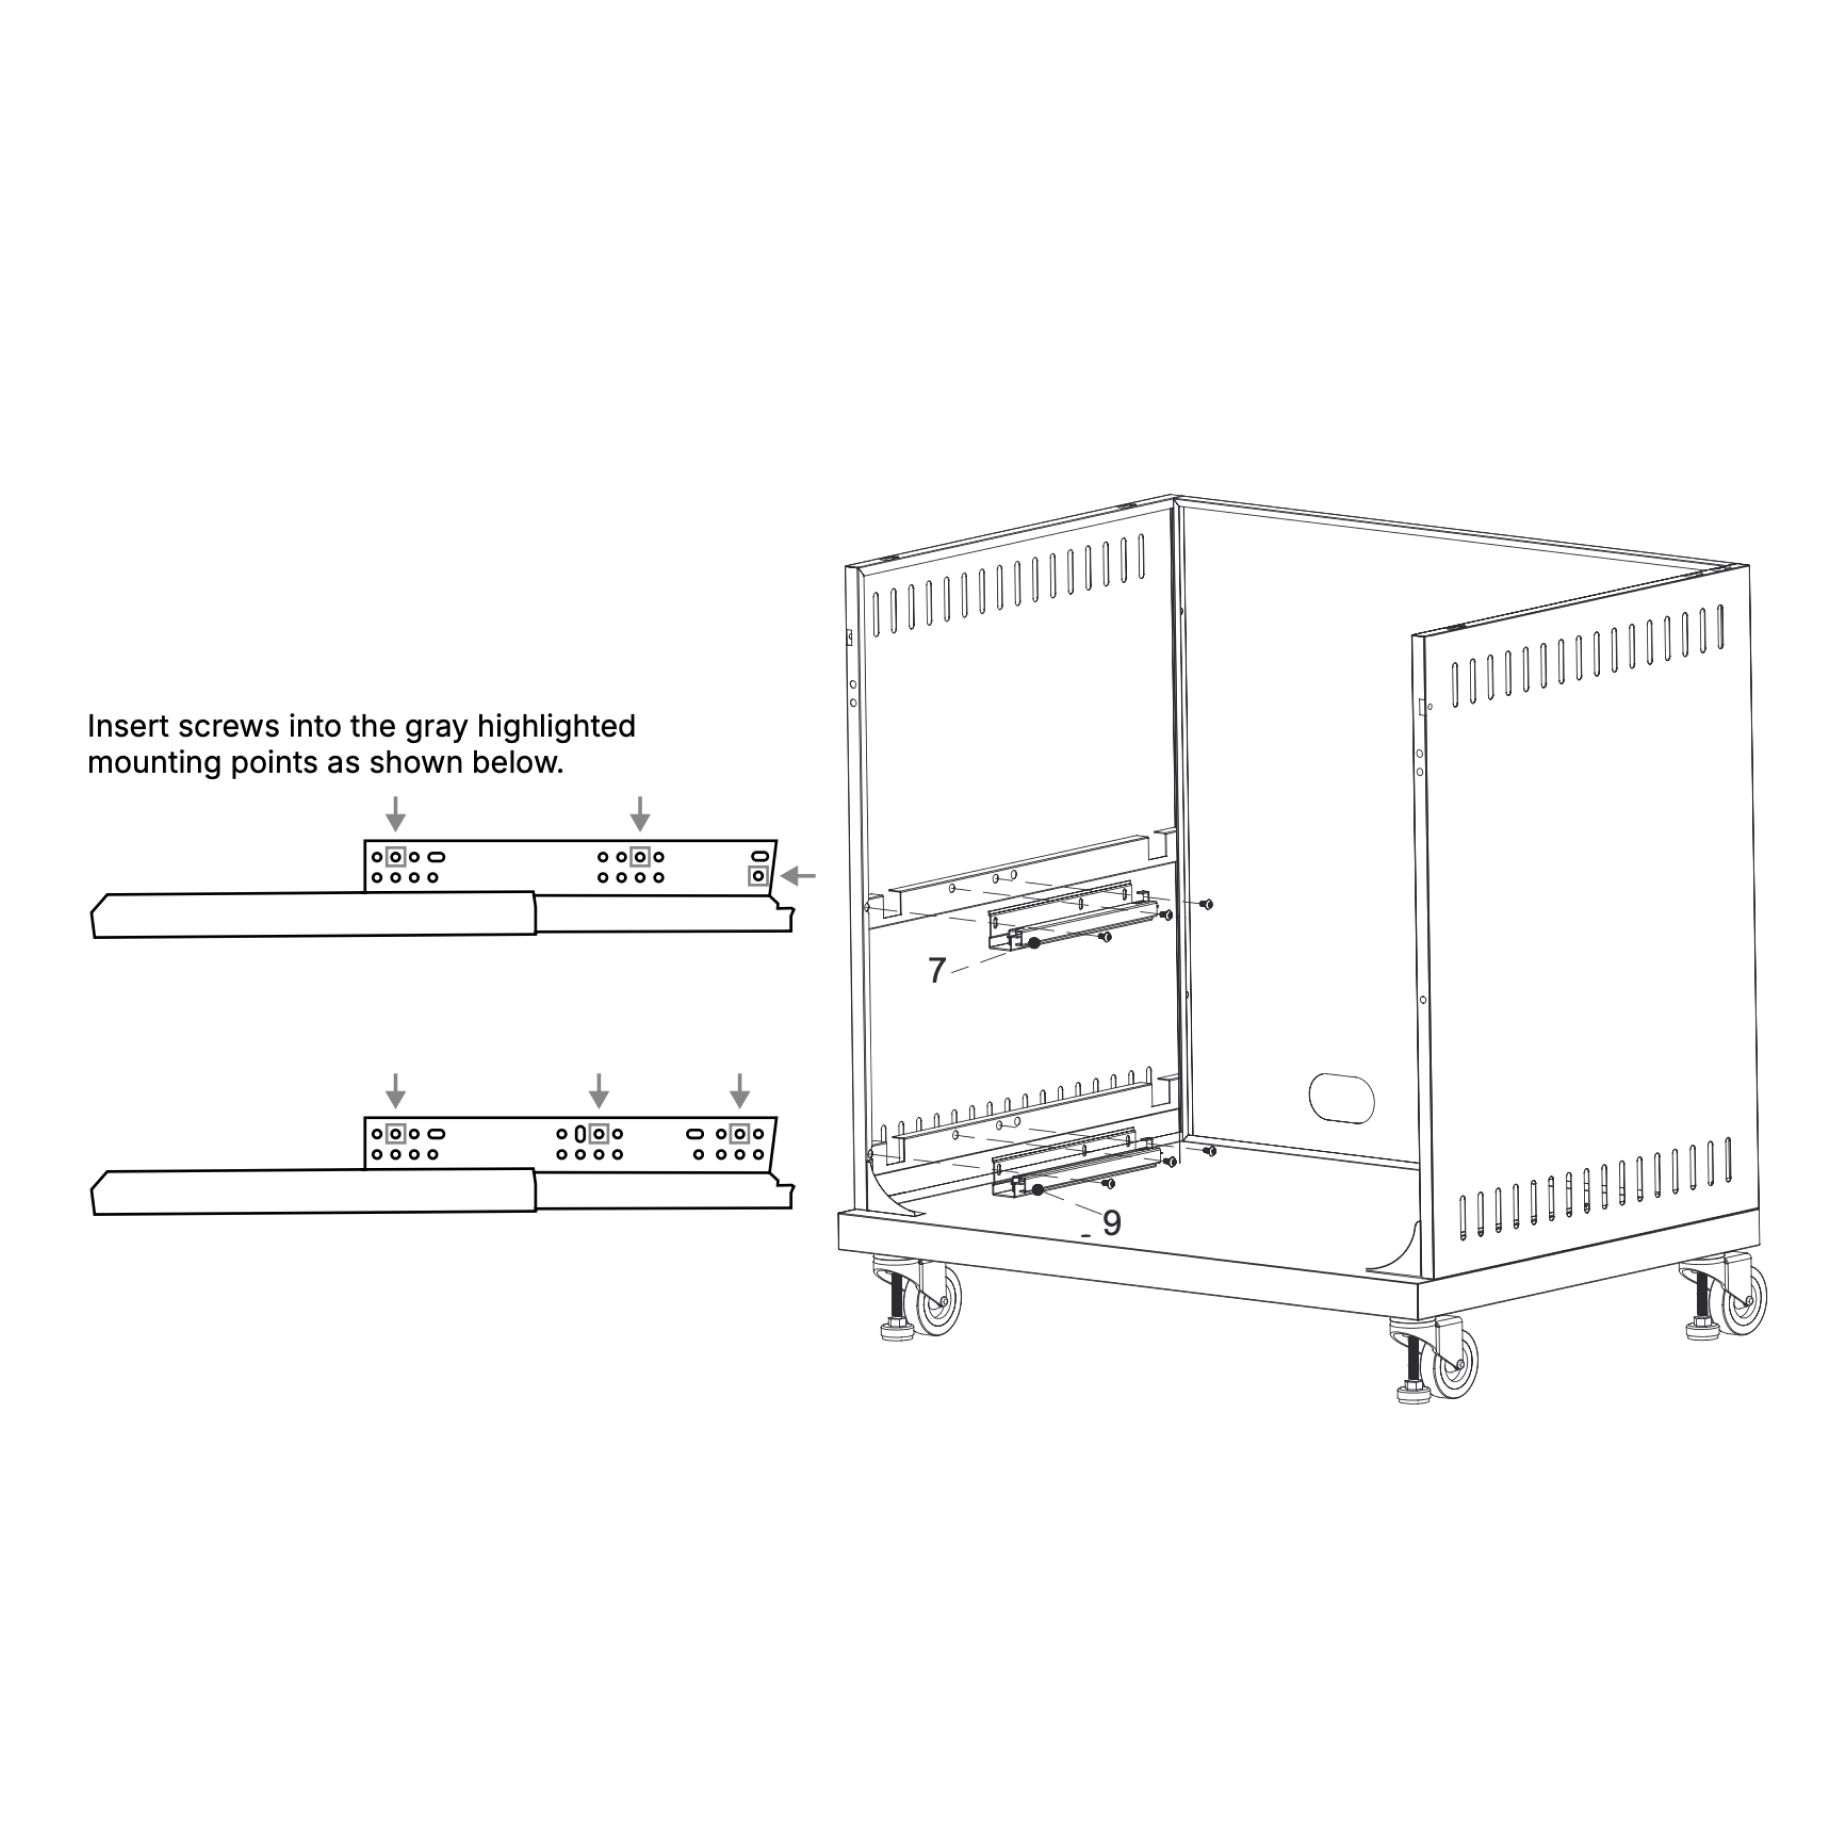
4. Install lower sliding rails
Attach the left lower (9) and upper (7) sliding rails to the left side of the unit.
Secure each with M5×12 bolts (B) as shown in the highlighted positions.
Parts used:
Sliding Rail Left (Lower) | 9 | 1×
Sliding Rail Left (Upper) | 7 | 1×
M5×12 bolt | B | 6×
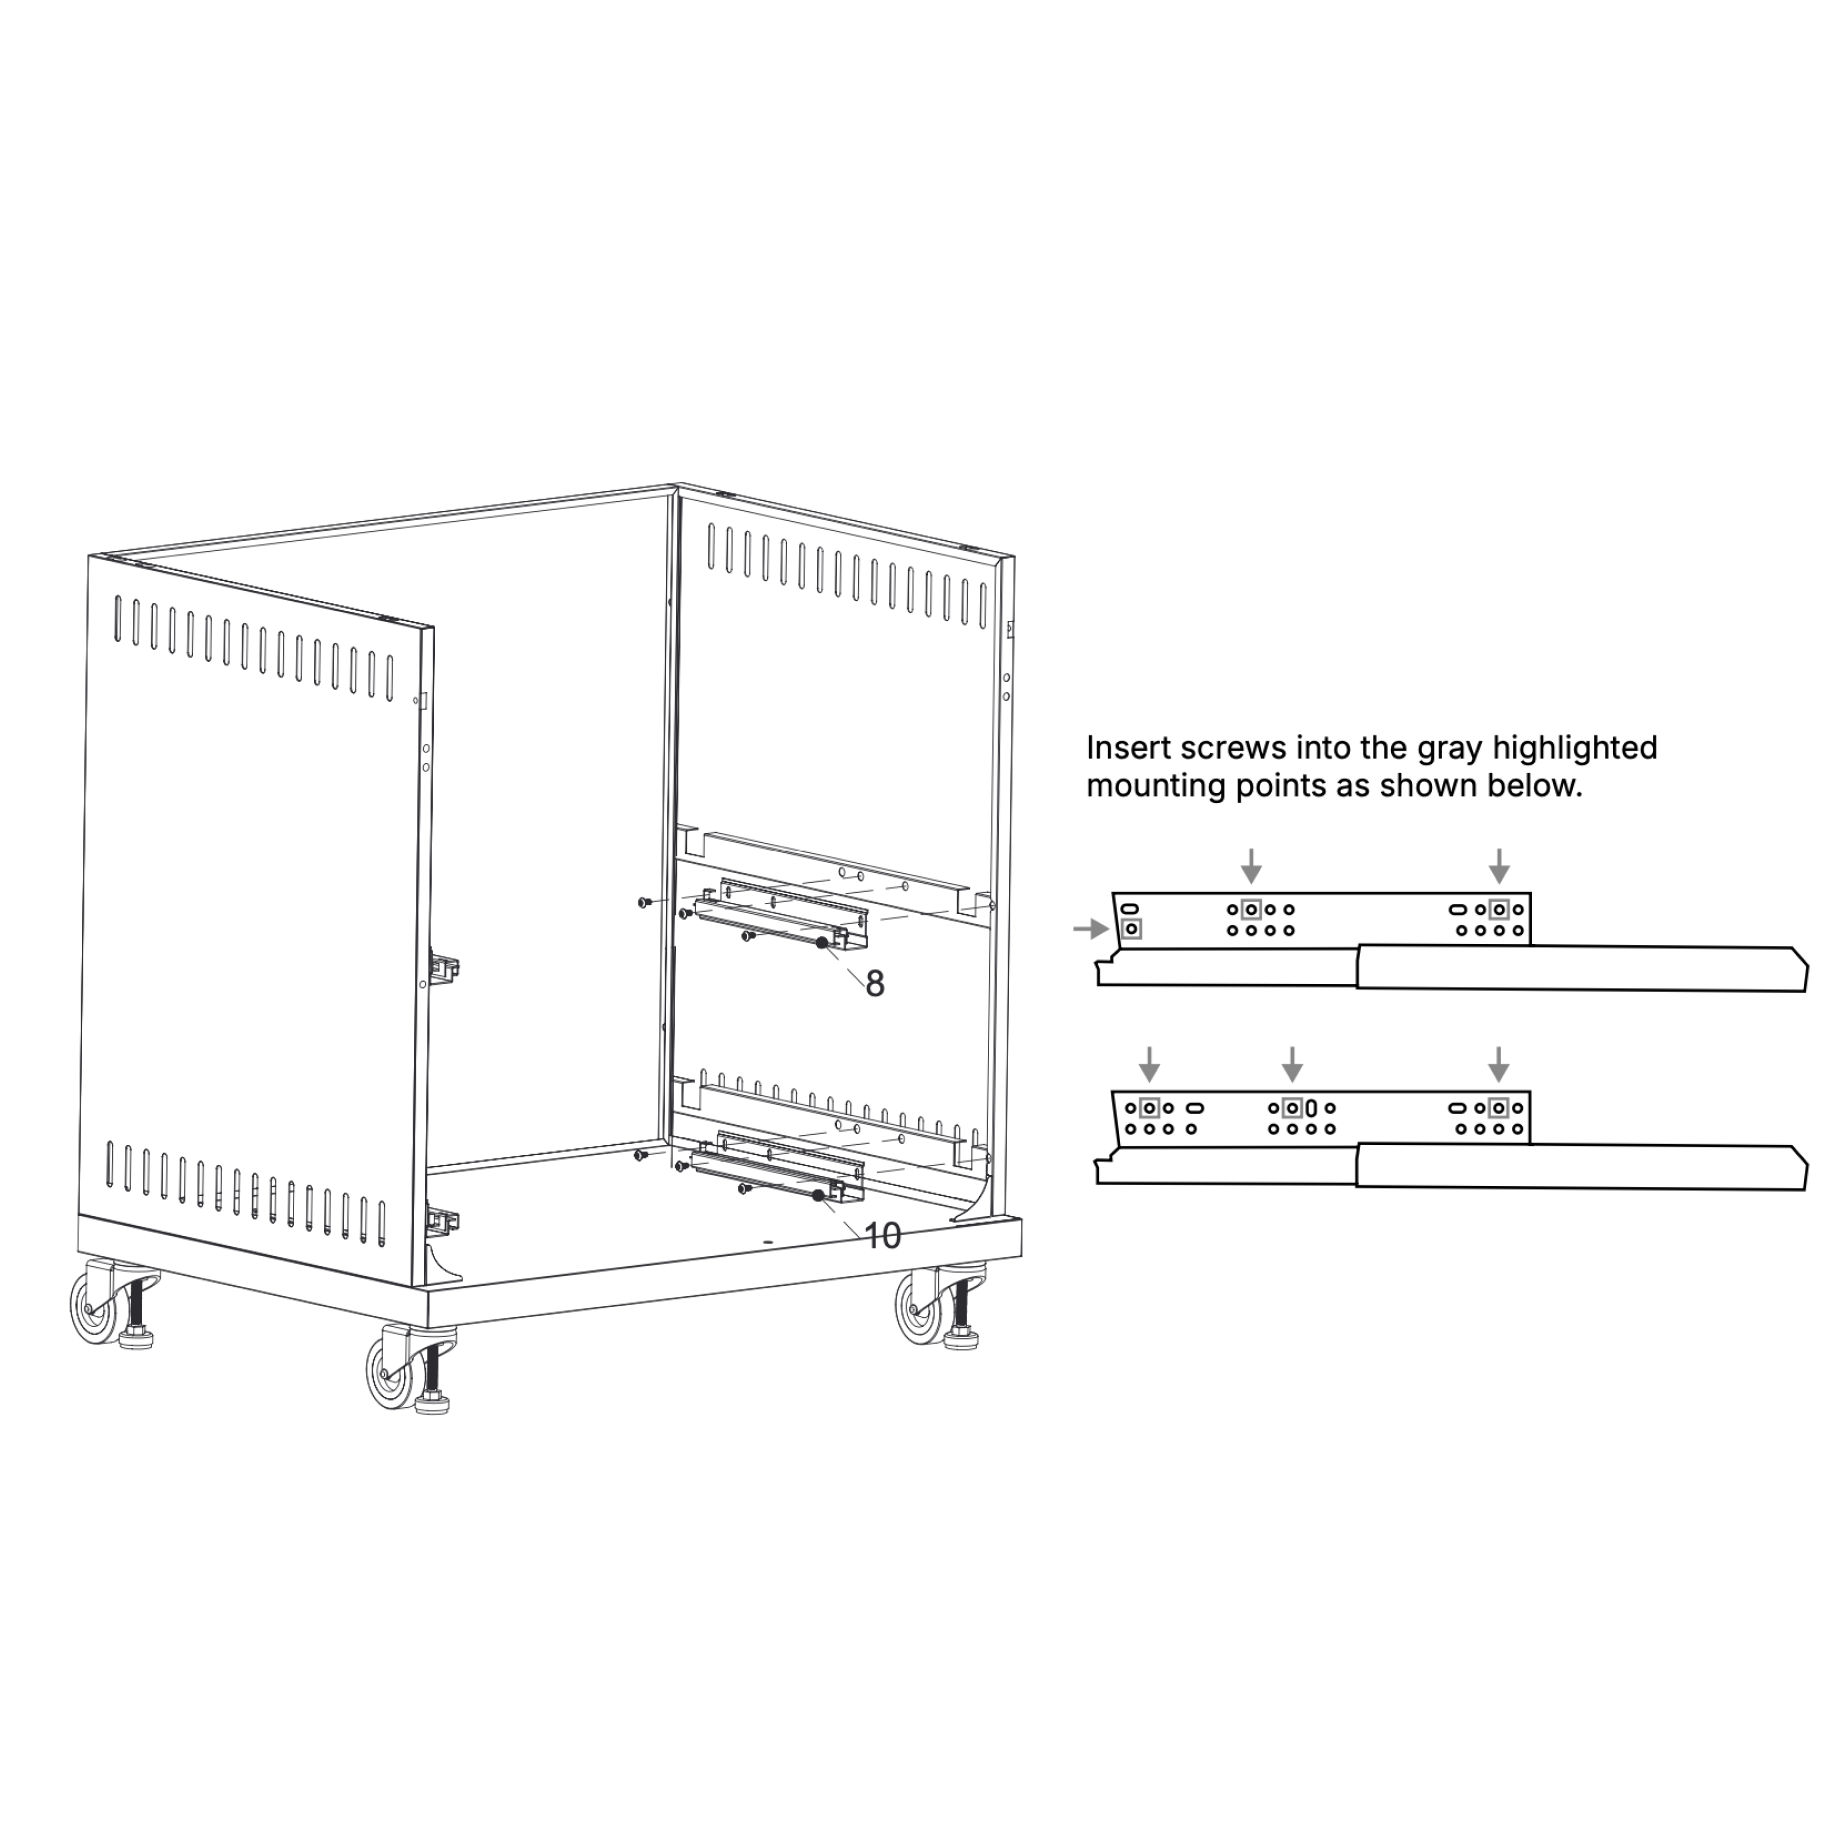
5. Install upper sliding rails
Attach the right lower (10) and upper (8) sliding rails to the right side of the unit.
Secure each with M5×12 bolts (B) as shown in the highlighted positions.
Parts used:
Sliding Rail Right (Upper) | 8 | 1×
Sliding Rail Right (Lower) | 10 | 1×
M5×12 bolt | B | 6×
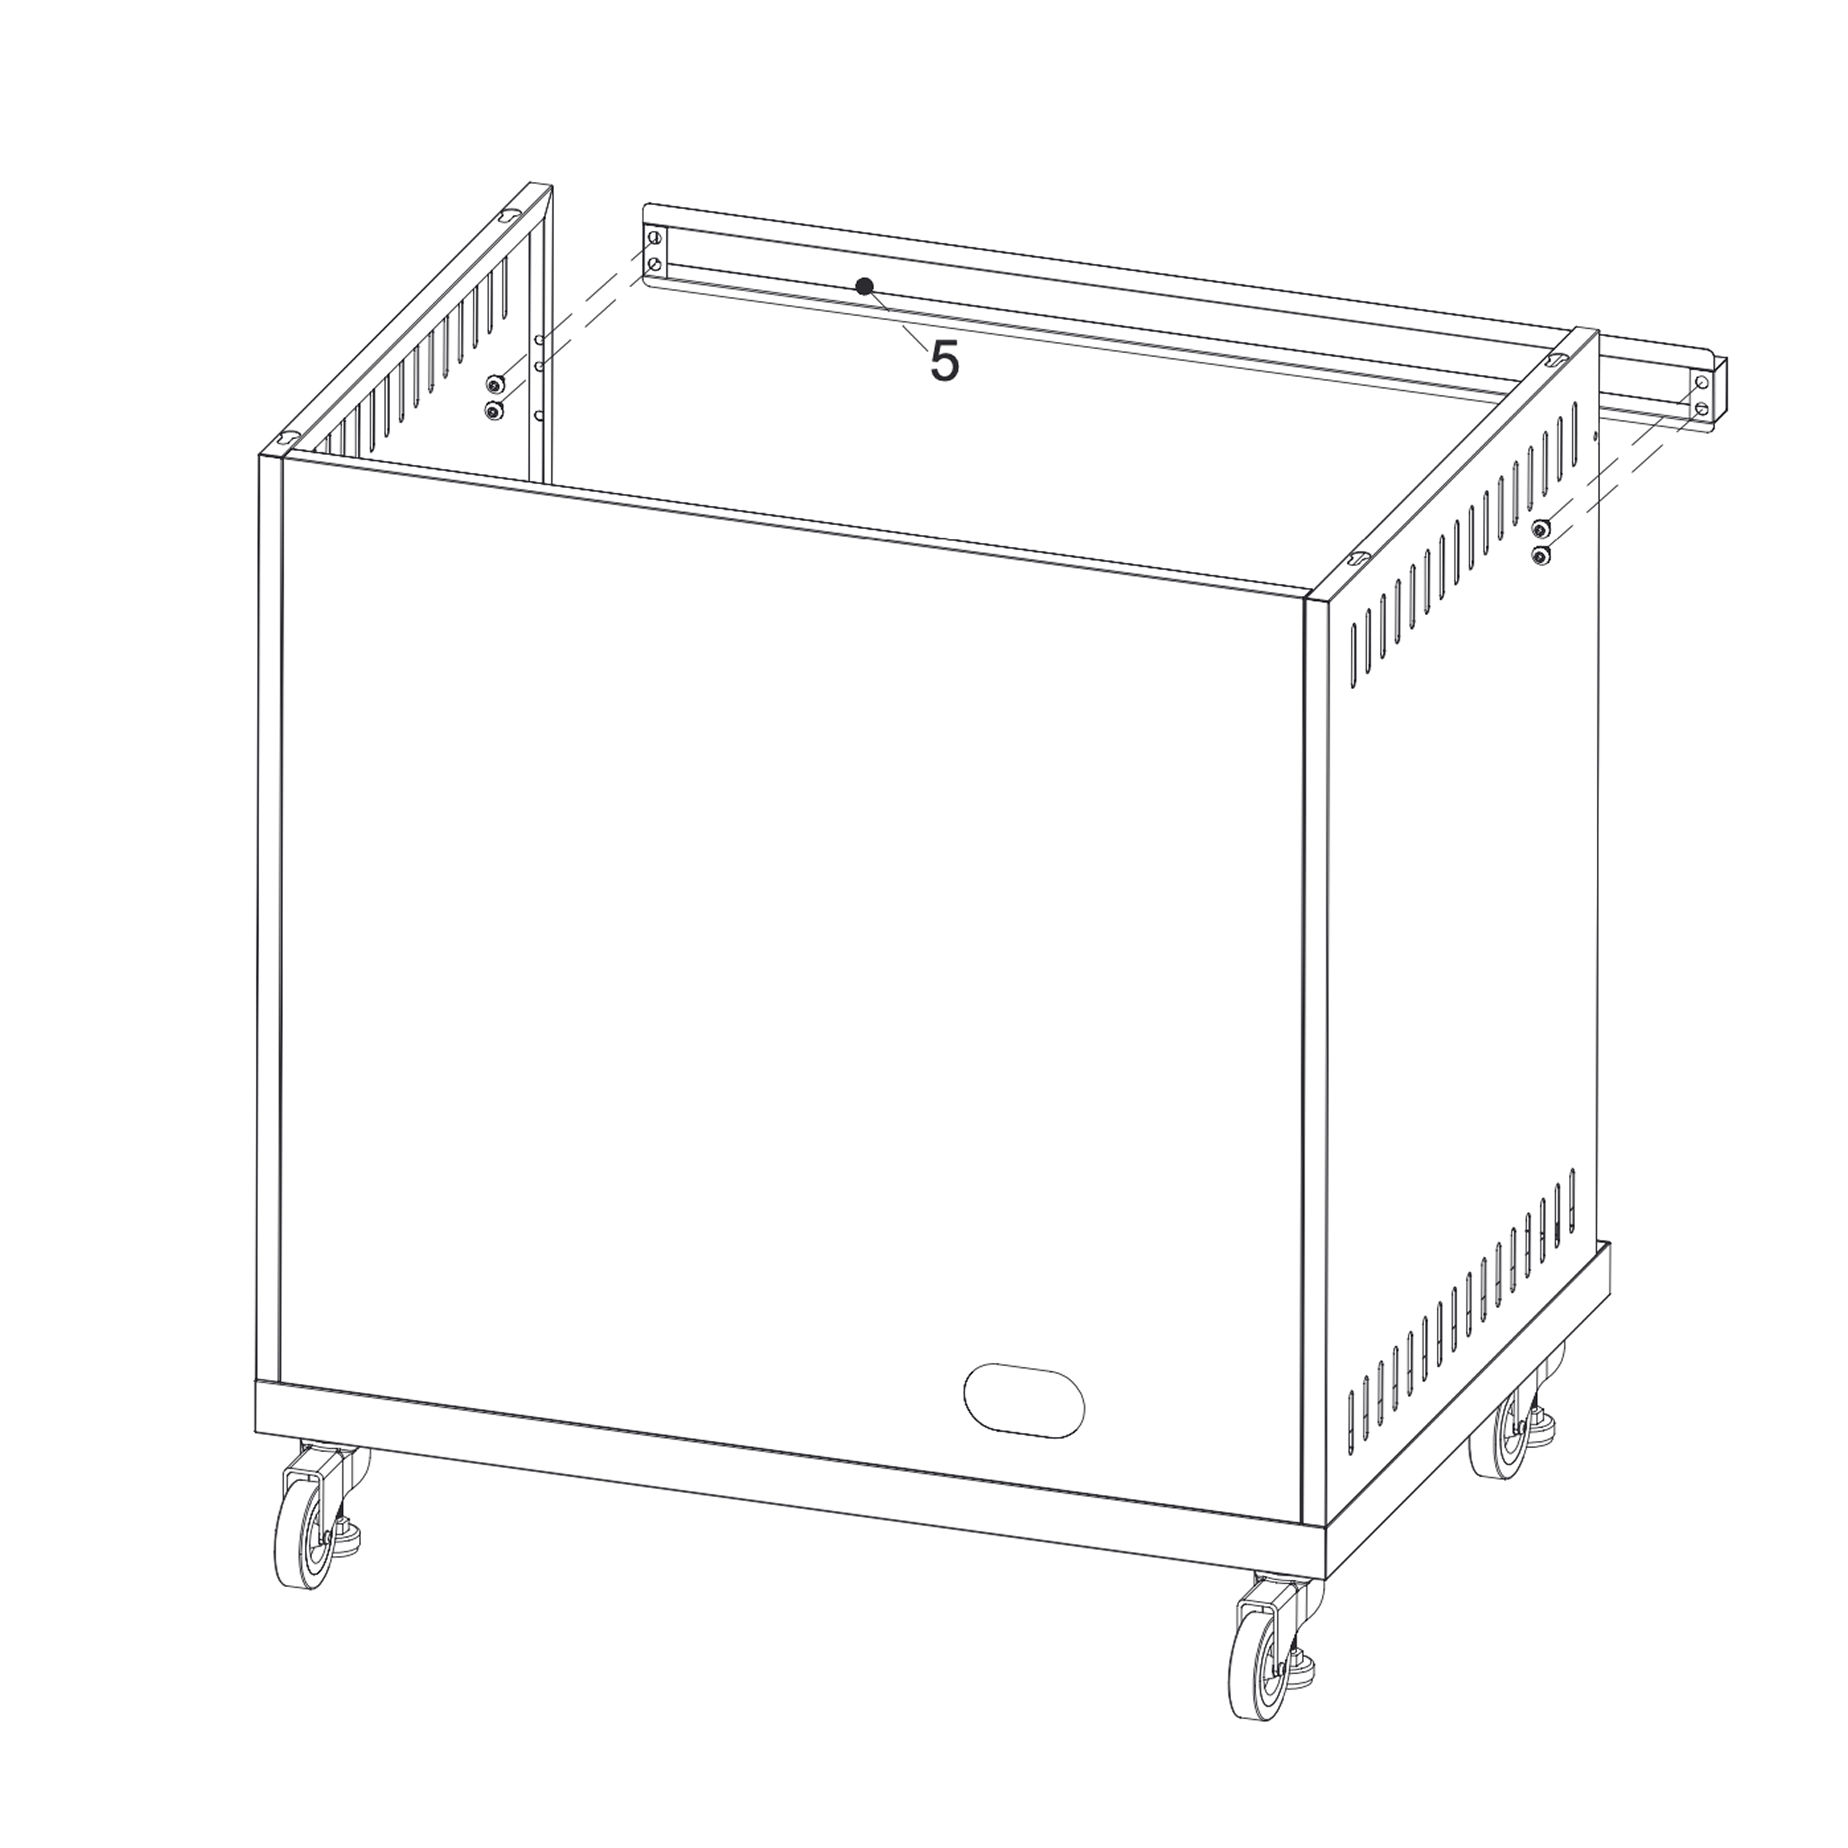
6. Fix the top bracket
Place the Bracket (5) across the top rear edge of the unit.
Fasten using M6×10 bolts (A).
Parts used:
Bracket | 5 | 1×
M6×10 bolt | A | 4×
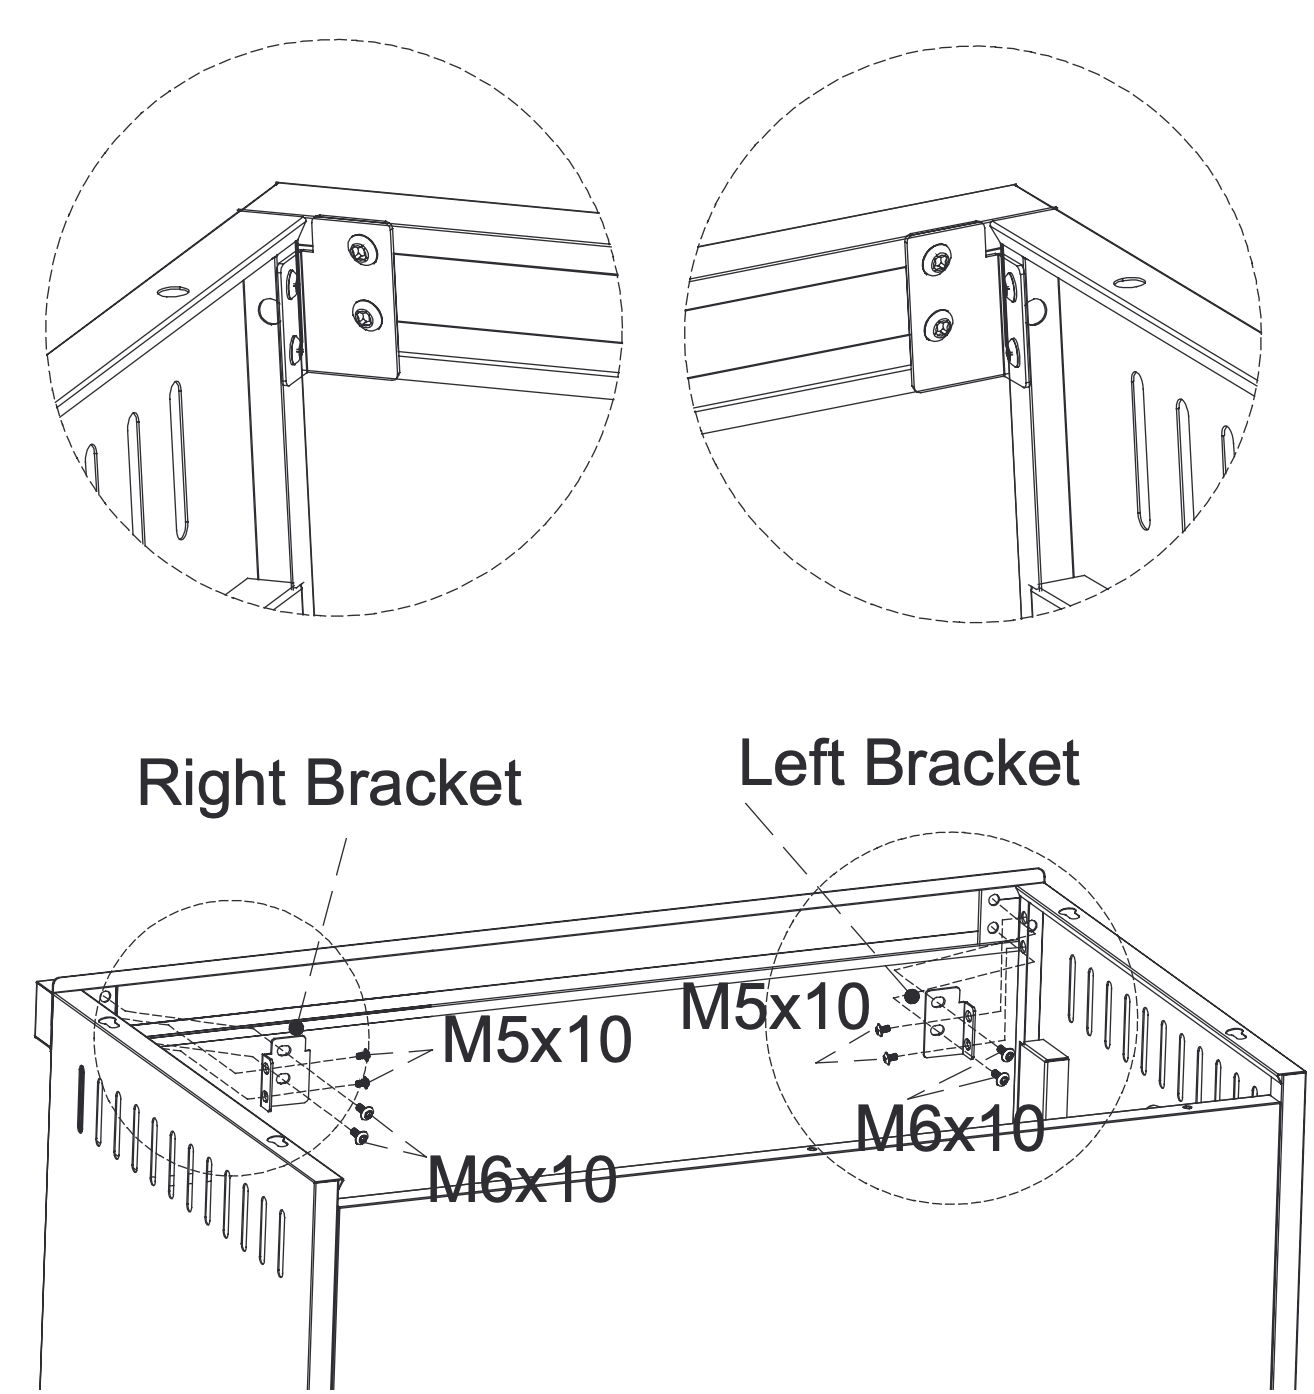
7. Secure the Top Bracket
Attach the Left (22) a and Right (23) Brackets to the sides of the Top Bracket (4)
Secure them using M6x10 and M5x10 screws
Parts used:
Left Bracket | 24 | 1×
Right Bracket | 25 | 1×
M6×10 Screw | A | 8×
M5×10 Screw | E | 4×
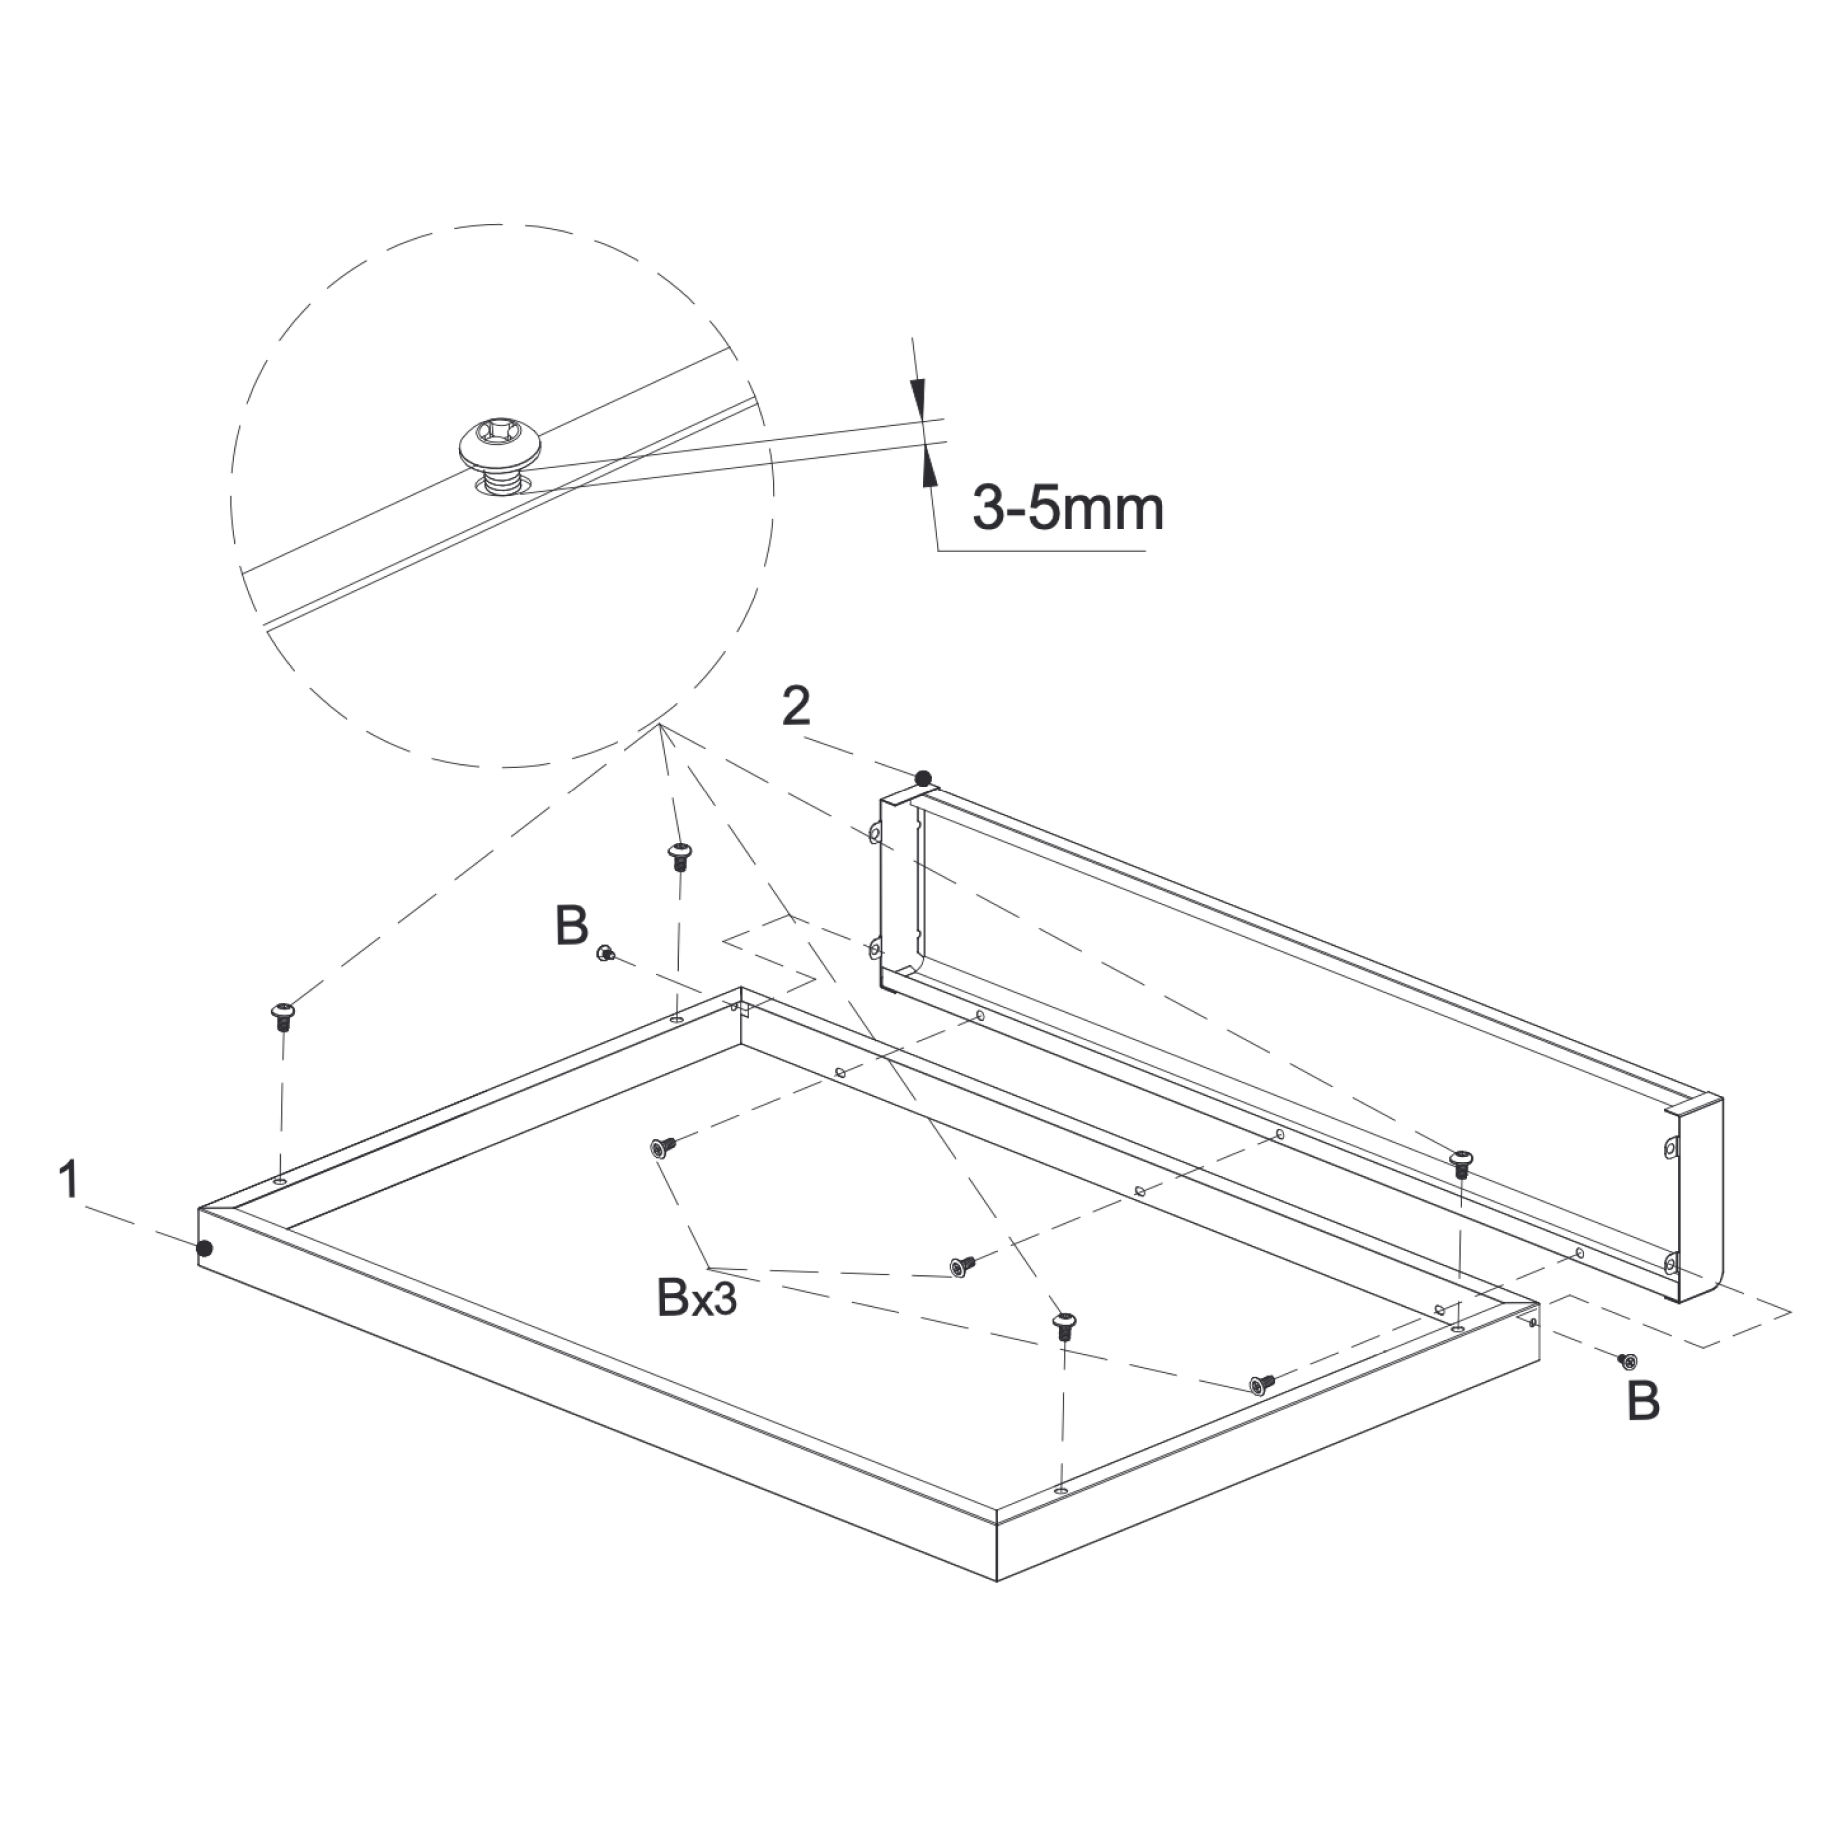
8. Assemble the tabletop and front panel
Position the Front Panel (2) below the Table Top (1),
Secure together using M5×12 bolts (B).
Insert the M6×10 screws (A) in the remaining holes of the Table Top.
Leave 3-5 mm space for later tightening.
Note!
If you have purchased one of our different countertop options, at this step, please use the preferred top, instead of the standard model included in the original packaging.
Parts used:
Table Top | 1 | 1×
Front Panel | 2 | 1×
M6×10 bolt | A | 4×
M5×12 bolt | B | 6×
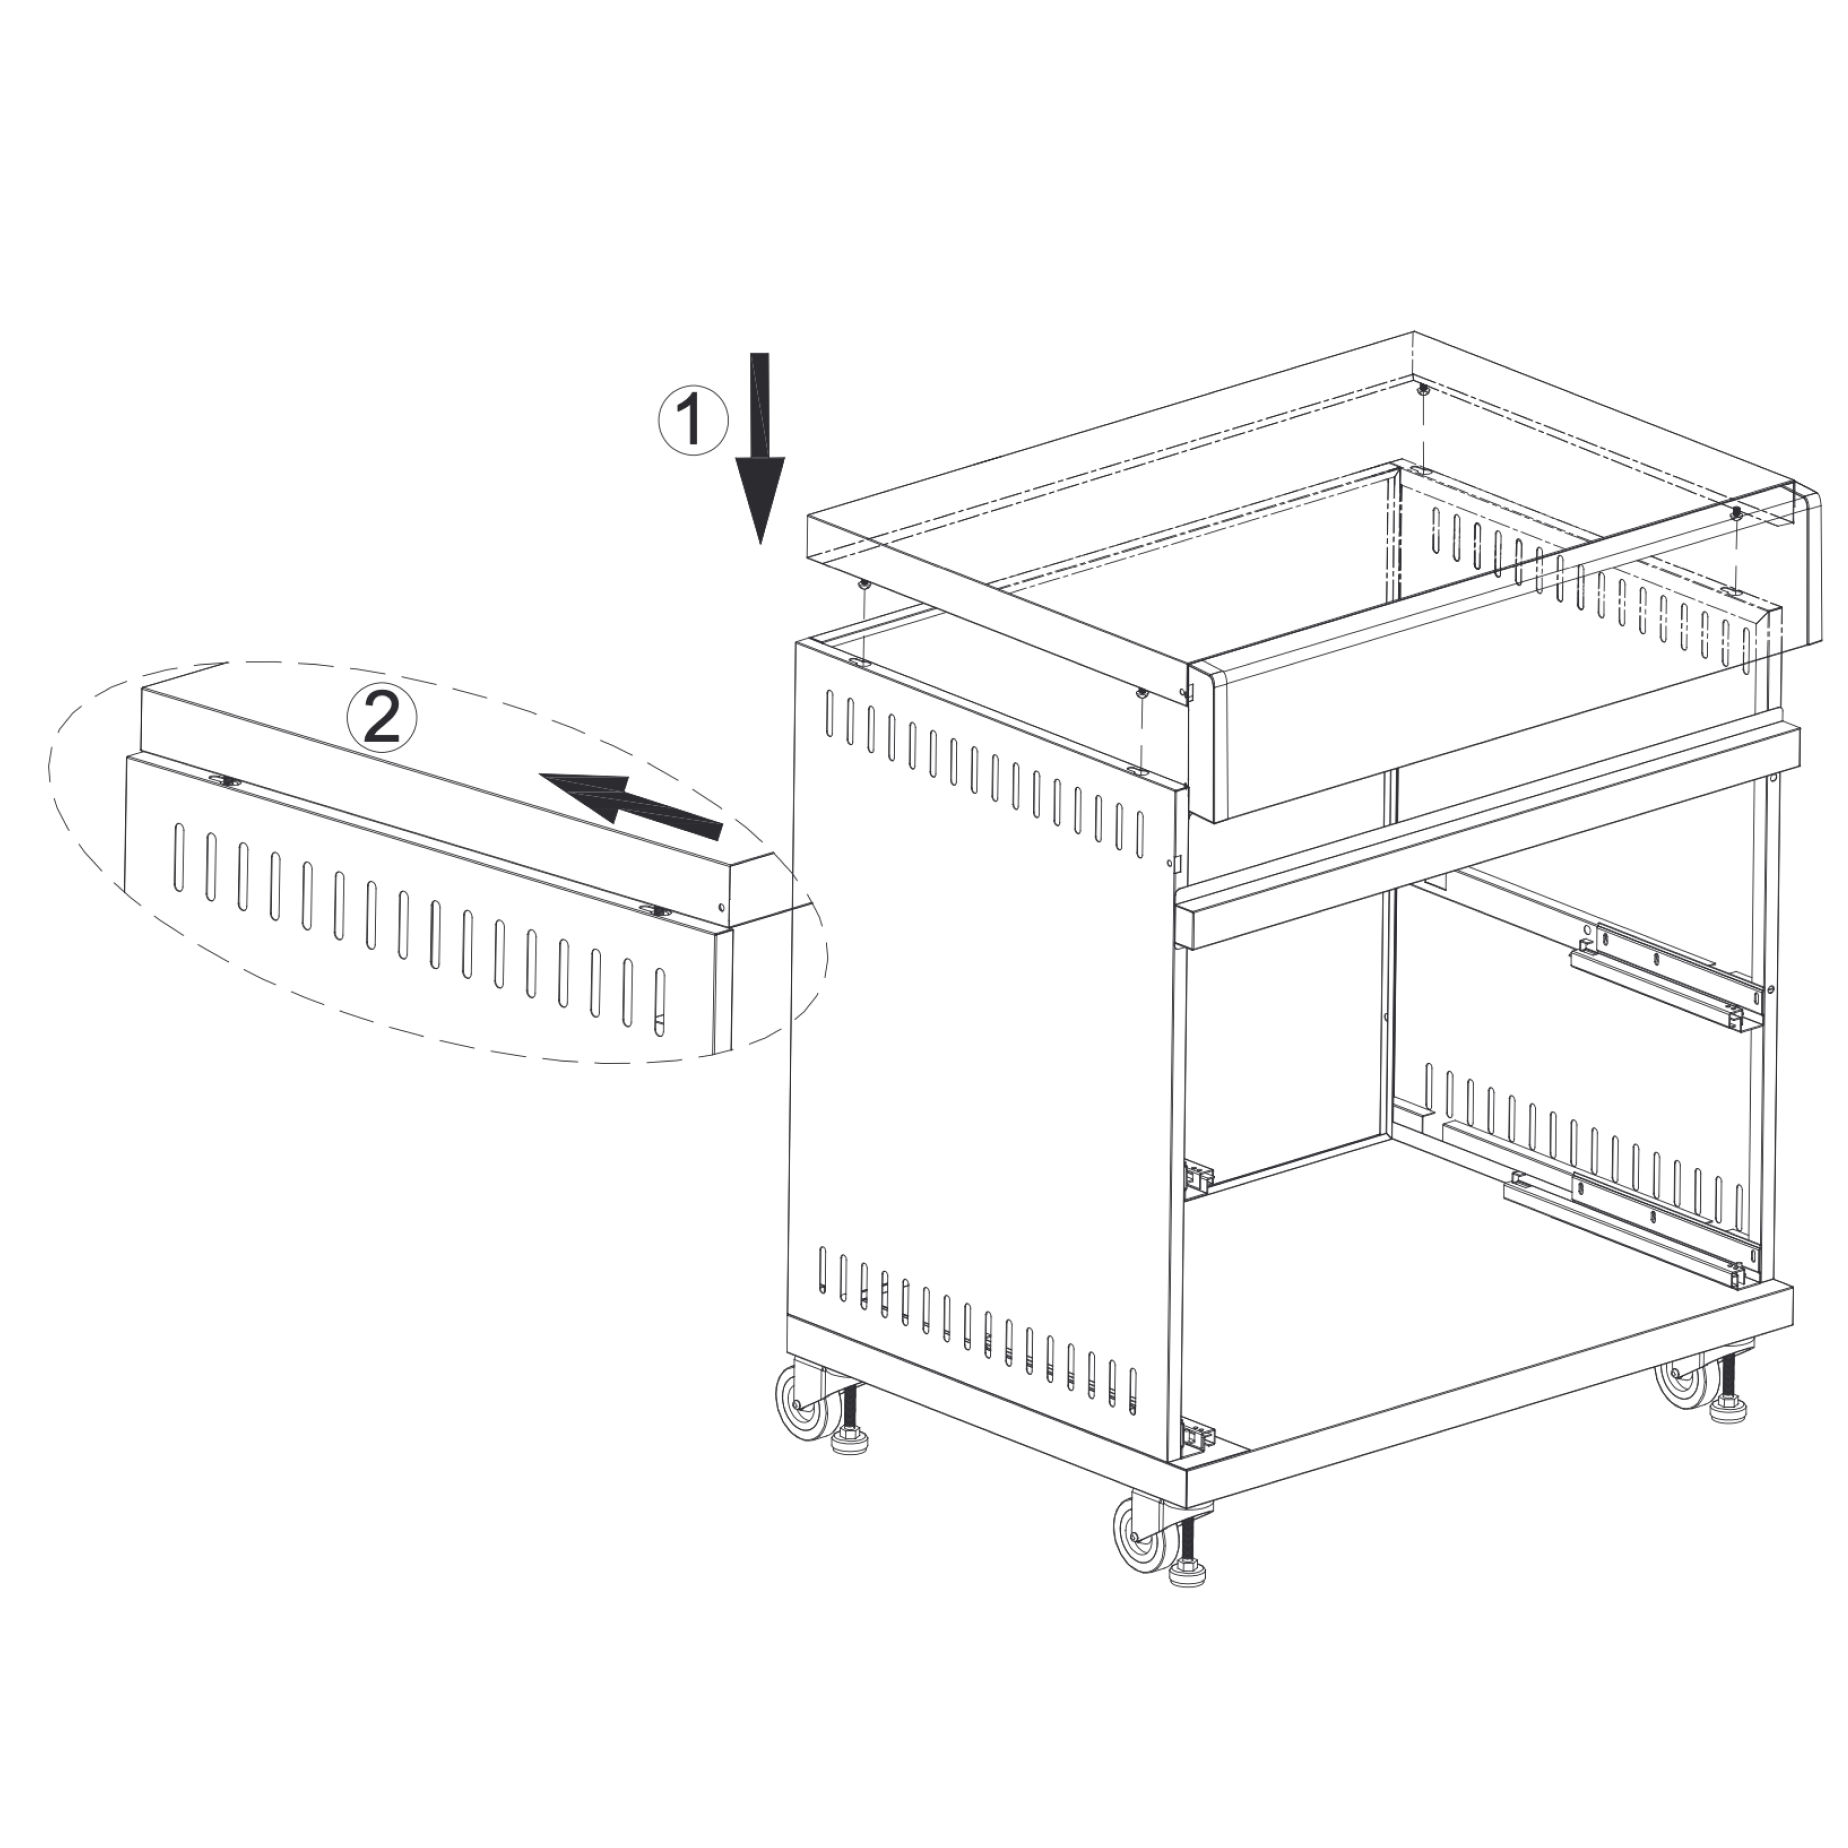
9. Install the tabletop assembly onto the body
Carefully place the assembled Table Top (1) and Front Panel (2) onto the unit body.
Align all holes and press down firmly to fit in place.
Parts used:
Table Top | 1 | 1×
Front Panel | 2 | 1×
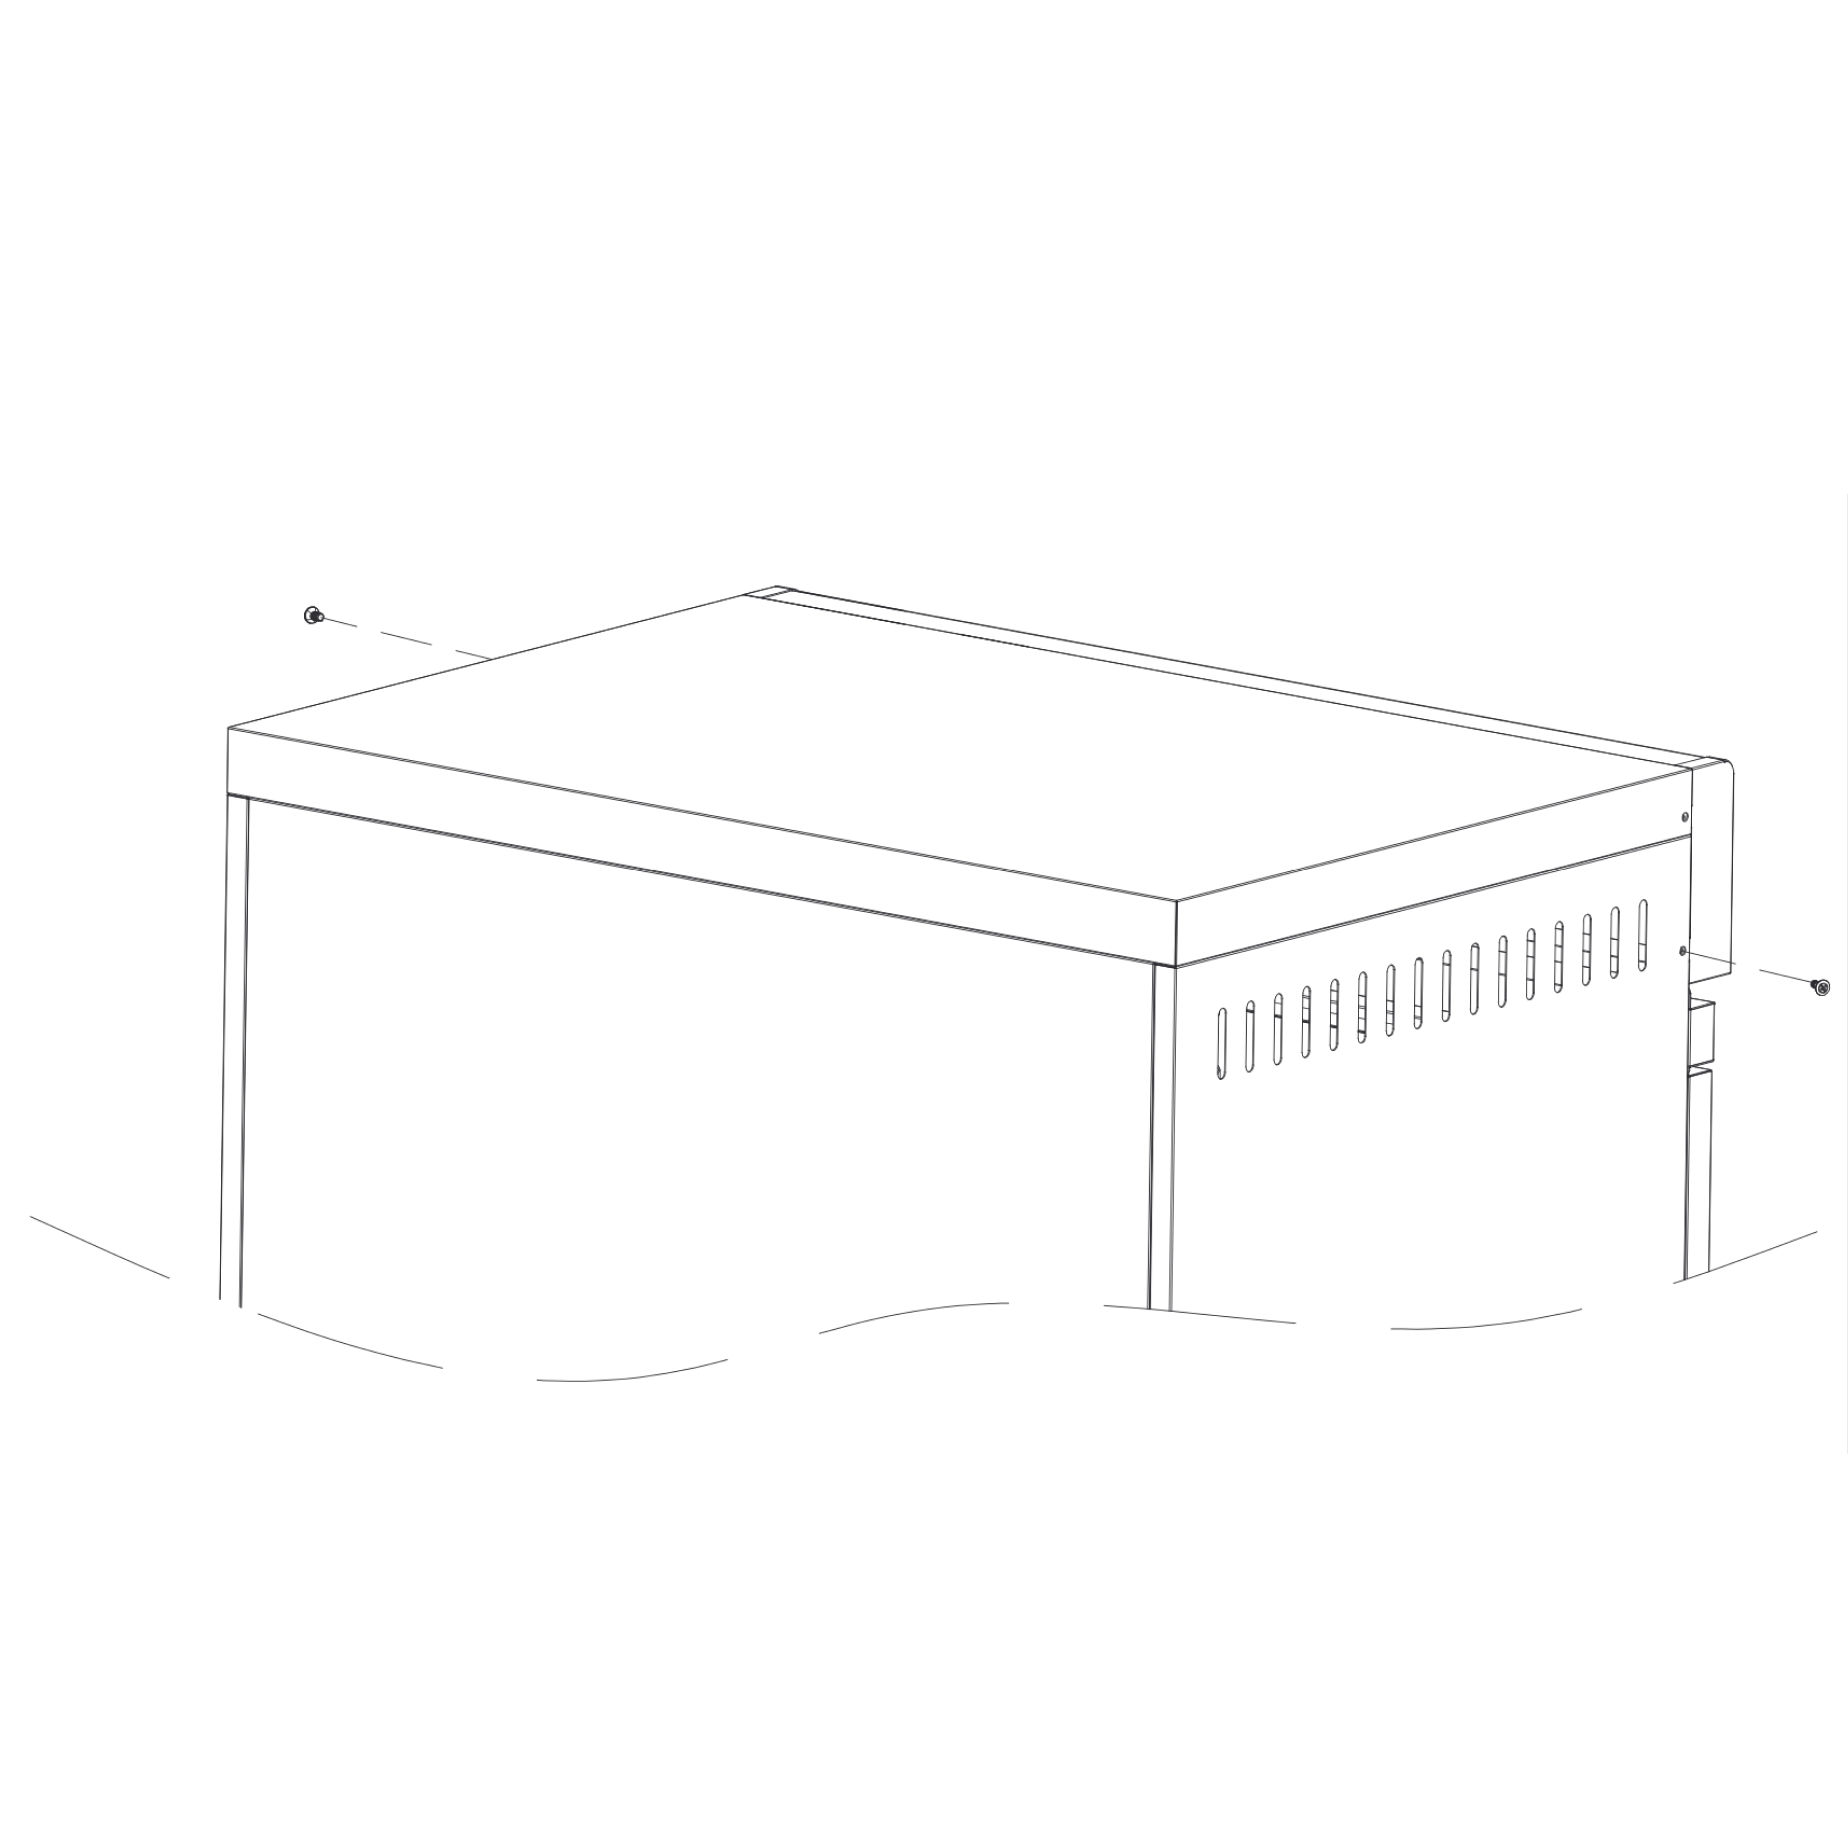
10. Secure the tabletop assembly
Align the Table Top (1) and Front Panel (2) with the main structure.
Fasten both sides securely using M5×12 bolts (B).
Parts used:
Table Top | 1 | 1×
Front Panel | 2 | 1×
M5×12 bolt | B | 2×
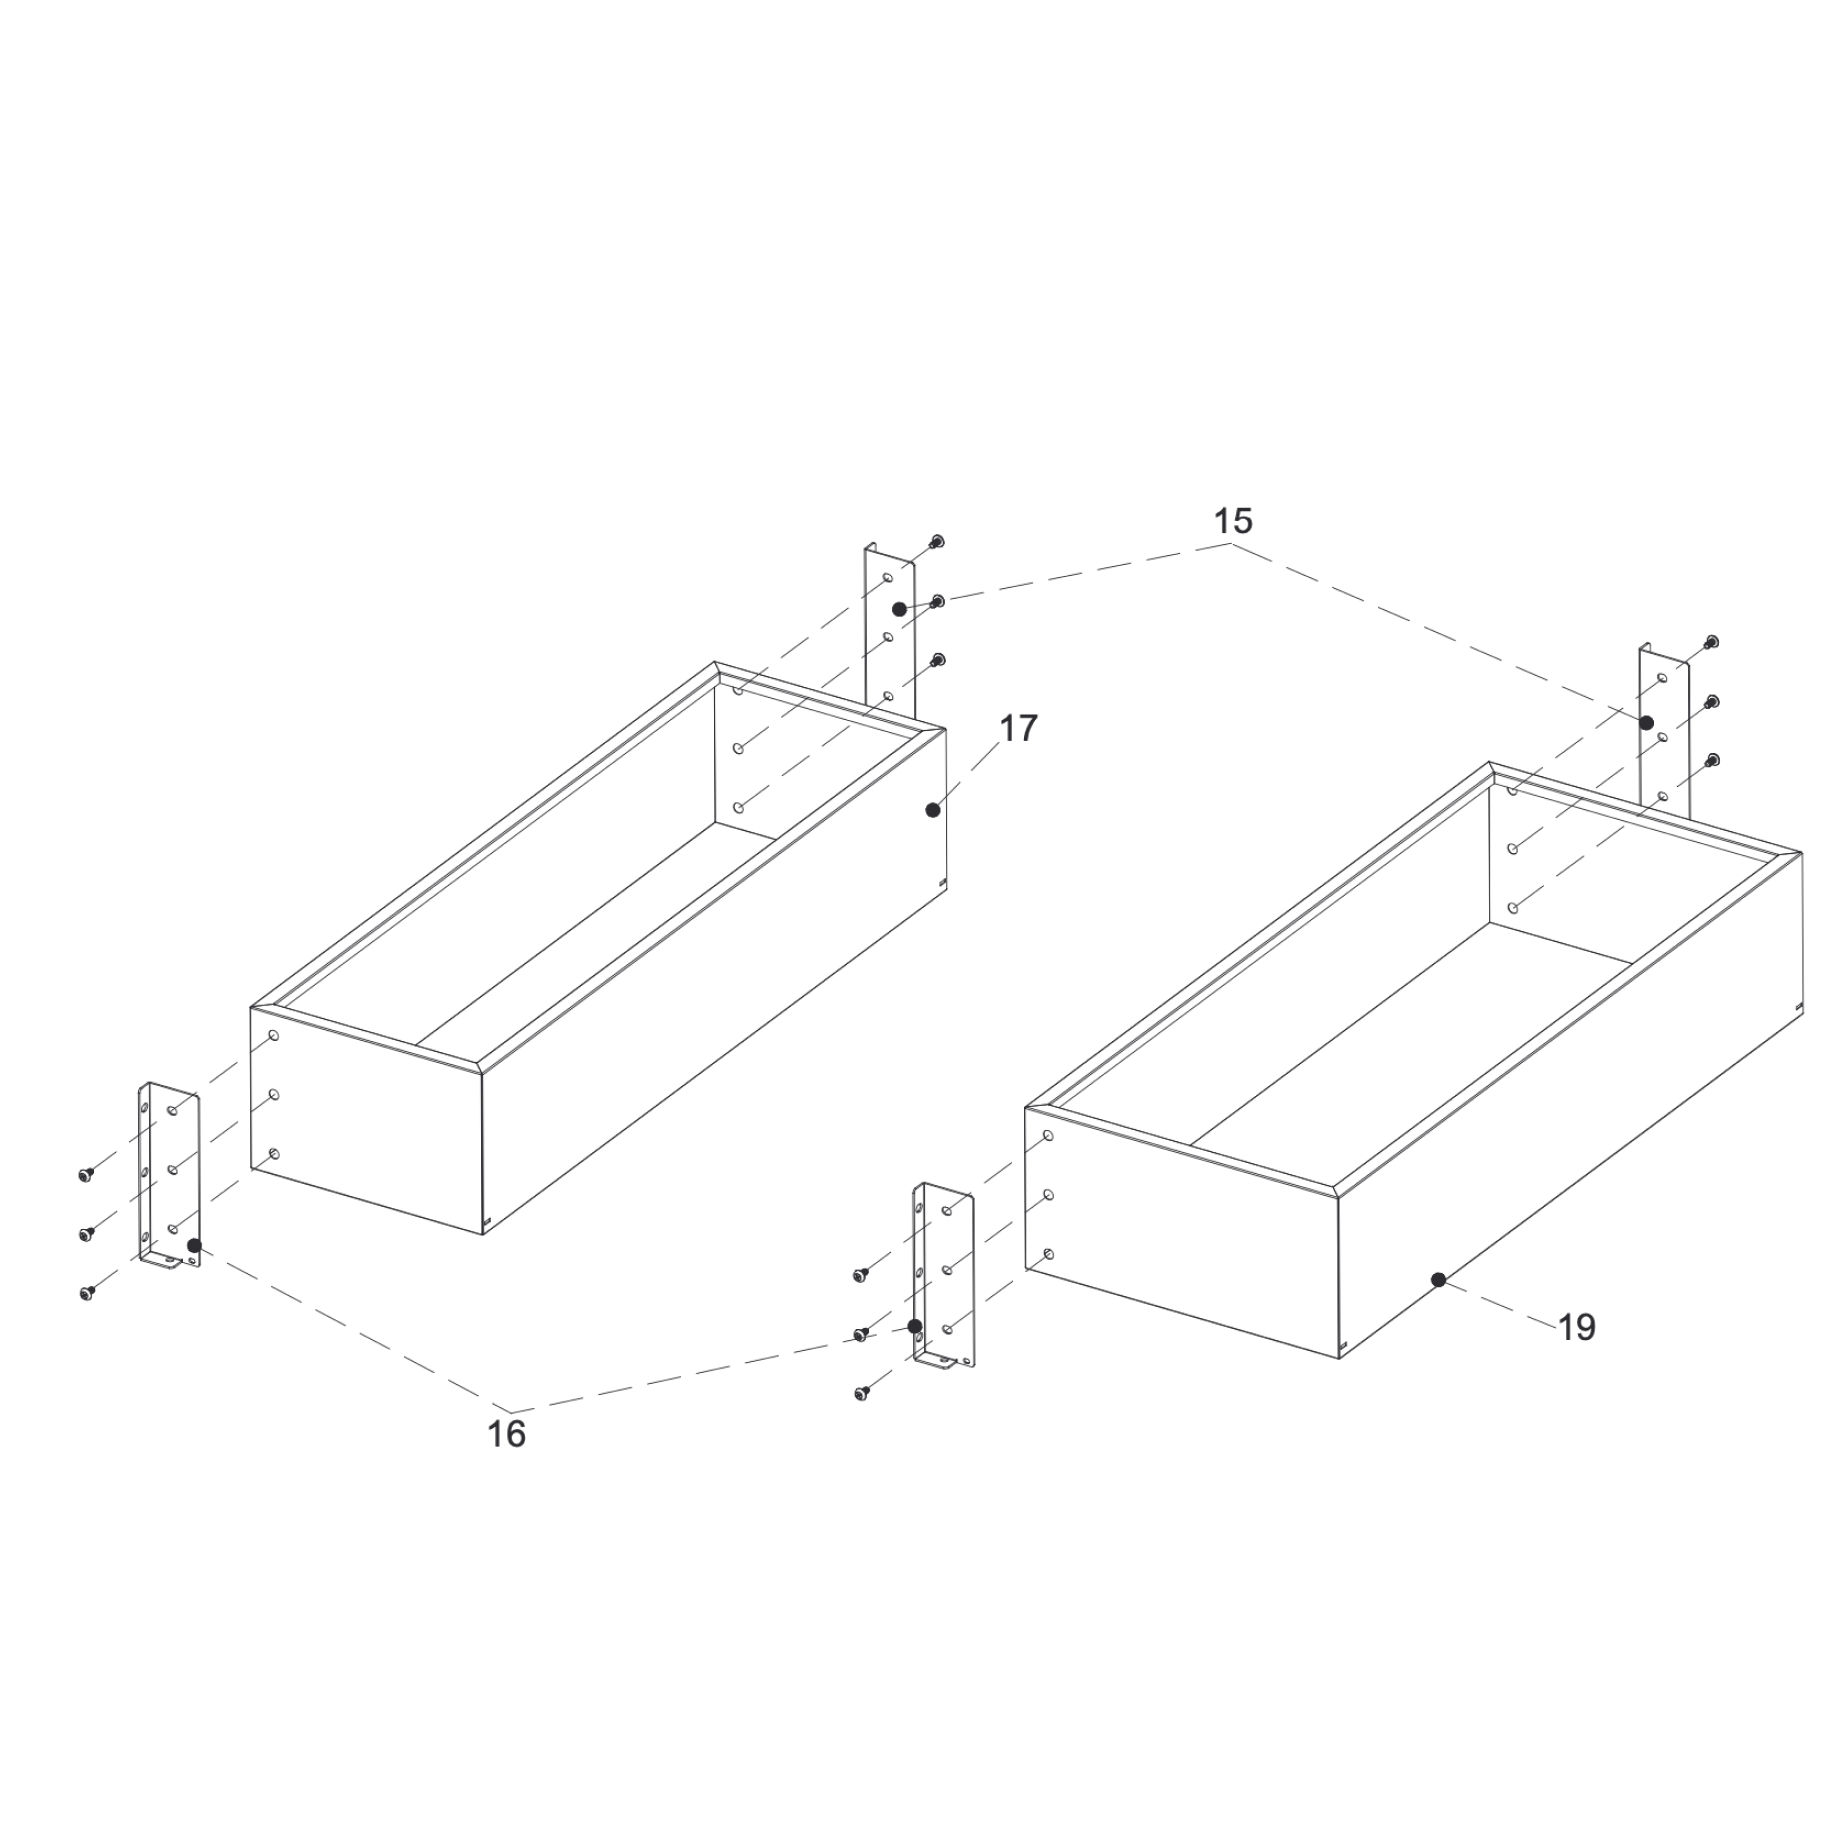
11. Attach brackets to drawers
Fix Left Brackets (15) and Right Brackets (16) onto the sides of the Upper Drawer (17) and Lower Drawer (19) using M5×12 bolts (B).
Ensure each bracket is aligned correctly with the drawer sides.
Parts used:
Left Bracket | 15 | 2×
Right Bracket | 16 | 2×
Upper Drawer | 17 | 1×
Lower Drawer | 19 | 1×
M5×12 bolt | B | 12×
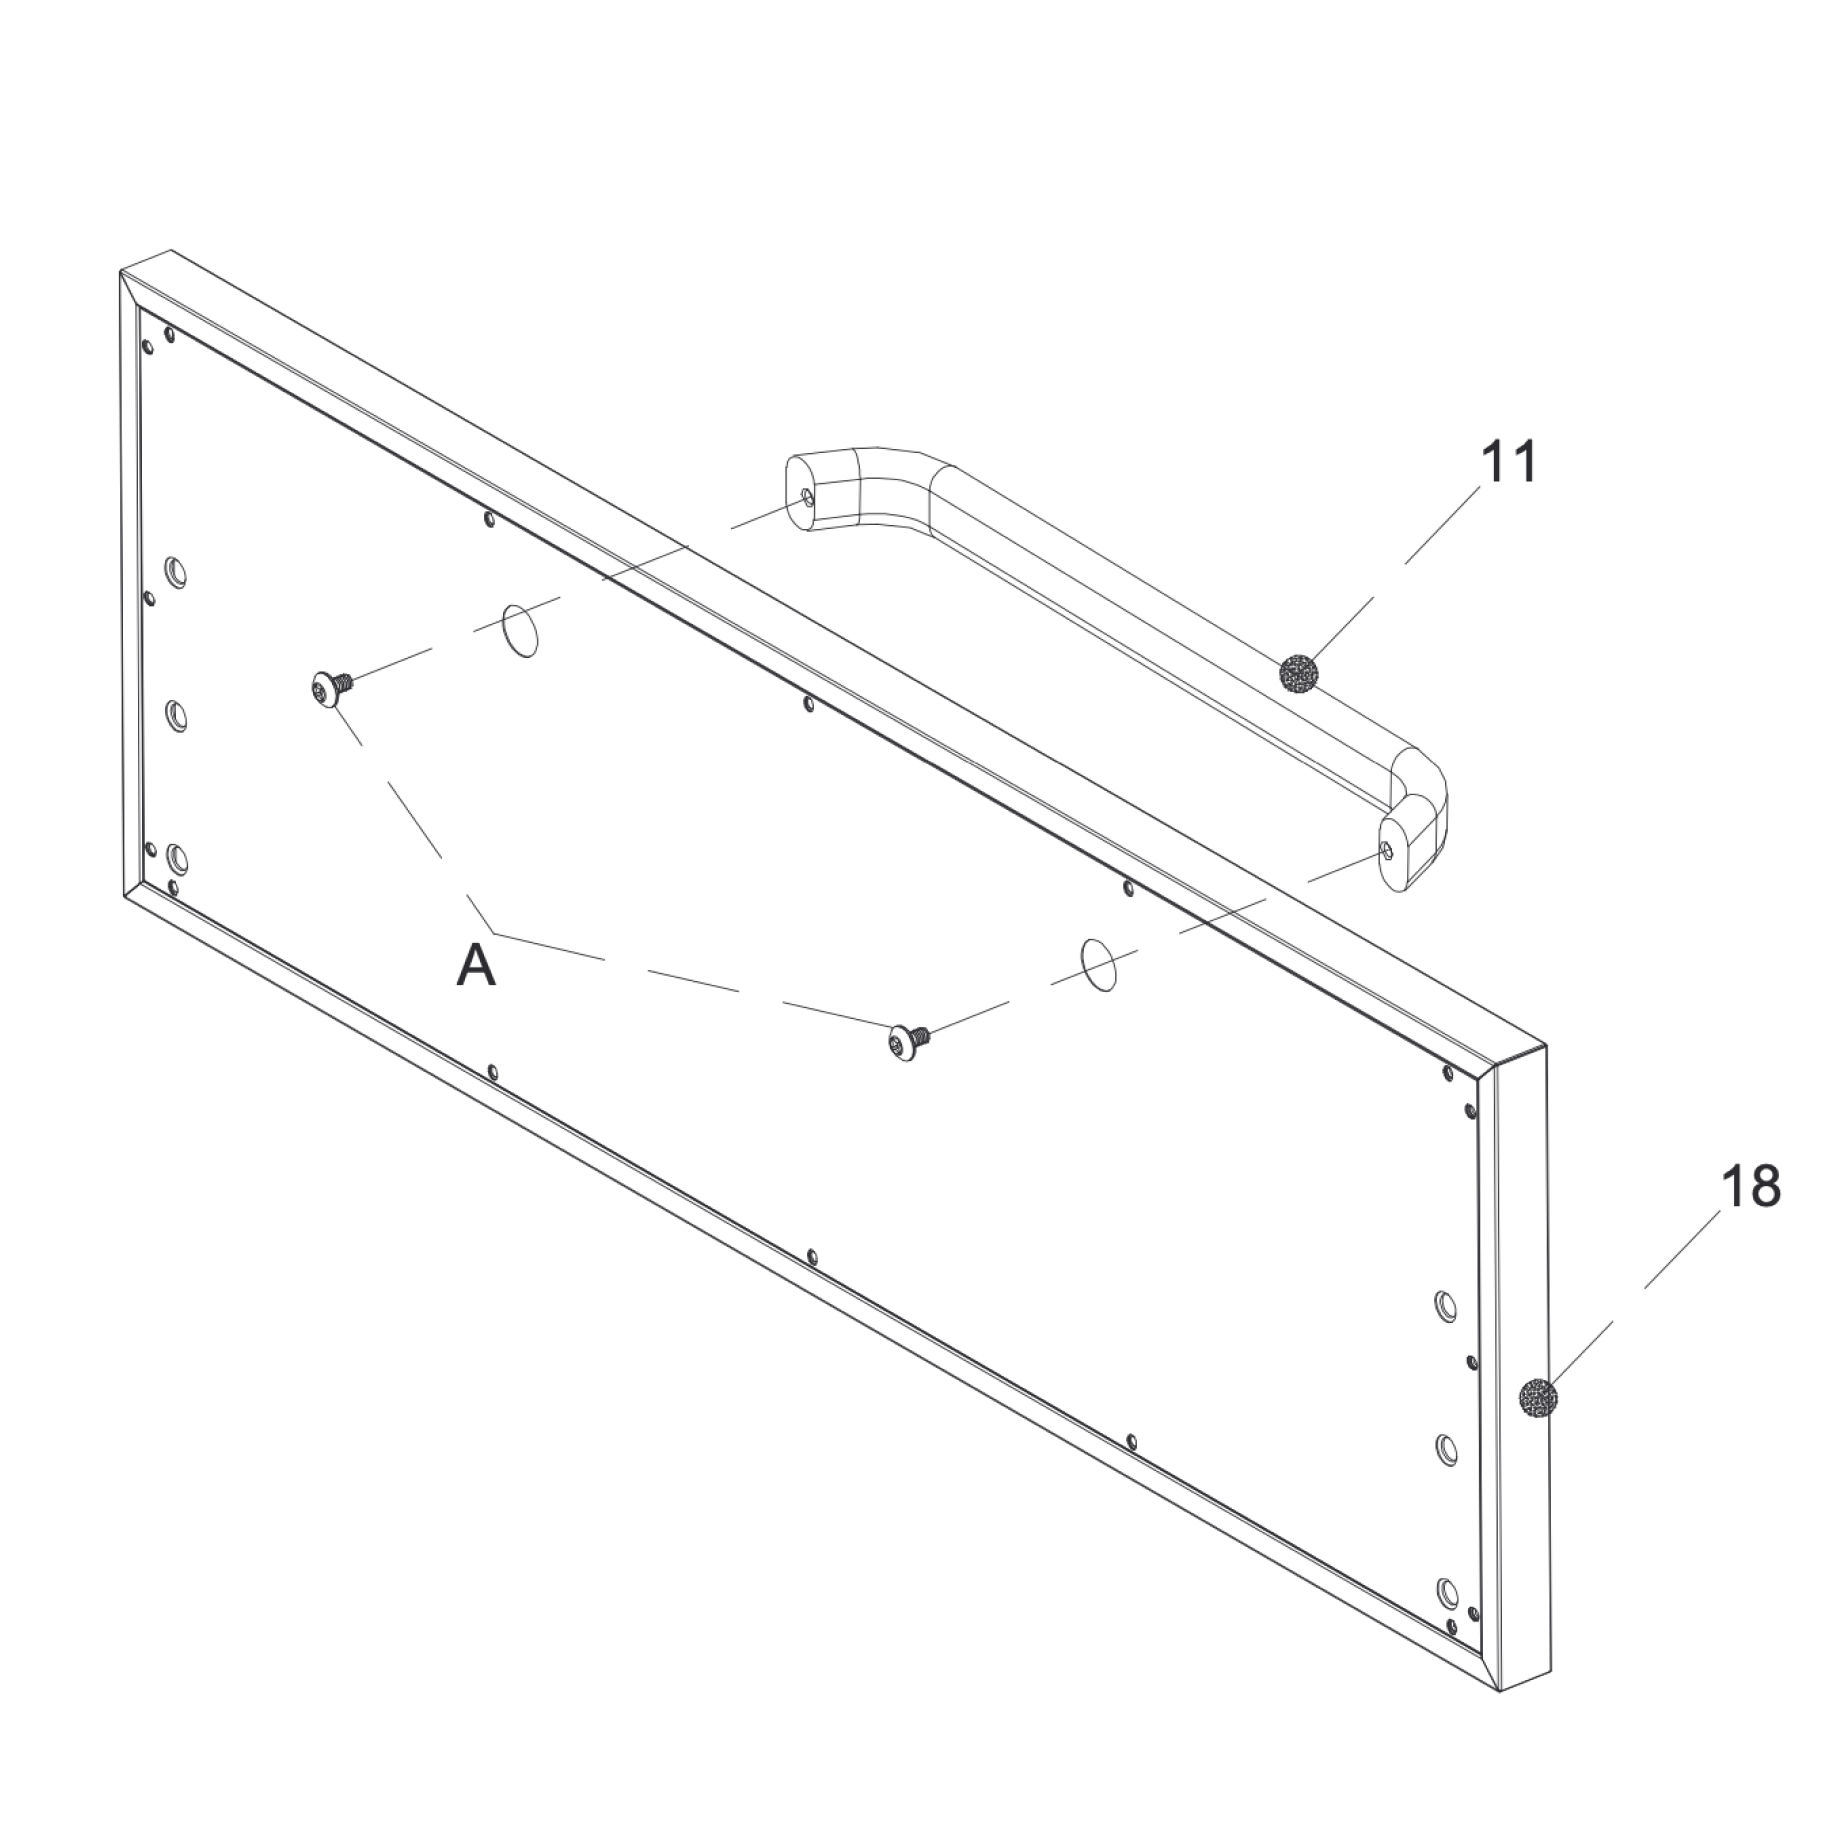
12. Install handles on drawer panels
Attach Handles (11) to the Drawer Panels (18) using M6×10 mm bolts (A).
Repeat for both drawers.
Parts used:
Handle | 11 | 2×
Drawer Panel | 18 | 2×
M6×10 bolt | A | 4×
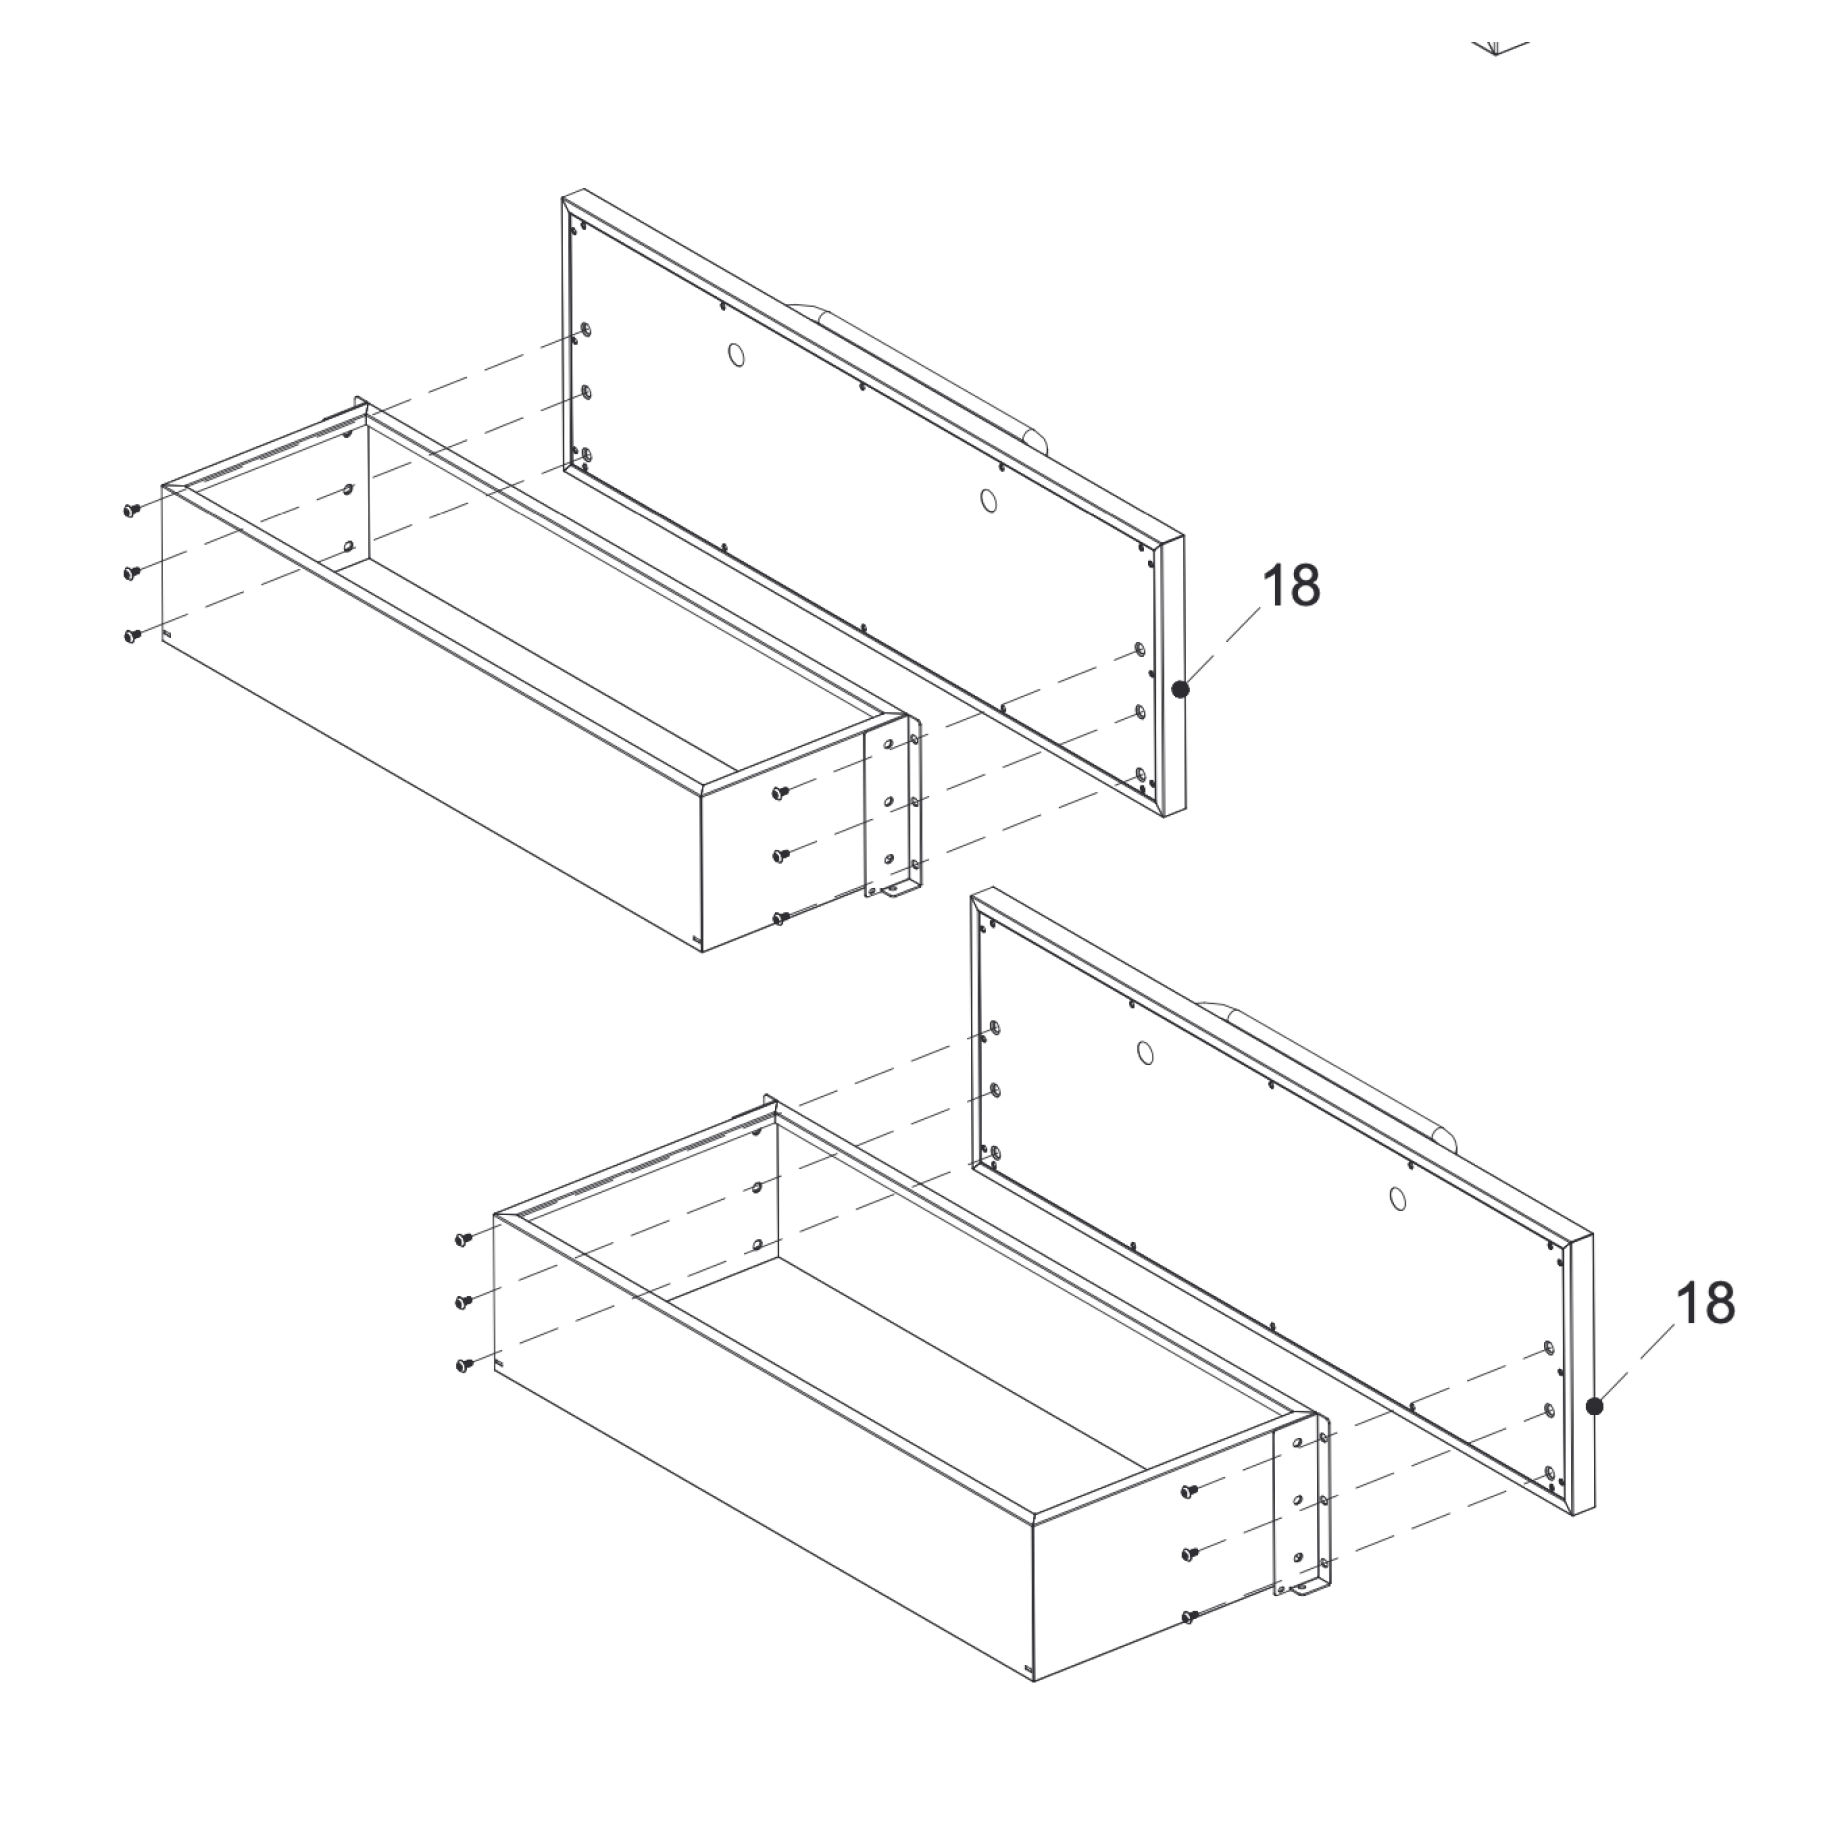
13. Assemble drawers
Attach the Drawer Panels (18) to the Upper Drawer (17) and Lower Drawer (19) using M5×12 bolts (B).
Parts used:
Drawer Panel | 18 | 2×
Upper Drawer | 17 | 1×
Lower Drawer | 19 | 1×
M5×12 bolt | B | 12×
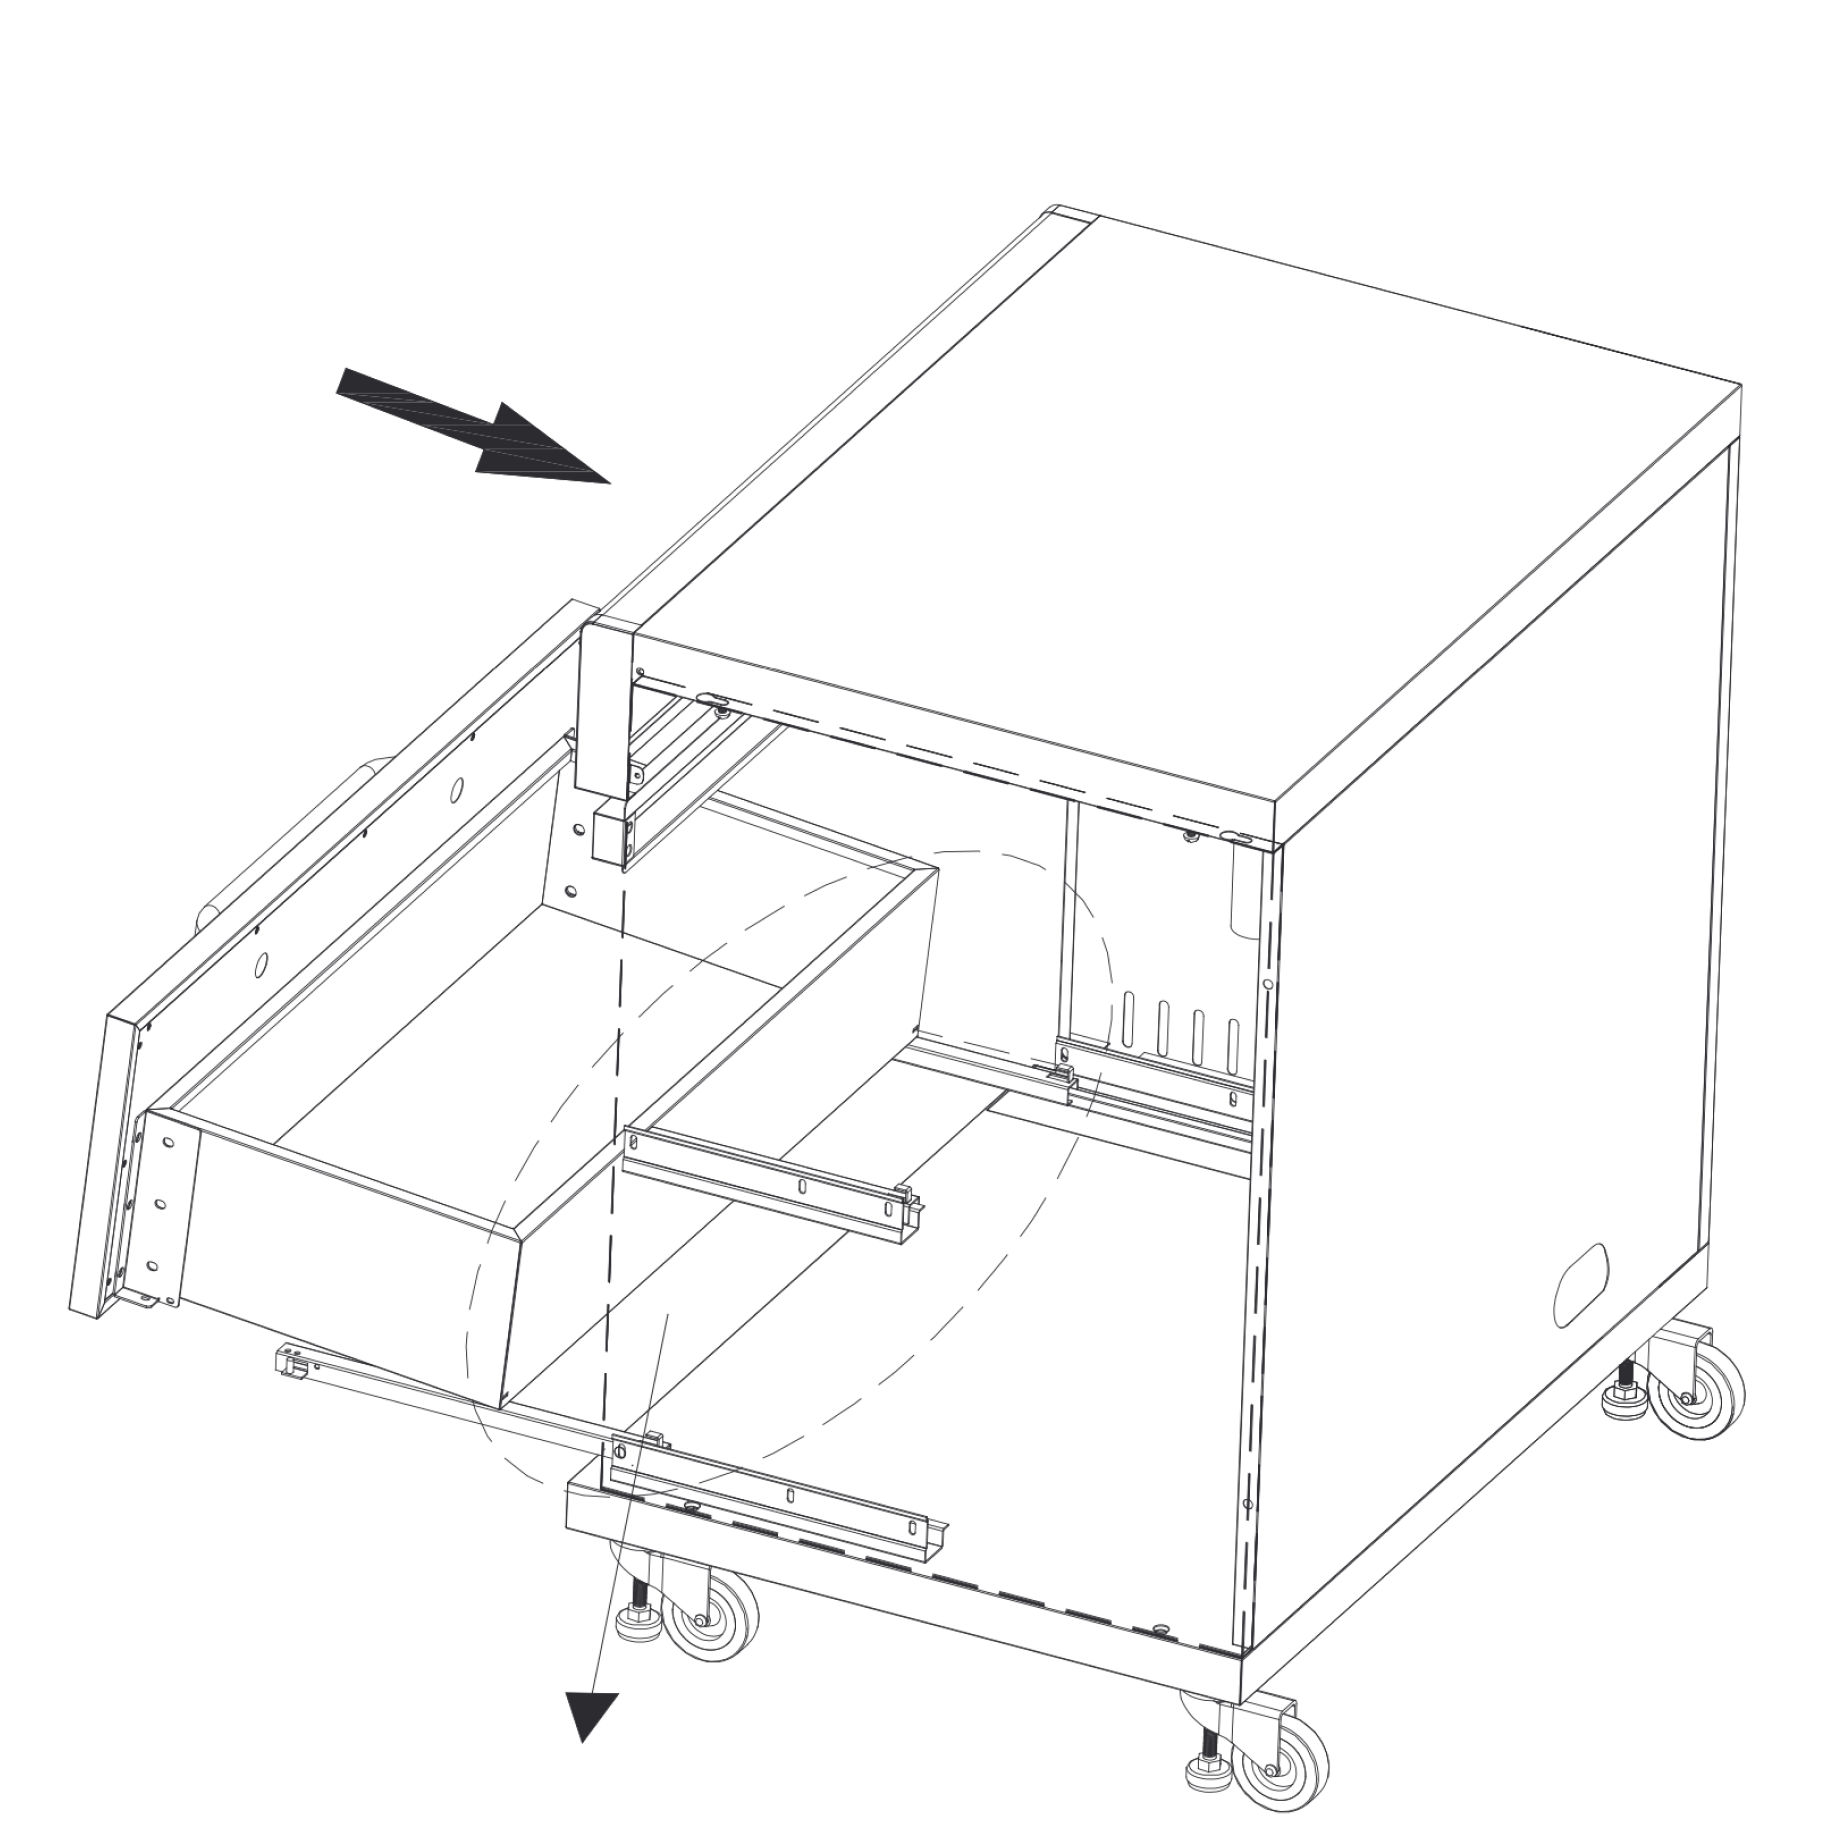
14. Insert the drawers
Pull out the sliding rails from the unit body.
Align the Upper Drawer (17) and Lower Drawer (19) with the corresponding rails.
Gently slide each drawer into position until it locks in place.
Parts used:
Upper Drawer | 17 | 1×
Lower Drawer | 19 | 1×
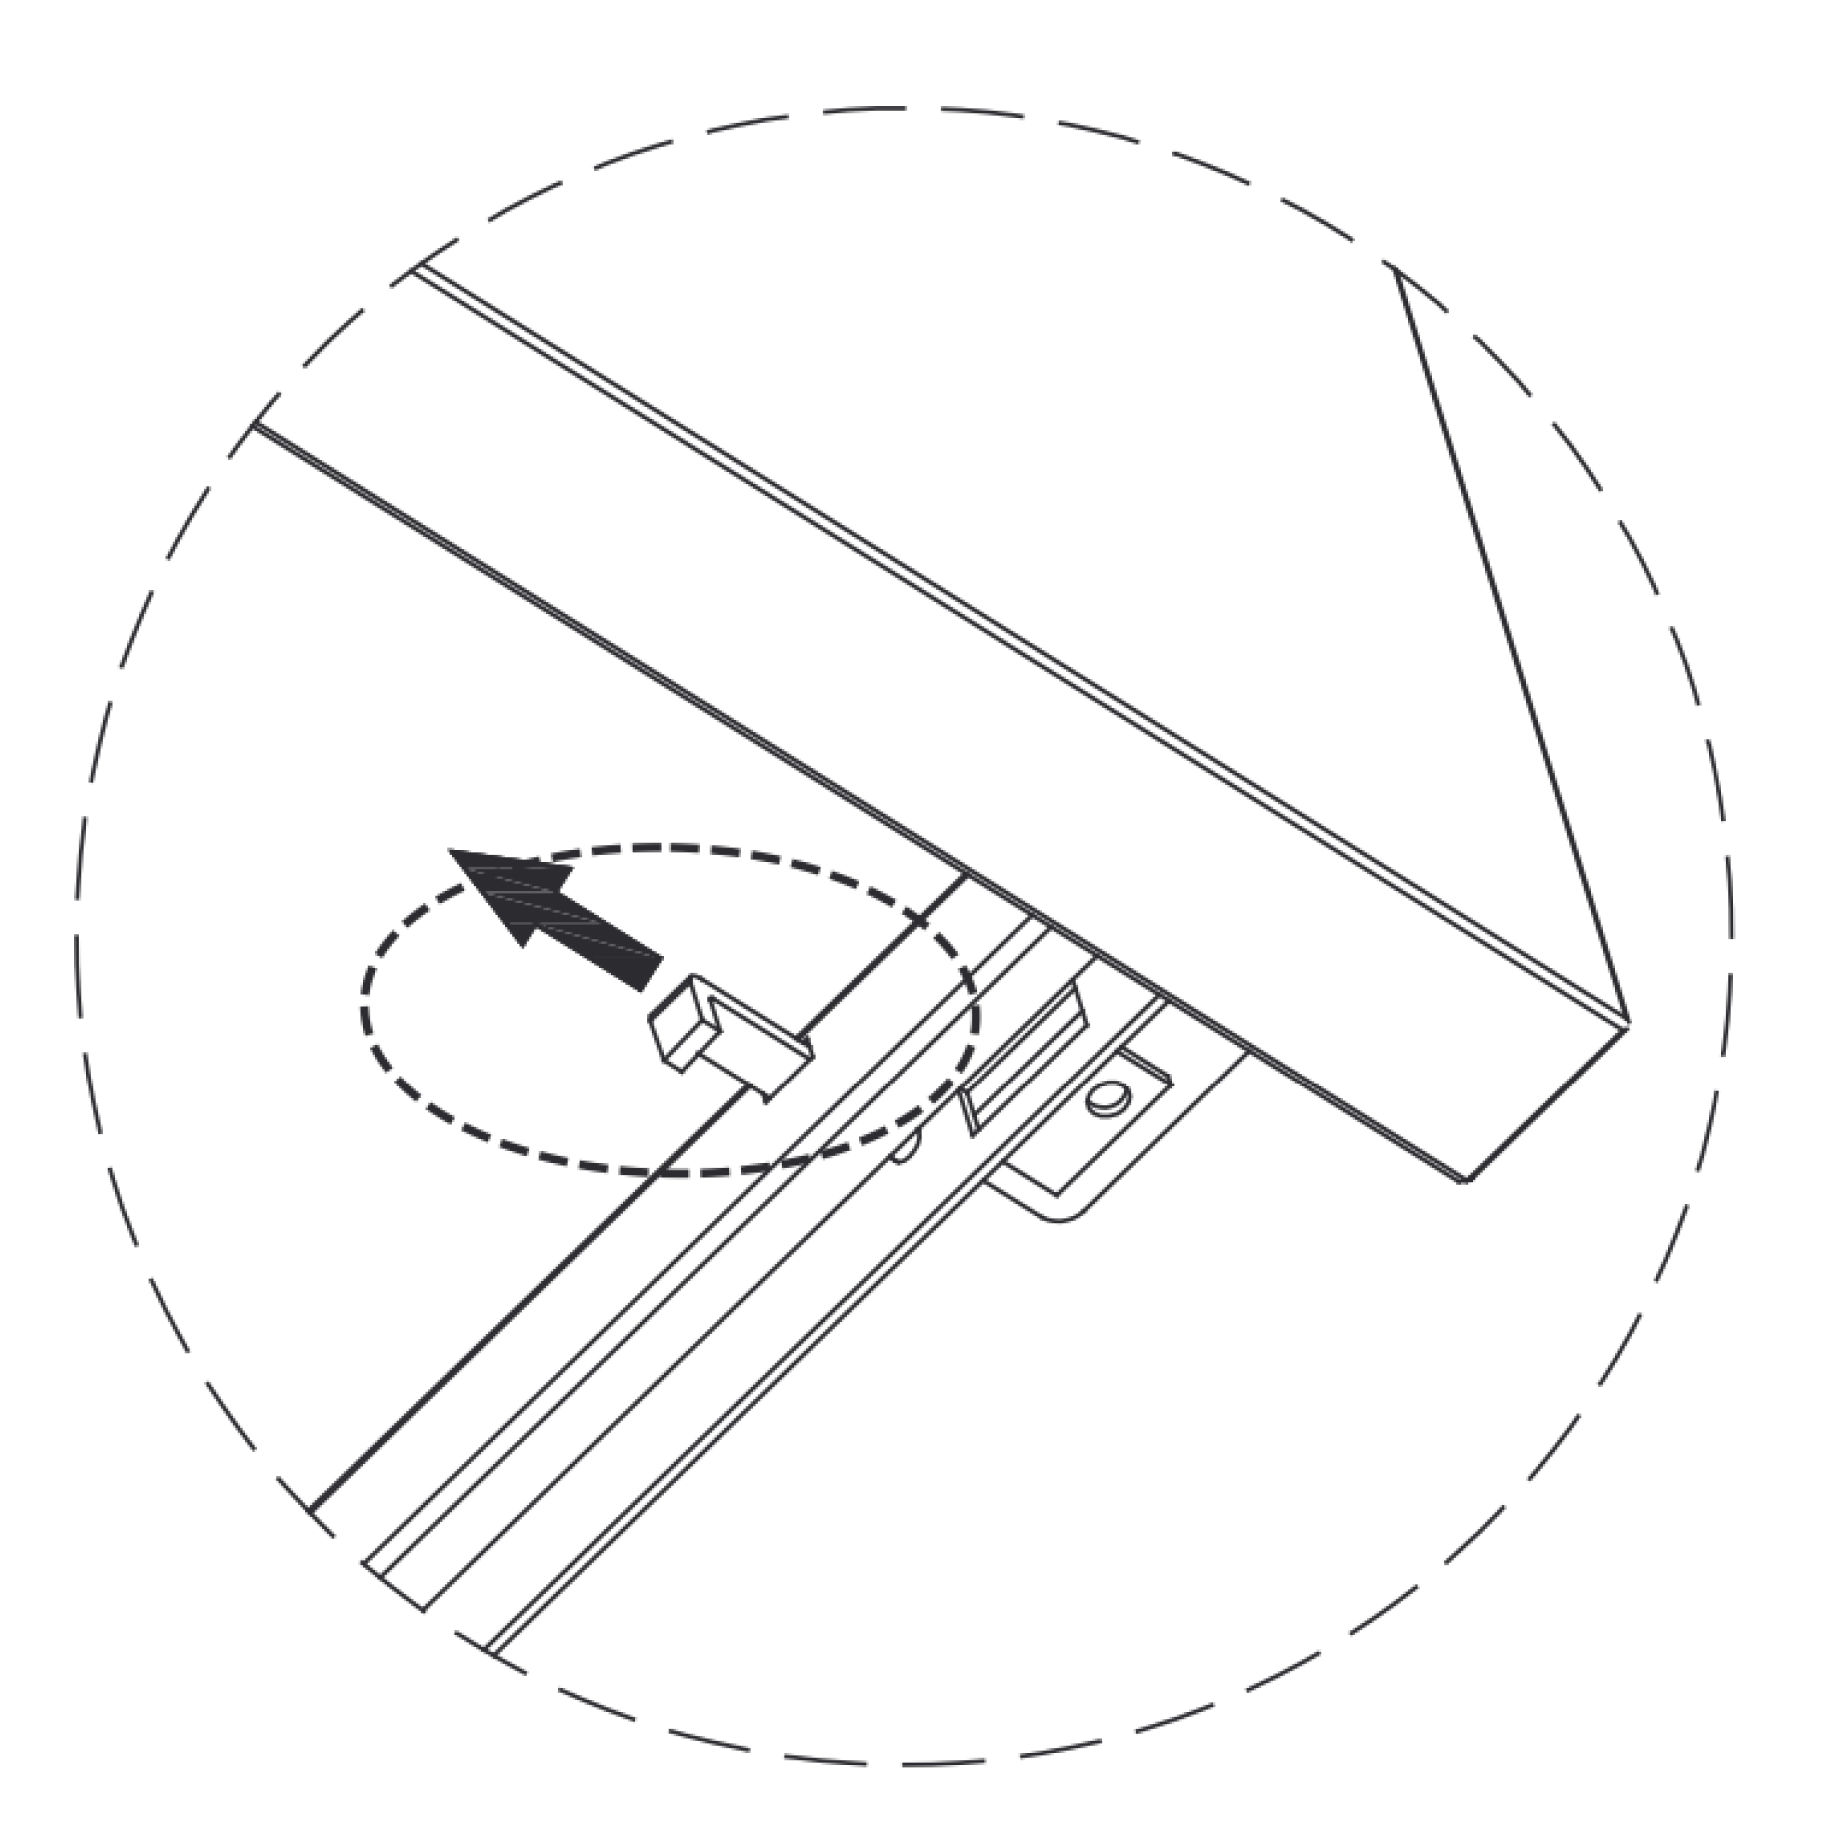
15. Secure the drawers
Pull out the plastic clips located on the sliding rails.
Adjust the drawer position so that the mounting holes align correctly.
Once aligned, push the drawers fully in and press the clips back to lock them in place.
Confirm both drawers slide smoothly and are securely fastened.
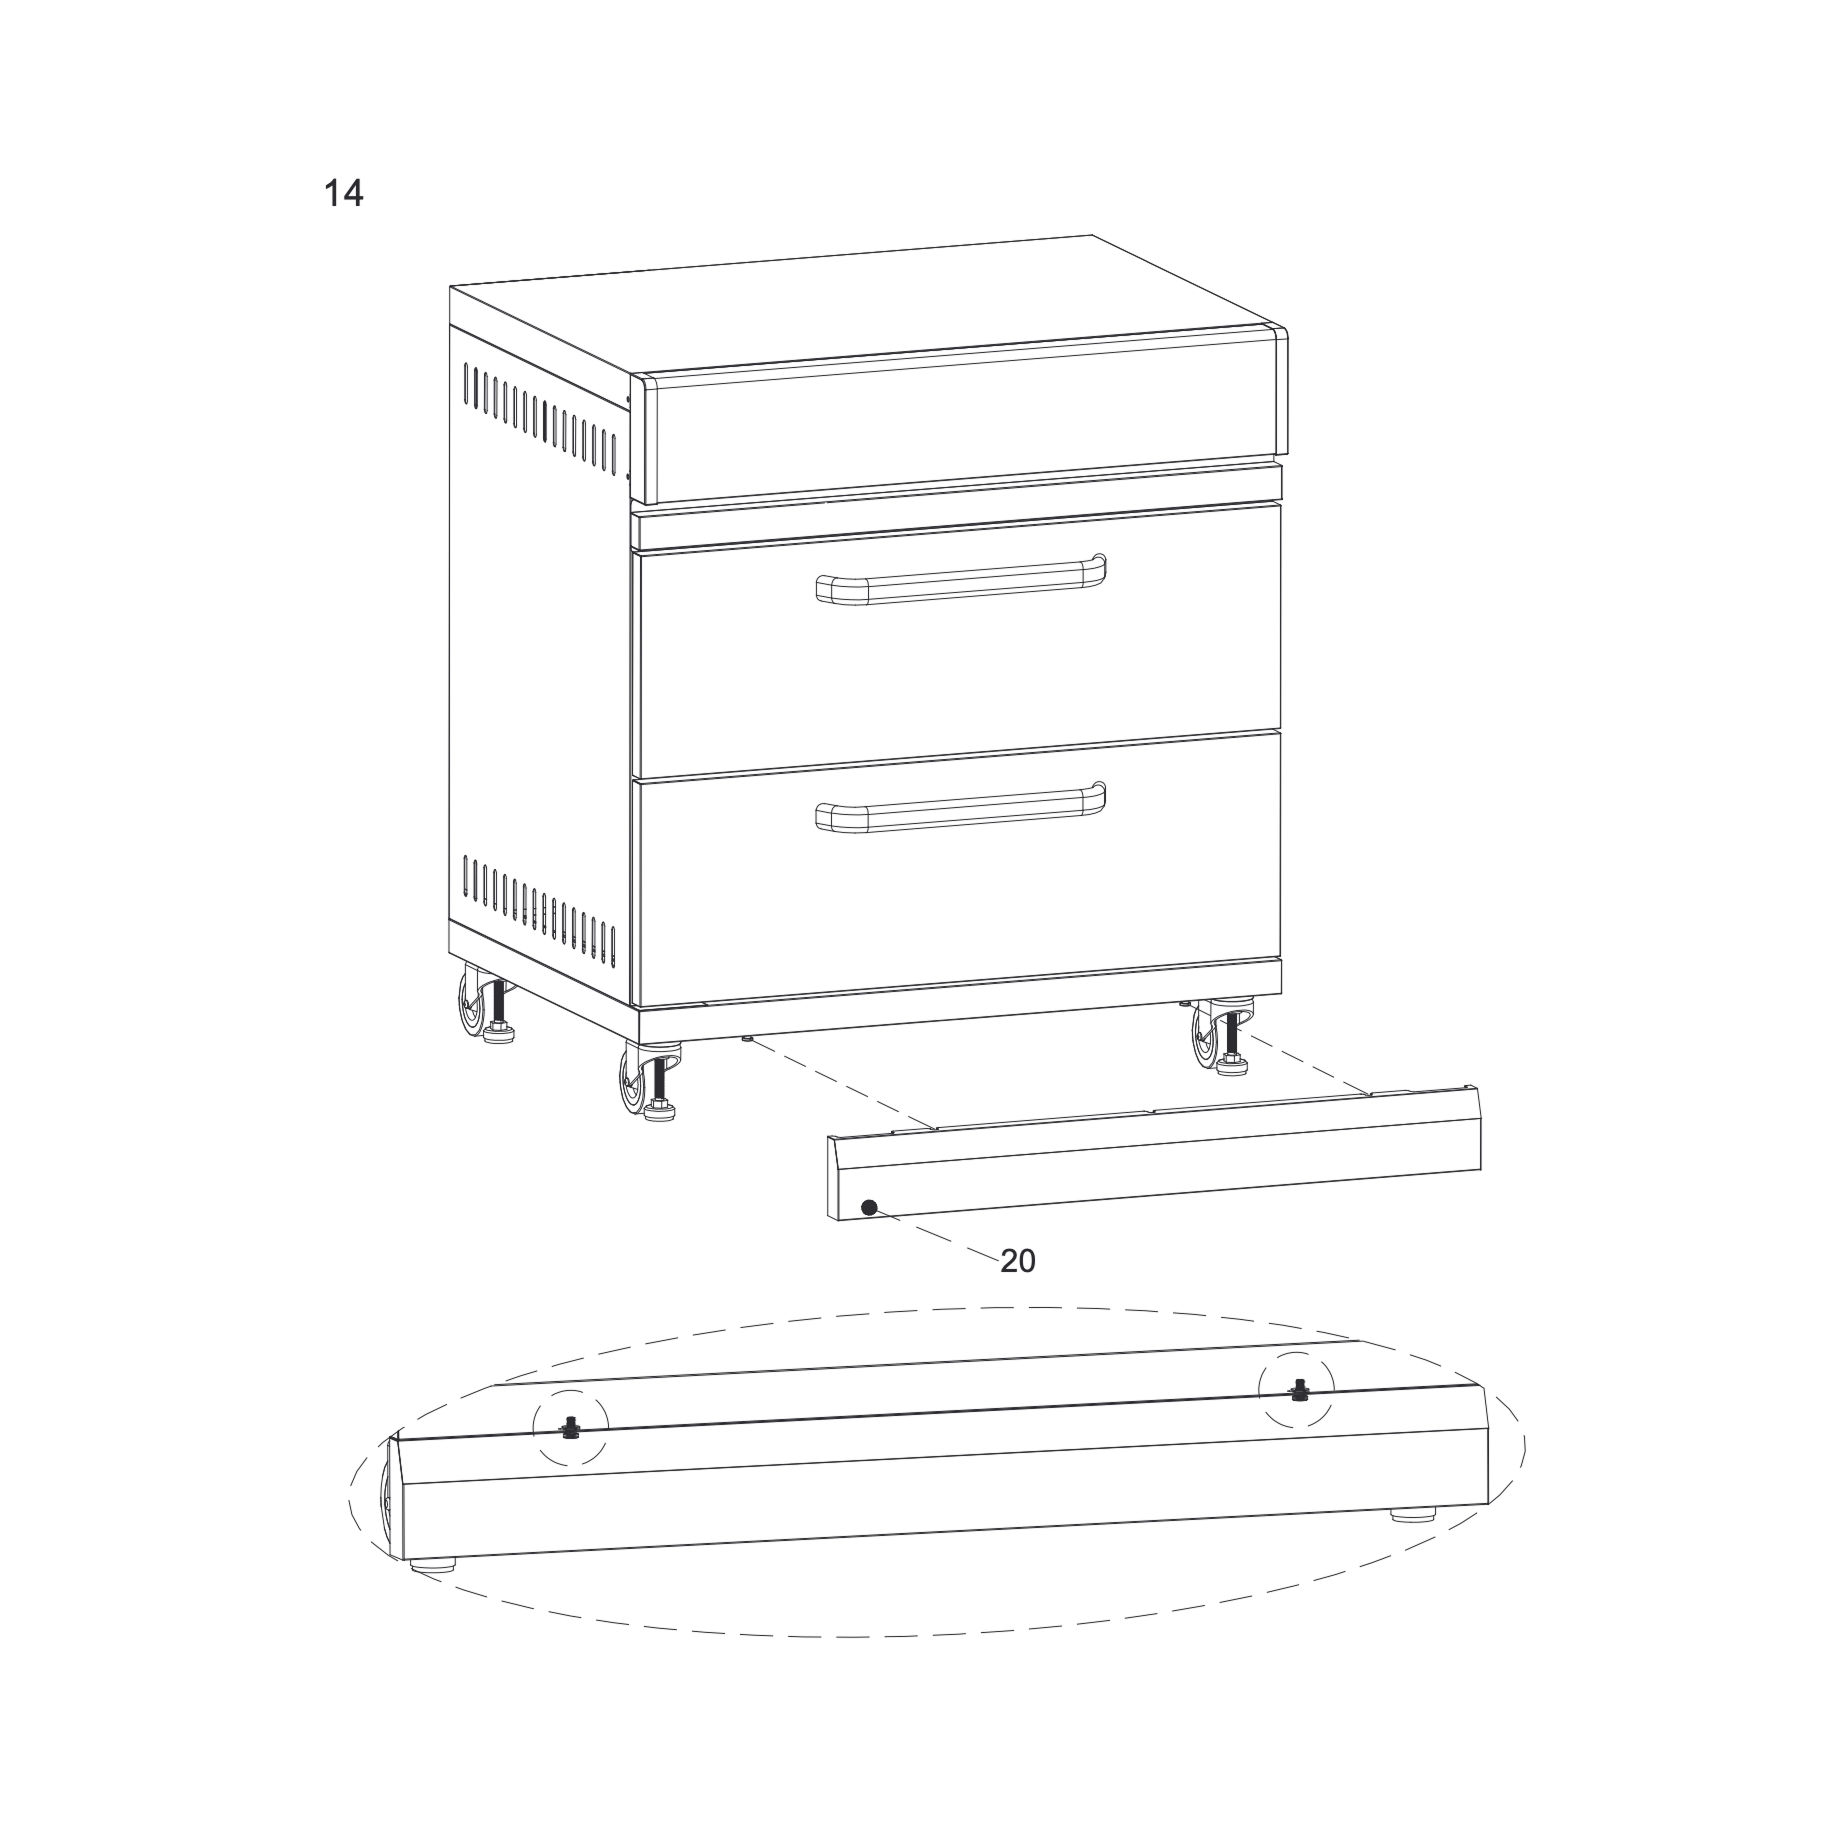
16. Install the wheel cover
Attach the Wheel Cover (20) to the lower front edge of the unit.
Align the fixing holes and press or screw into position as shown.
Ensure it is centered and flush with the front casters.
Note!
Plinth should only beattached if the unit will remain stationary.
Parts used:
Wheel Cover | 20 | 1×
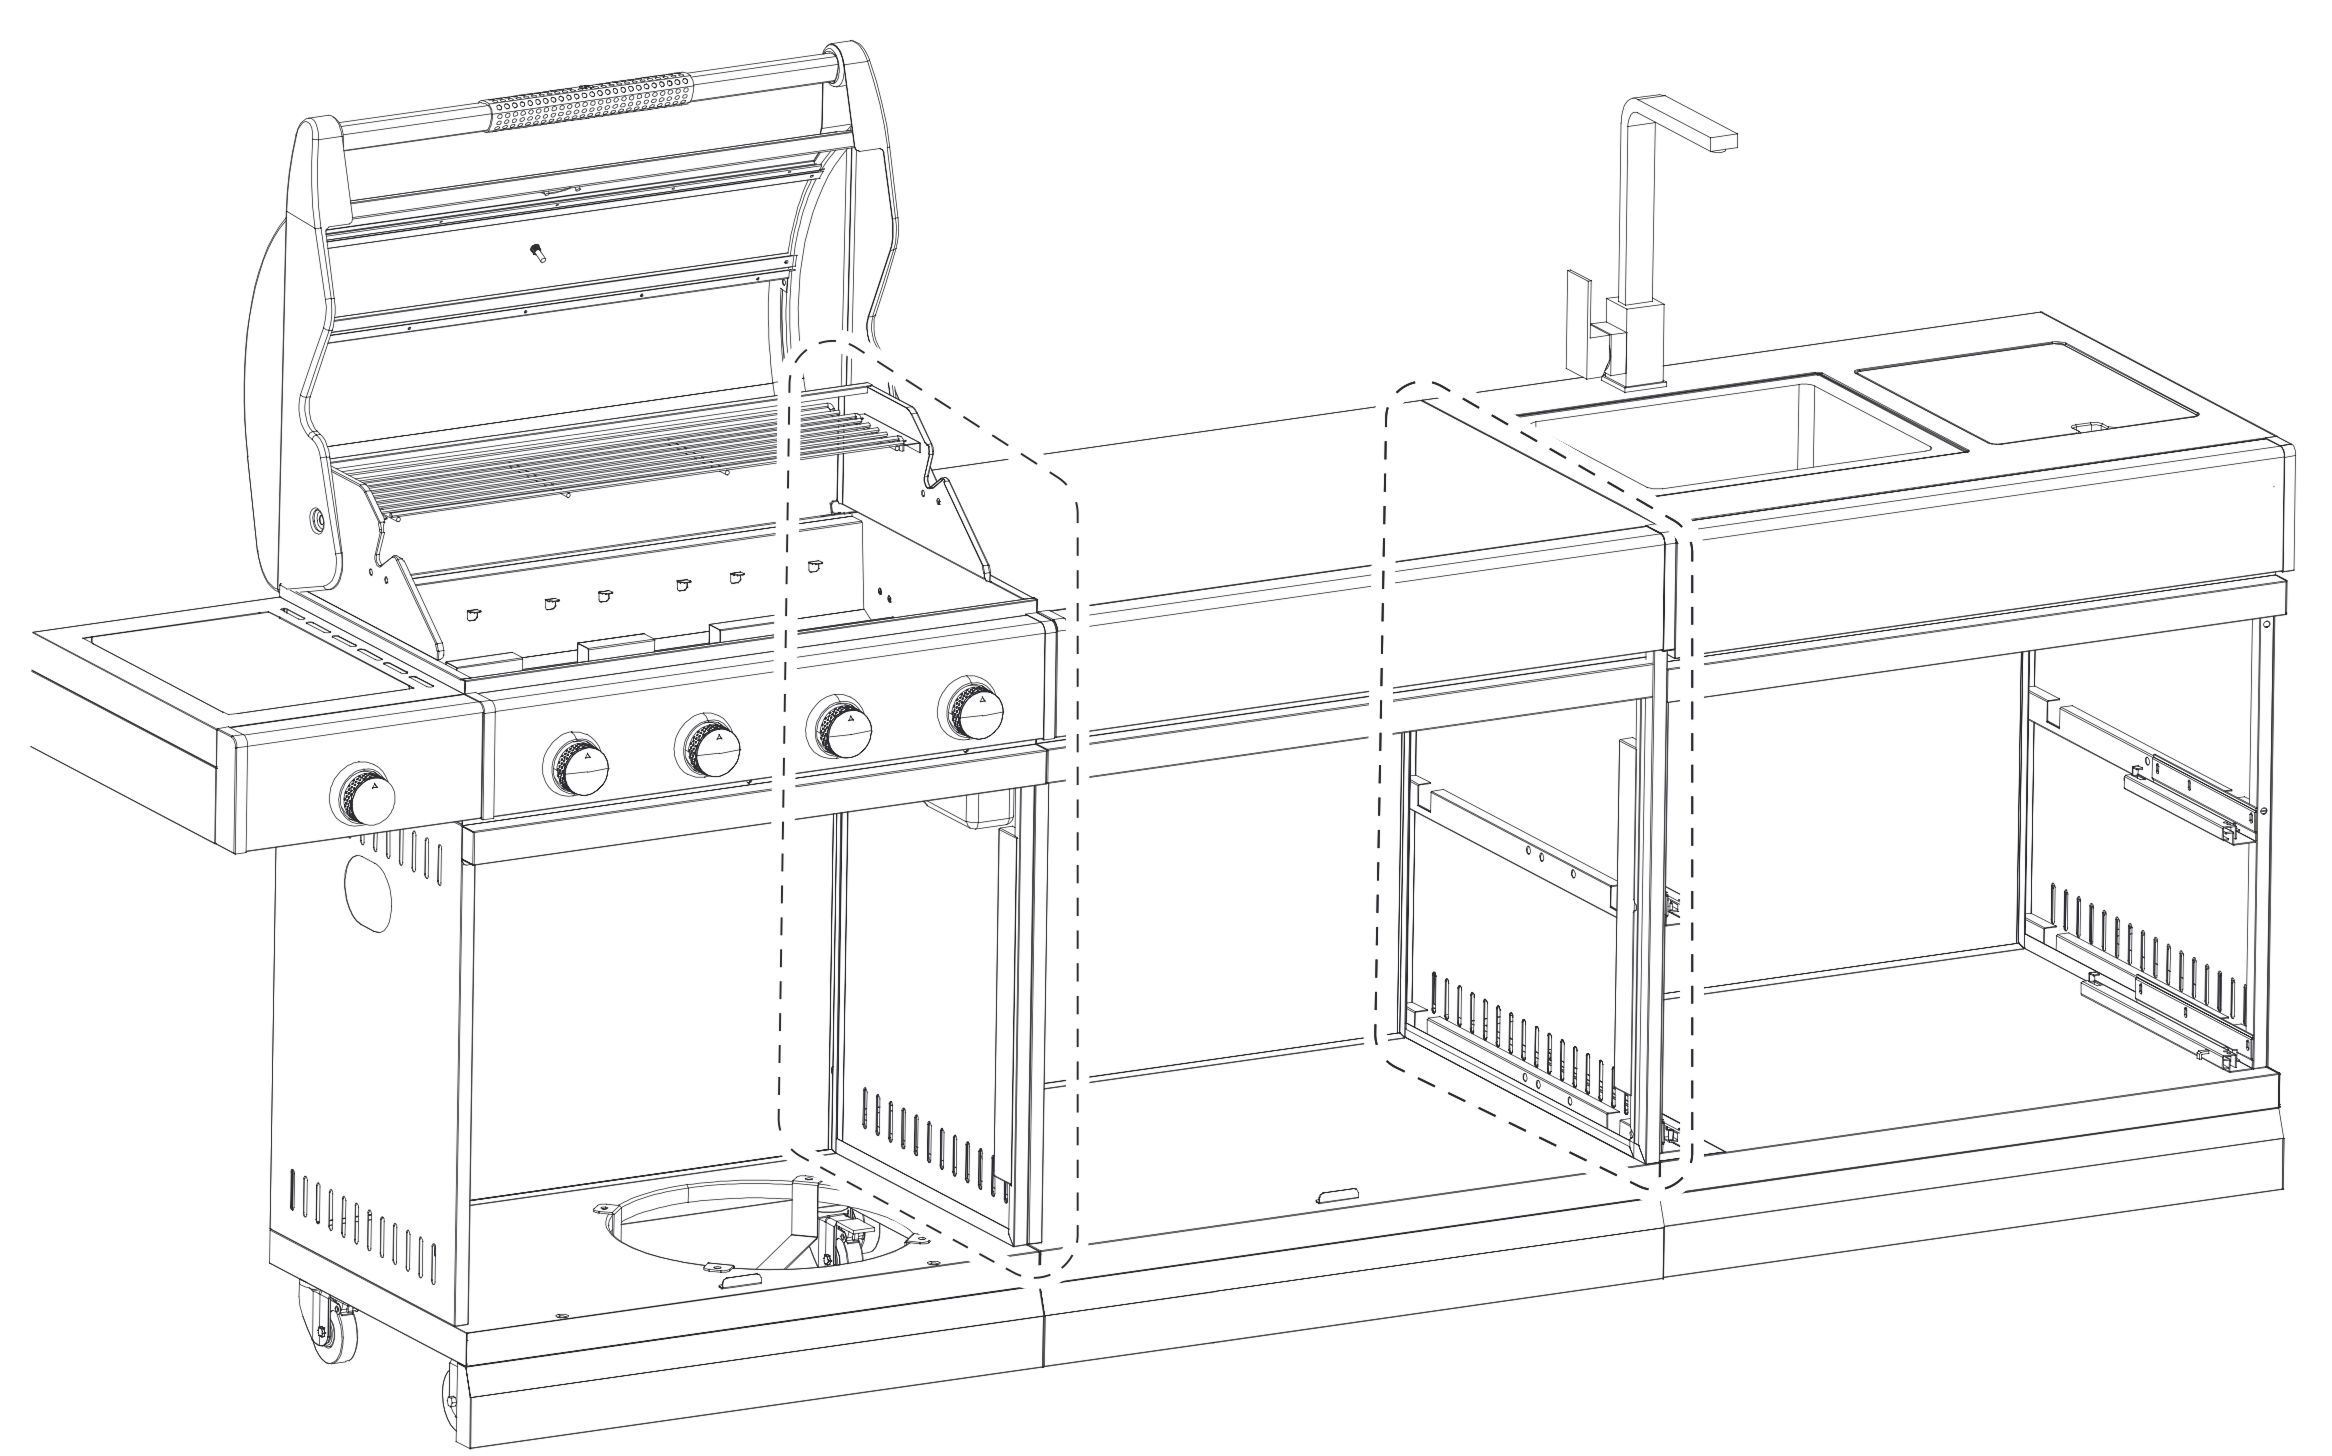
Connecting the Units
17. Connecting the Units
Align the rear panel between the left and right side panels.
Secure it using M5×12 screws to attach the connect bracket, ensuring stability and proper alignment with the rest of the structure.
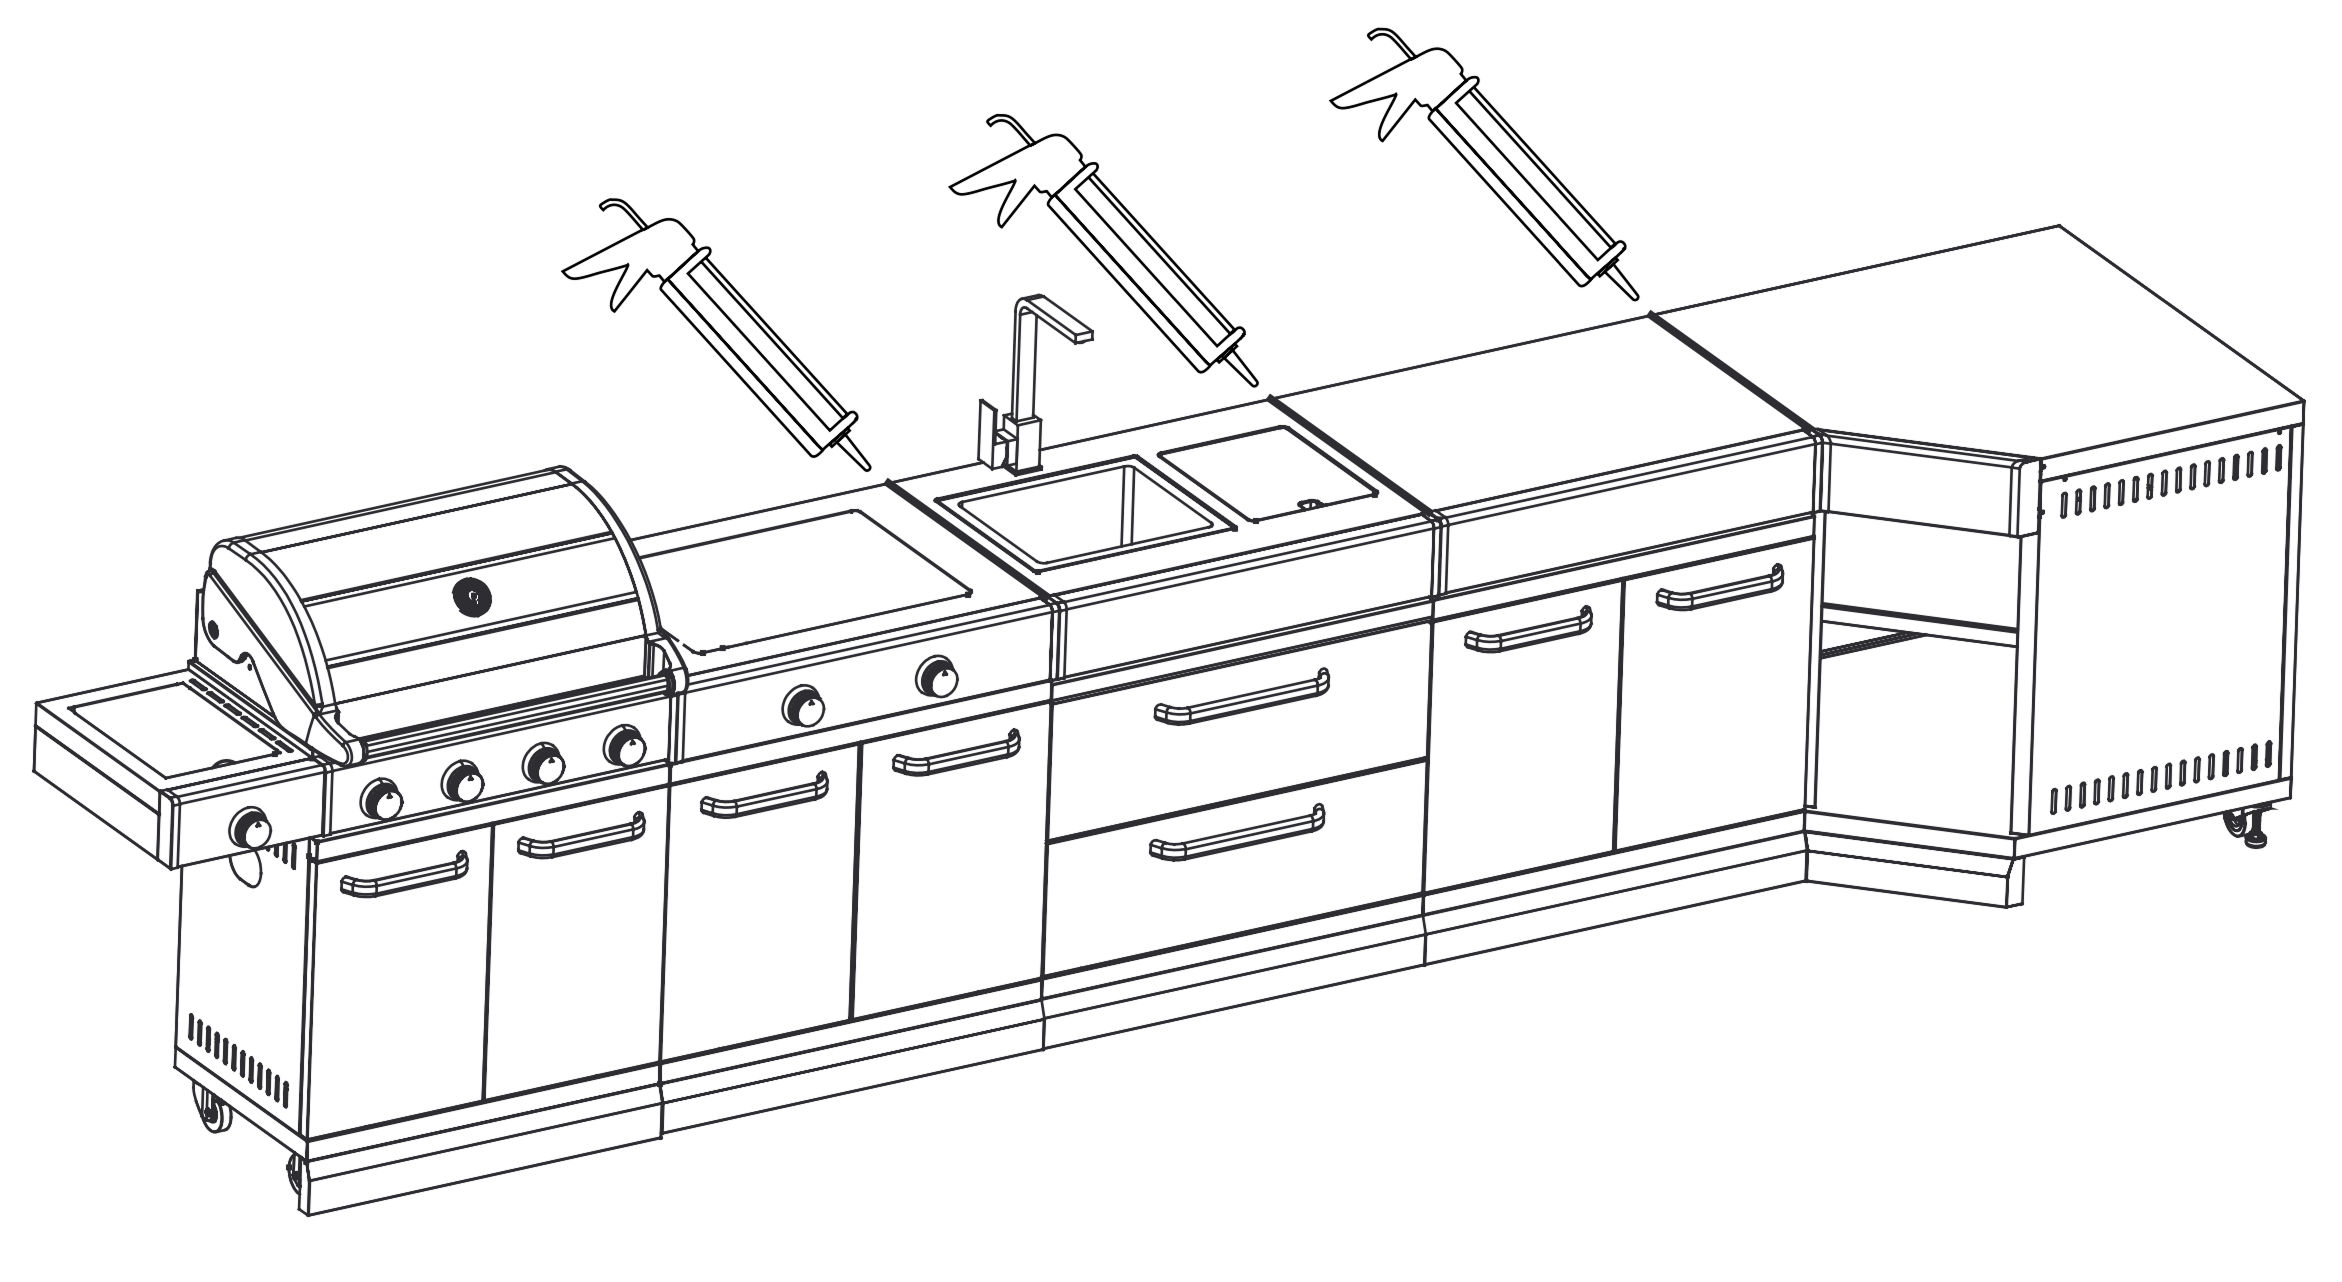
18. After connecting
We strongly recommend sealing the joints between the units along the top edge of the kitchen tops, as well as between every kitchen top and the fascia, with an appropriate outdoor sealant to prevent water ingress.
Maintenance
19. Preventing Rust
Rust is a chemical process in which iron oxidizes and begins to flake away the metal. This is caused by water that soaks into the metal or comes in contact with the metal frequently over time. As an outdoor appliance made of steel, some surface rust should be expected from time to time. Keeping your grill under cover, clean and dry, goes a long way toward preventing rust from occurring. Some tips are:
Ensure cooking surfaces (including flame tamer) are kept clean and dry after cooking, particularly after cooking with marinades. The cooking surface should be rubbed with oil after use.
Do not leave the grill out in the rain.
Do not store the grill when it is wet. Dry thoroughly first.
During both summer and winter, periodically remove the cover to enable the grill to air out, and get rid of any built-up condensation.
Light surface rust can be easily removed with a rag, soaked in white vinegar, or using a commercial rust remover. Dry the affected area and apply a coating of rust-preventing fluid, available at most auto stores.
Chipped enamel can be treated with touch-up paint to cover the bare metal surface.
20. Maintaining Powder-Coated Steel
Frequency: Clean every 3-6 months or more often if the item is exposed to harsh environments (e.g., coastal areas, high pollution).
Method:
Use a soft cloth or sponge with warm water and mild detergent.
Avoid abrasive cleaning tools like steel wool or scouring pads that can scratch the surface.
Use minor clean water to remove any residue.
Dry with a soft cloth to prevent water spots or streaks.
2. Avoid Harsh Chemicals
Do not use solvents, strong alkaline cleaners (e.g., ammonia), or acidic products, as these can damage the powder coating.
Stick to pH-neutral or slightly alkaline cleaning solutions.
3. Protect Against Scratches
Use care when handling or storing powder-coated items to avoid scratching the surface.
If scratches occur, touch them up promptly with a matching paint or protective coating to prevent rust or further damage.
4. Protect from Harsh Conditions
If the powder-coated steel is outdoors:
Use a silicone-based wax, car wax, or a clear protective sealant specifically formulated for powder-coated surfaces.
This adds a water-repellent layer, reducing the chance of water penetration and rust formation.
Reapply every 6–12 months for outdoor items.
5. Inspect Regularly
Check for chips, cracks, or peeling in the powder coating.
Address any damage promptly to prevent rusting or corrosion underneath the coating.
6. Lubricate Moving Parts (if applicable)
For items like hinges or joints, use a silicone-based lubricant to keep them functional and protect against corrosion.
7. Ensure Proper Drainage and Ventilation
Avoid water pooling: Design or place powder-coated items in a way that prevents water from accumulating, such as tilting outdoor furniture slightly for runoff.
Ventilation: Ensure proper airflow around the item to allow quick drying after exposure to rain or cleaning.
8. Apply a Protective Coating:
Products like silicone-based sprays or car wax can repel water and add a shiny finish.
21. Preventing Rust On Stainless Steel
1. Regular Cleaning
Frequency: Clean every 3-6 months or more often if the item is exposed to harsh environments (e.g., coastal areas, high pollution).
Remove Contaminants: Clean stainless steel regularly to remove dirt, salt, grease, or other debris that can lead to rust.
Use warm water and a mild detergent with a soft cloth or sponge.
Rinse thoroughly with clean water and dry with a microfiber cloth to prevent water spots.
Avoid prolonged exposure to saltwater or chloride-based cleaners, as these can corrode stainless steel.
2. Protect the Surface
Apply a Protective Coating: Use a stainless steel polish, wax, or clear protective coating to create a barrier against moisture and contaminants.
Use Passivation Treatments: For higher corrosion resistance, apply a passivating agent (available commercially) to remove iron contaminants and reinforce the chromium oxide layer.
Storage
22. Storage
Check these instructions if you stop using the for a longer time or you wish to put the unit into storage for the winter, for example. Proper storage prolongs the unit service life and keeps it operational for many years.
Clean inner and outer metal surface.
Keep the all parts in dry.
These parts need to be stored in a dry and warm space. It is also recommended that use a cover to protect the unit.
Warranty
23. Warranty
COMPANY ADDRESS
The GRLLR Company B.V.
Liesbosstraat 43 A
4813 BC Breda
The Netherlands
CONDITIONS OF WARRANTY
This limited warranty applies only to products registered within 30 days of purchase according to instructions in the manual.
Proof of purchase date according to buying receipt.
The GRLLR manual must be kept, in order to refer back to it.
Products must be assembled, used and maintained according to the manuals.
Any alteration, reparation or adjustment of the original product parts will cancel the validity of this warranty.
1. COVERAGE
GRLLR warrants this Connect Unit to be free from defects in material and workmanship from the date of purchase by the original consumer purchaser. This warranty is limited to the following components:
Cast Iron parts have a warranty period of 5 years — no rust through or burn through.
All stainless steel parts have a warranty of 10 years from the date of purchase.
Kamado worktop has a warranty of 2 years, provided adequate maintenance with seasonal oil.
Water drainage accessories and tap have a warranty of 2 years from the time of purchase.
All other parts are covered for 5 years from the date of purchase.
Please note: Surface rust is normal and can be cleaned easily. If not maintained properly as indicated in the manual, it can become a bigger issue. Please follow the instructions for optimal usability and durability.
2. WHAT IS NOT COVERED
The limited warranty does not cover the following:
Normal wear and tear.
Damage caused by improper assembly, installation, use or maintenance.
Commercial use of this product.
Any modifications or alterations made to the appliance.
Damage caused by accidents, misuse, abuse, or neglect.
Surface corrosion, discoloration, or rust.
Excluded from this warranty are the following:
Removal or re-installation expenses. This warranty does not cover transit or in-home service costs.
We do not assume responsibility for any loss or damage that occurs during transportation.
This warranty does not apply to instances of inadequate maintenance, abuse, neglect, misuse, accidental or improper installation of the appliance.
Any cosmetic imperfections, including scratches, dents, corrosion, or discoloration due to heat, abrasive chemical cleaners, or chipping of porcelain enamel components, as long as they do not impair the functionality of the appliance.
3. EXCLUSIVE REMEDY
In the event of a covered defect, GRLLR will, at its option, repair or replace the defective part or product. The cost of labor for removal or installation of the replacement part is not covered.
4. HOW TO OBTAIN SERVICE
If you believe that your GRLLR product is defective and covered under this warranty, please contact our Customer Service Department at the contact information provided above.
5. LIMITATION OF LIABILITY
To the extent permitted by applicable law, GRLLR’s liability under this warranty is limited to the repair or replacement of defective parts or products, as specified in section 3 above. GRLLR shall not be liable for any other damages, including but not limited to incidental, consequential, or punitive damages.
6. GOVERNING LAW
This warranty shall be governed by and interpreted in accordance with the laws of the country or jurisdiction where the product was purchased.
7. NON-TRANSFERABLE
This warranty is valid only for the original consumer purchaser and is not transferable to subsequent owners.
8. OTHER CONDITIONS
Set-up and installation of all GRLLR products must conform with the manual, as well as with the applicable Gas, Electrical and Building standards as laid down by the local laws and codes in your country, state or region.
Do not place any GRLLR BBQ, Oven or Stove directly on or near a combustible surface, such as tables, carpets, wooden floors or other combustible materials. You must use a refractory barrier with adequate thickness as a protective base, such as concrete tiles between the GRLLR product and a combustible surface.
Improper use of GRLLR products or misplacement of any GRLLR BBQ, Oven or Stove will cancel any warranty validity and disclaims all liability for direct, indirect or incidental damages.
This warranty has been translated from English to several other languages. We do not cover claims that result from a mistranslation or a poor interpretation of context. At the GRLLR Company, we always strive to help our clients and partners as well as we can. Disagreements will always refer to the English or Dutch warranties to rule out contextual mistranslations.