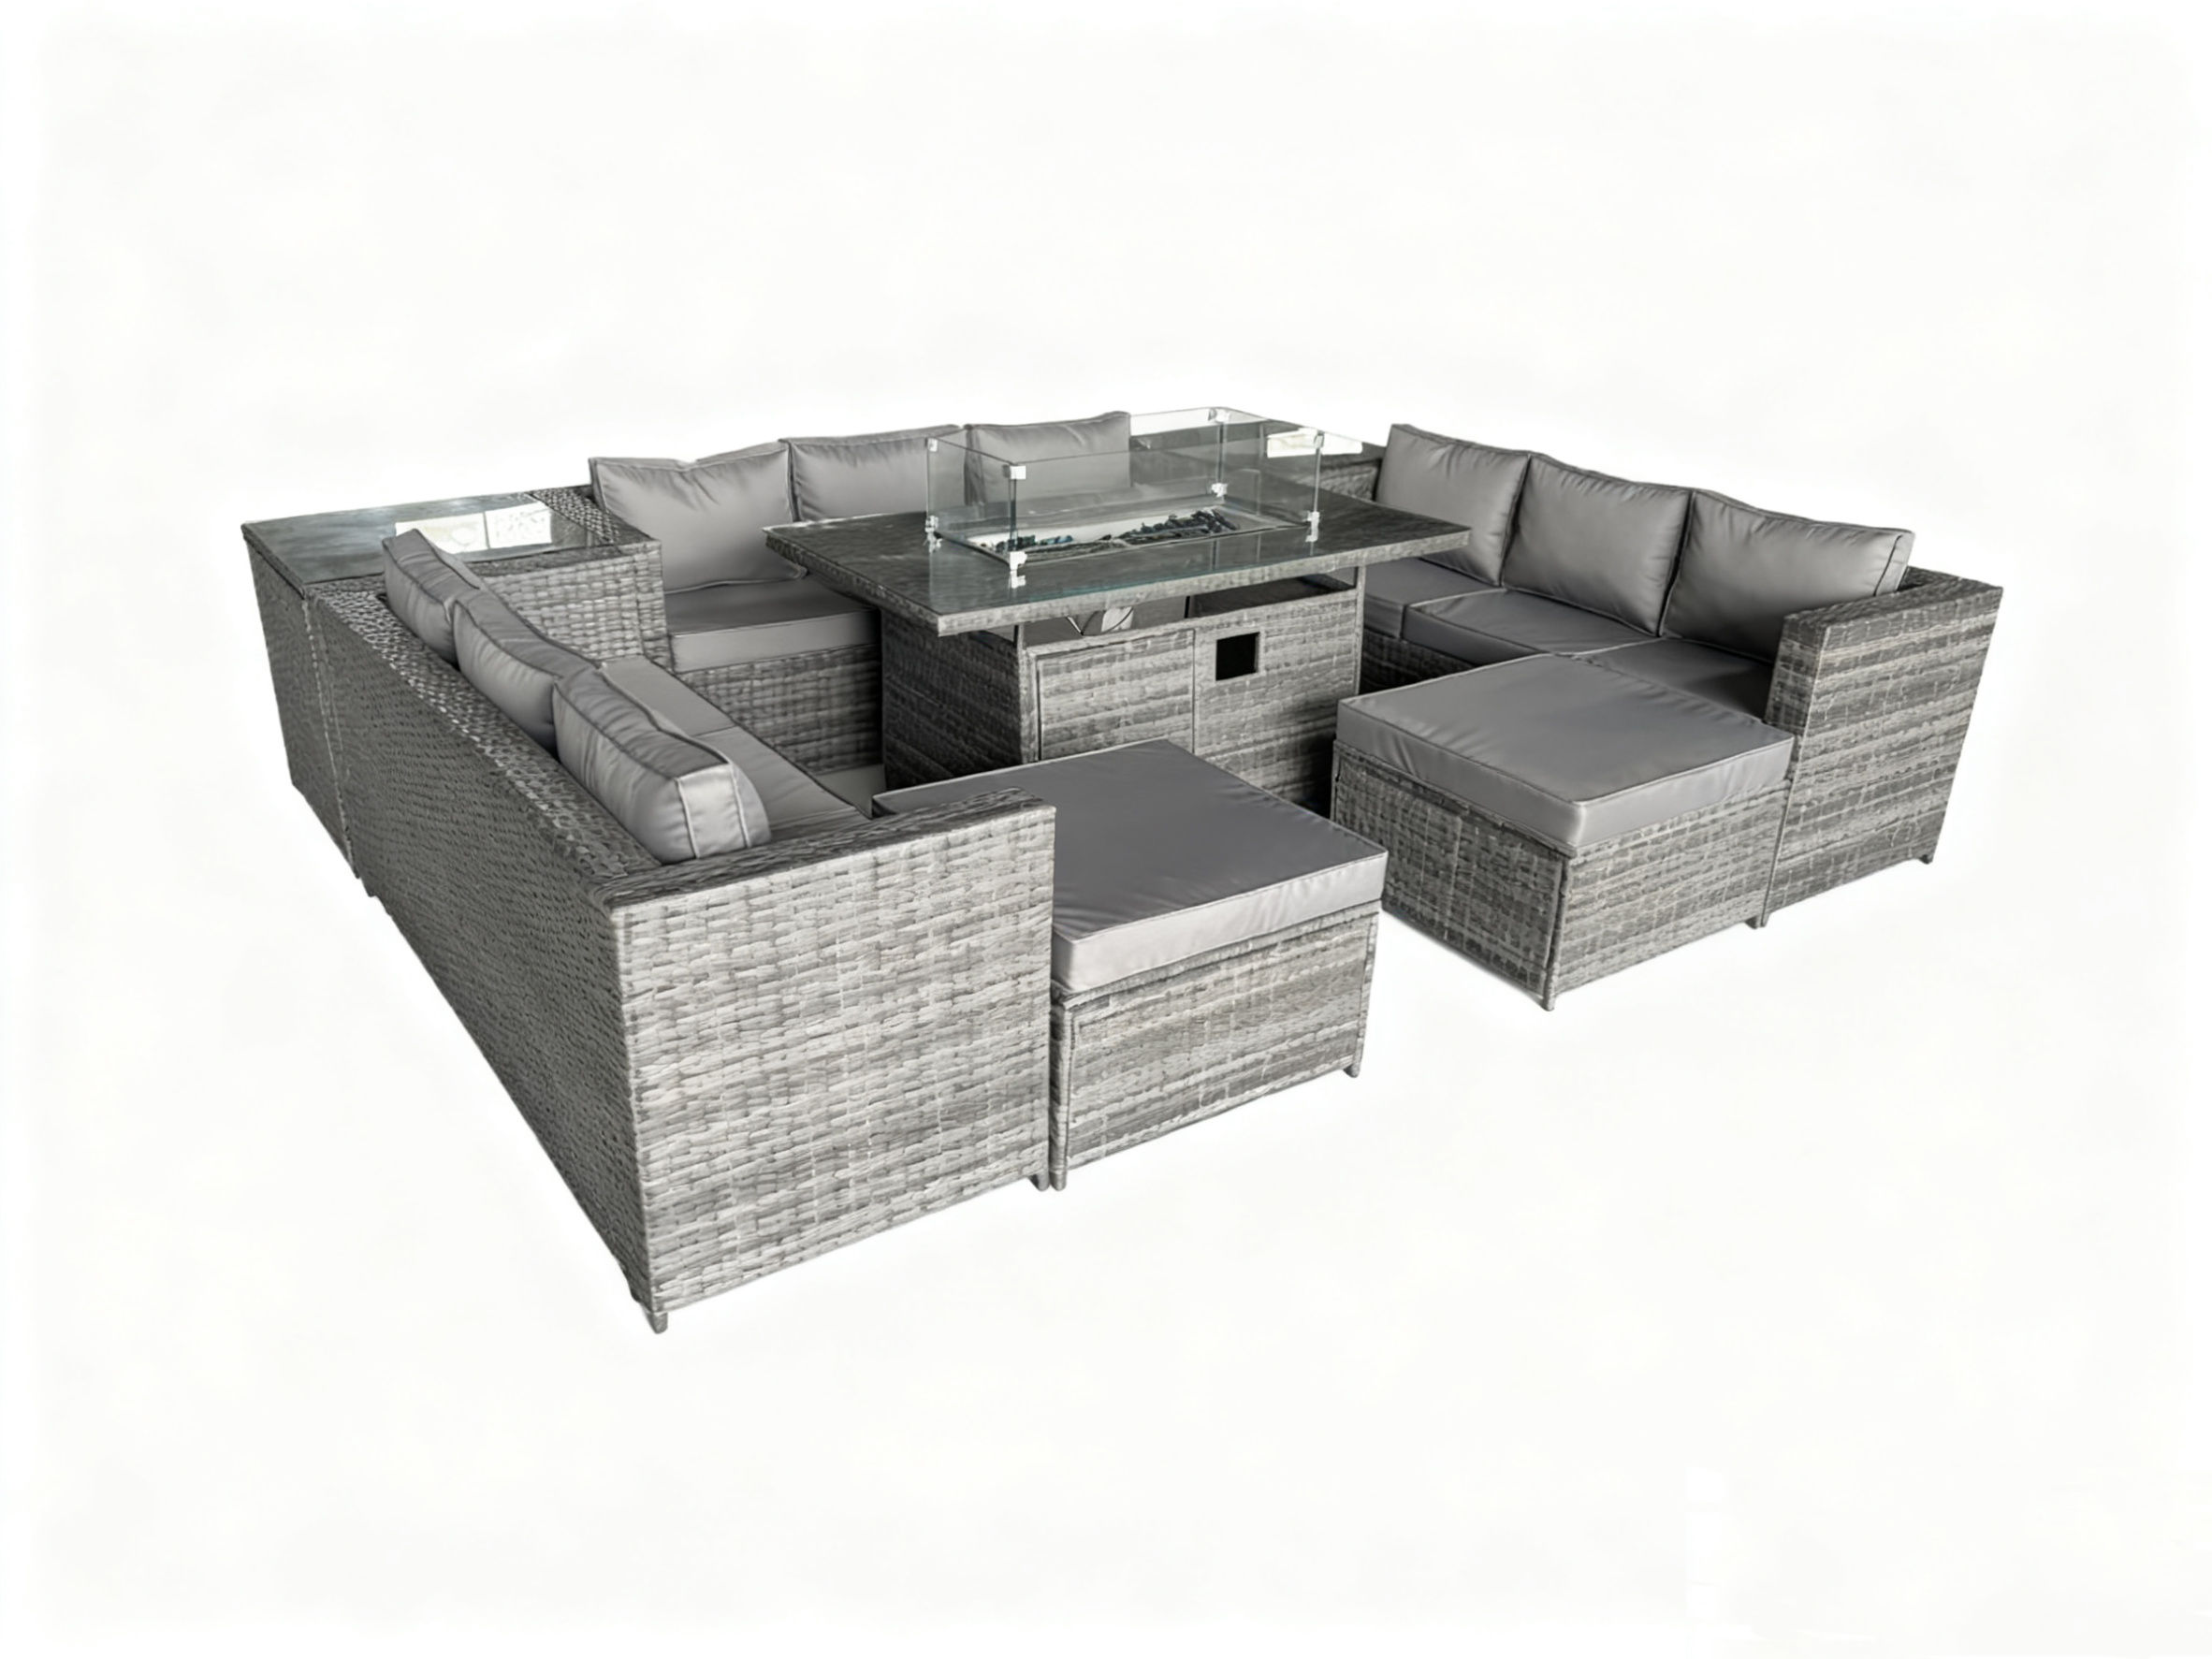
Designed with weather-resistant materials and plush cushions, this set offers the ideal setting for entertaining or relaxing all year round.
Product Information
11-Seater Furniture Set with Firepit
Thank you for choosing our 11-seater rattan furniture set with integrated firepit table - the perfect centrepiece for stylish and spacious outdoor living. Crafted from durable, weather-resistant materials with deep, comfortable cushions, this set is designed for both entertaining and relaxing in all seasons. Please read this manual carefully before assembly and use to ensure safe installation, proper operation, and long-lasting enjoyment.
SKU
216666,216668
Specifications:
Sofa Dimensions (HxWxD):
66cm x 177cm x 65cm
Table Dimensions (HxWxD):
71cm x 140cm x 80cm
Coffee Table Dimensions (HxWxD):
66cm x 65xm x 65cm
Foot Stool Dimensions (HxWxD):
34cm x 65cm x 65cm
Cushions Material:
Polyester
Tabletop:
Tempered Glass
Frame Material:
Poly Rattan & Powder Coated Steel
Rain Cover Material:
210D Waterproof Oxford Fabric
Firepit Rocks Material:
Natural Volcanic Rocks
Firepit Dimensions:
73 x 27.5cm
Seat Cushion Thickness:
9cm
Total Net Weight:
133.5KGs
Sofa Weight Capacity:
270KGs
Foot Stool Capacity:
110KGs
Firepit Weight Capacity:
75KGs
Coffee Table Capacity:
30KGs
GPSR Information
UK
Manufacturer:
Monster Group UK Limited, Monster House
19-23 Alan Farnaby Way,
Industrial Estate Sheriff Hutton,
York
YO60 6PG
Person Responsible:
Rana Harvey, Monster Group UK Limited,
Monster House
19-23 Alan Farnaby Way,
Industrial Estate Sheriff Hutton,
York
YO60 6PG,
England,
+441347878880
EU
Manufacturer:
Monster Group BV,
Van Heemskerckweg 28A & B,
Venlo 5928LL
Netherlands
+441347878880
Person Responsible:
Rana Harvey,
Monster Group BV,
Van Heemskerckweg 28A & B,
Venlo 5928LL,
Netherlands,
+44134787888
Materials
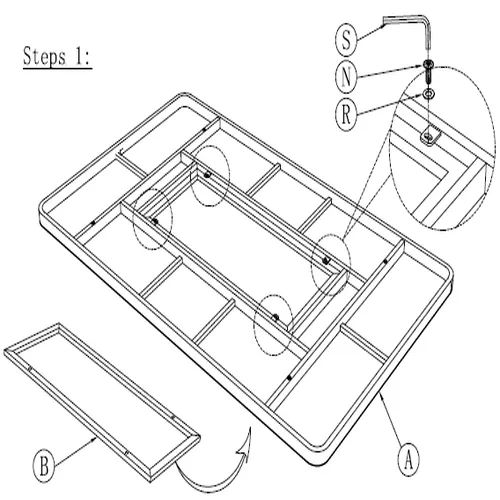
Steps For Assembling the Storage Box
1. Step 1 - Attach Parts K and L to Part M
Place Part M on a flat surface.
Take the large Panel K.
Position it at the back of the base frame.
Line up the holes.
Insert Part U through the holes.
Secure with Part R.
Take Part L.
Attach it to the side of the base frame.
Line up the holes.
Insert Part U and secure with Part R.
Do not fully tighten the bolts yet. Leave slightly loose for adjustment in the next step.
2. Step 2 - Attach Part W
Stand the storage box frame upright.
Take Part W.
Position it at the open front side of the frame.
Line up all the holes with the base and side panels.
Insert Part U through the holes.
Secure with Part R.
Repeat for all connection points shown.
Do not fully tighten the bolts yet. Make sure the frame is square and aligned before tightening completely in the next step.
3. Step 3 - Attach Part N
Place PartN on top of the storage box, and align it with the back panel where the hinge side is shown.
Line up all the holes along the sides.
Insert Part U through the holes.
Secure with Part R.
Tighten all bolts securely.
Check that the lid opens and closes smoothly.
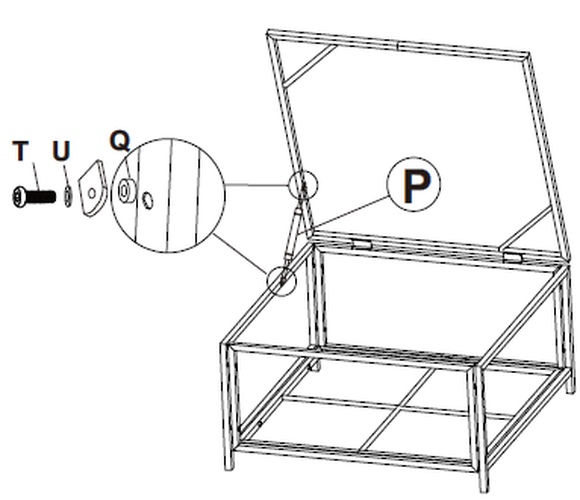
4. Step 4 - Attach Part P
Open the lid and hold it in the upright position.
Take Part P and position it between the lid and the inside of the side panel, as shown.
Line up the holes on the support arm with the holes on the lid and frame.
Insert Part T through Part U and Part Q, then through the holes.
Tighten securely.
Check that the lid opens and stays up properly before use.
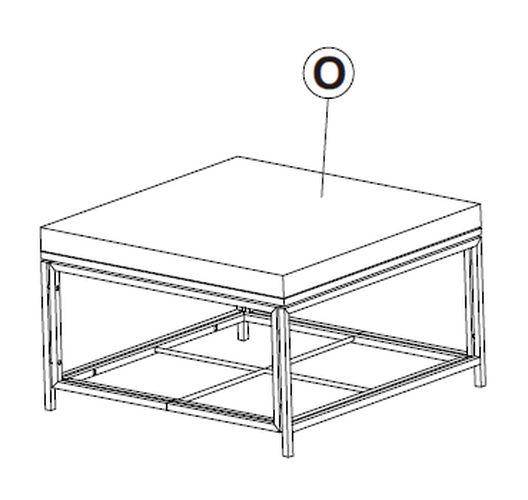
5. Step 5 - Place Part O
Make sure all bolts are fully tightened.
Close the lid completely.
Place the Part O on top of the storage box and center it evenly on all sides.
Check that the lid opens and closes properly with the cushion in place.
Steps For Assembling the Sofa
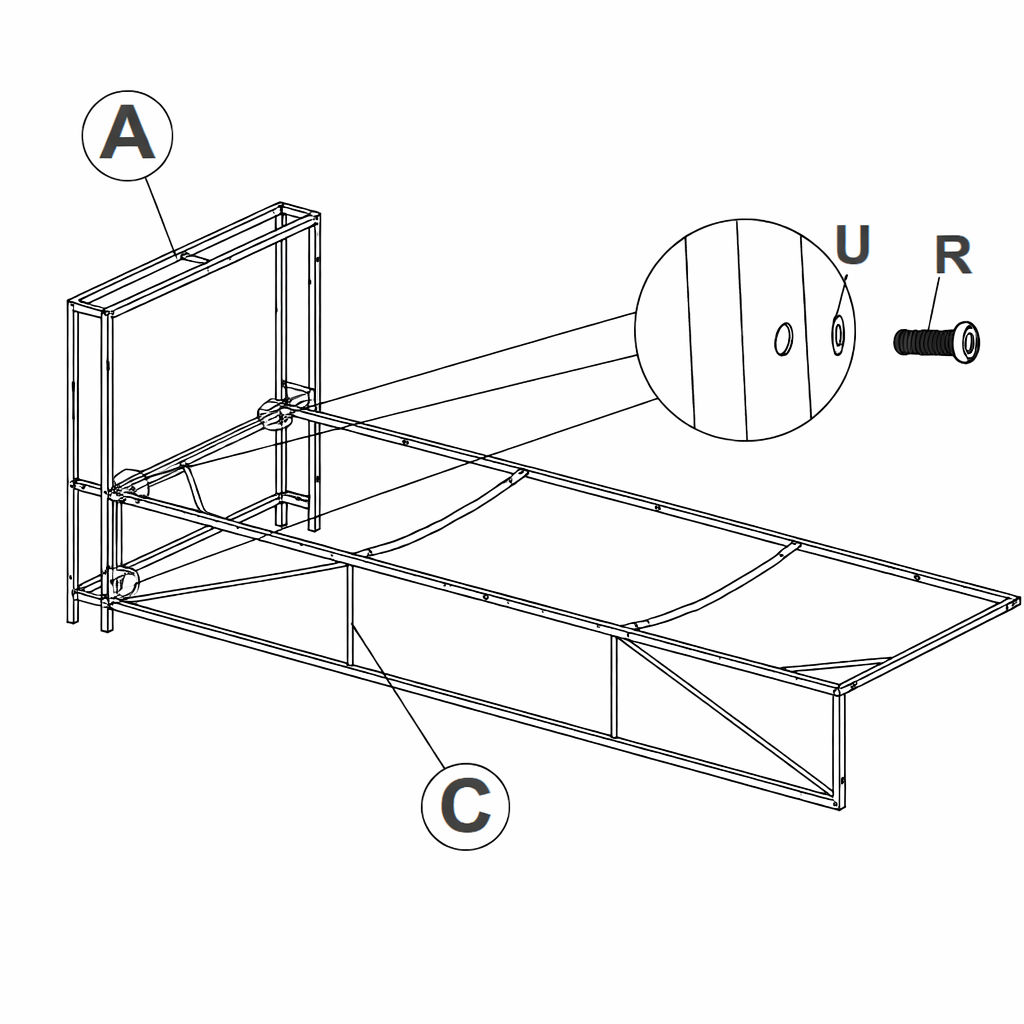
6. Step 1 - Attach Part A to Part C
Place Part C flat on the floor.
Stand Part A upright at the back end of the base frame.
Line up the holes on the back panel with the holes on the base frame.
Line up Part U with the holes.
Tighten Part U using the Part R.
Do not fully tighten yet — leave slightly loose for later adjustment.
Make sure the back panel is straight before moving to the next step.
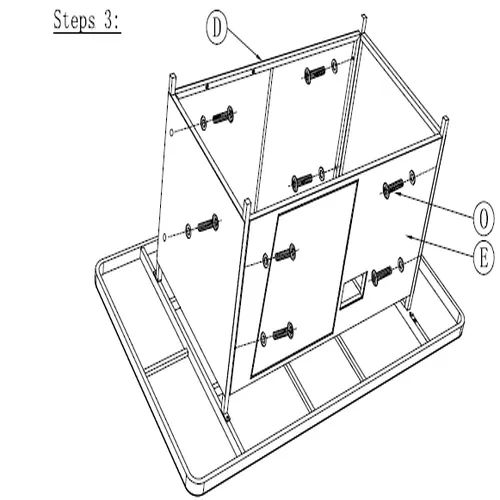
7. Step 2 - Attach Part A to Part D
Take the Part A.
Place it onto the base frame at the open end.
Line up the corner joints as shown in the picture.
Insert Part S into the top corner and tighten.
Position Part D along the back of the base.
Line up all the holes on the frame with the holes on the base.
Insert Part U through each hole.
Secure with Part R.
Do not fully tighten the bolts yet. Leave slightly loose for adjustment in later steps.
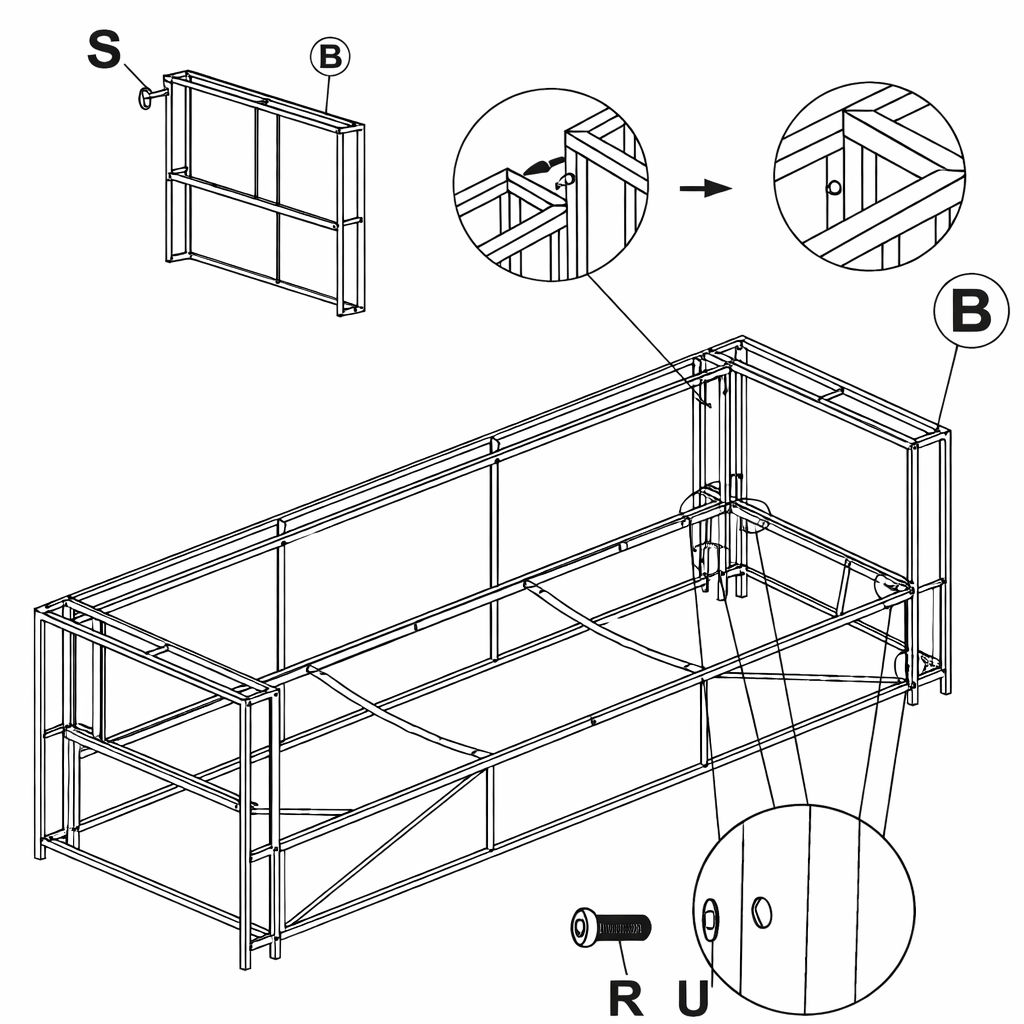
8. Step 3 - Attach Part B
Take the Part B.
Place it on the other open end of the sofa frame.
Make sure the corners fit together properly.
Insert Part S into the top corner and tighten.
Line up the side panel holes with the holes on the base and back frame.
Insert Part U through the holes.
Secure with Part R.
Do not fully tighten all bolts yet. Adjust if needed before tightening completely in later steps.
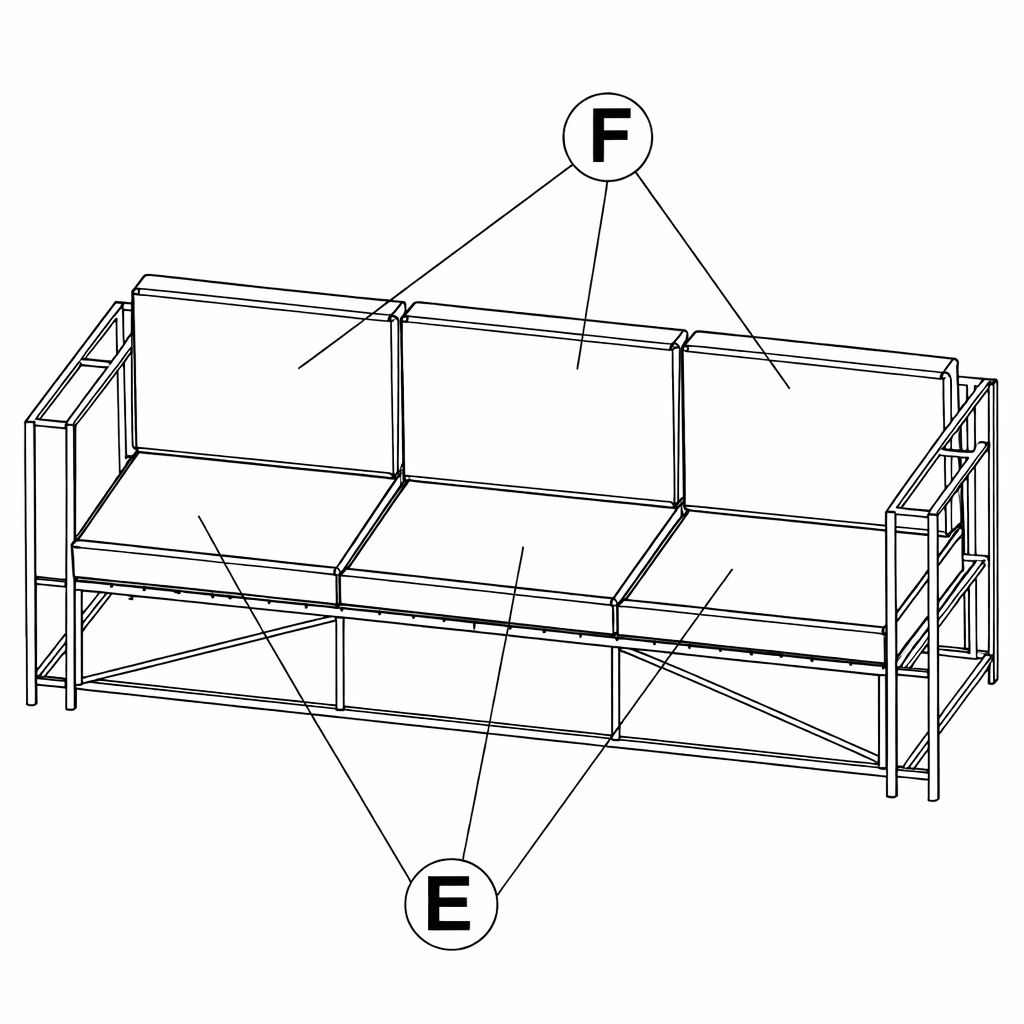
9. Step 4 - Place Parts E and F
Make sure the sofa frame is fully assembled and all bolts are tightened.
Place Part E onto the base of the sofa.
Lay them flat.
Line them up evenly across the frame.
Place PartF against the back frame.
Stand them upright.
Space them evenly.
Adjust the cushions so they sit straight and level.
Steps For Assembling the Coffee Table
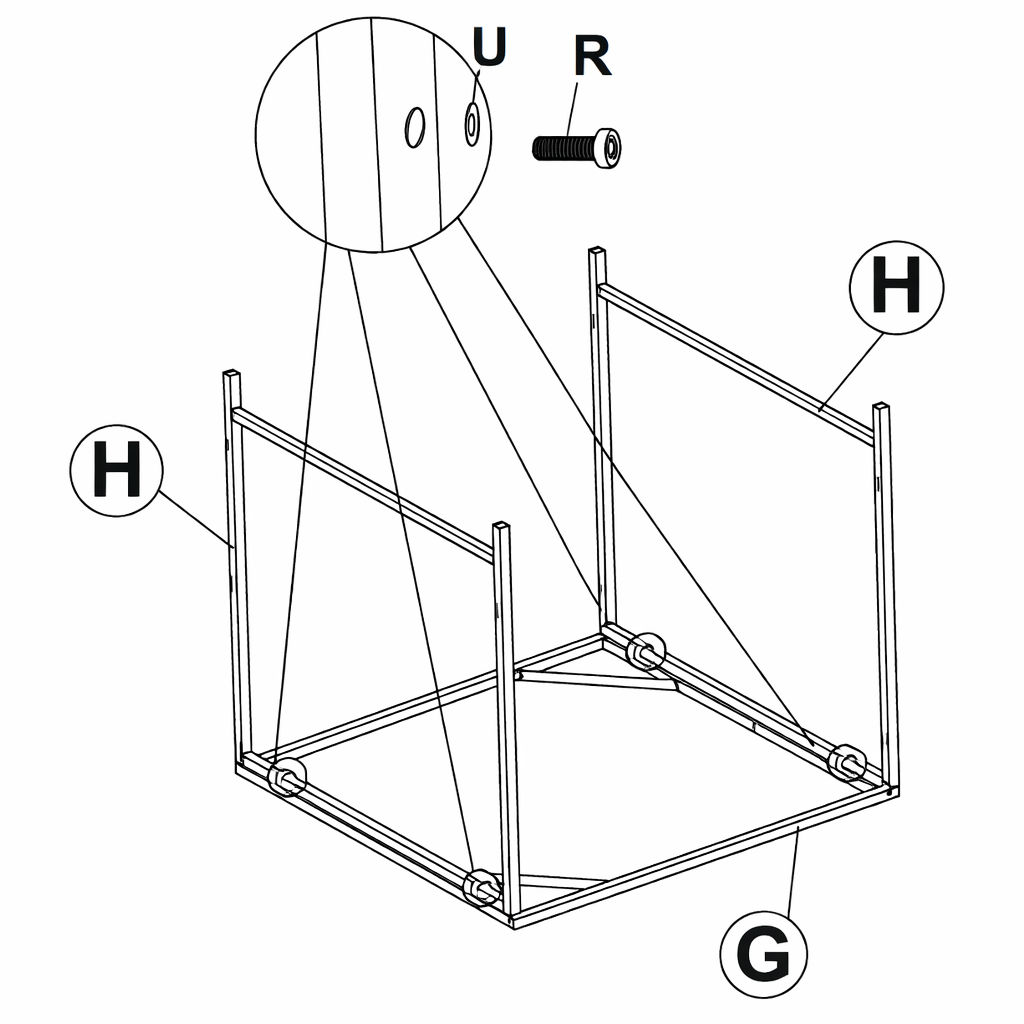
10. Step 1 - Attaching Parts H to Part G
Place PartG upside down on a flat surface.
Take one table leg (Part H).
Position it at one corner of the base frame.
Line up the holes.
Insert Part U through the holes.
Secure with Part R.
Repeat for the remaining leg frames (Part H).
Do not fully tighten the bolts yet. Leave slightly loose for adjustment in the next step.
11. Step 2 - Attach Part I
Place the Part I on top of the table legs.
Make sure all corners line up with the legs.
Insert Part U through the holes at each corner.
Secure with Part R.
Repeat for all connection points shown.
Do not fully tighten the bolts yet. Make sure the frame is straight before tightening.
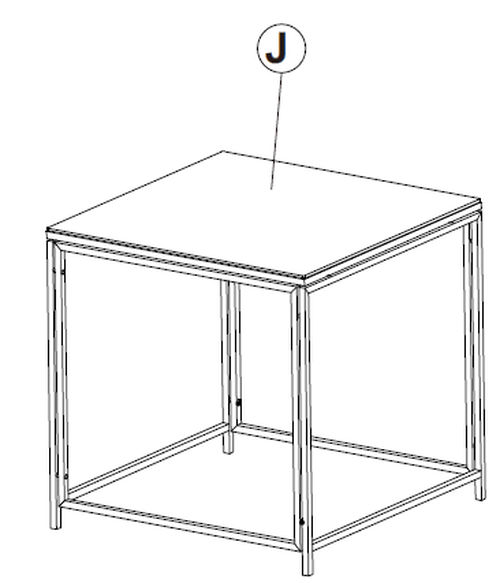
12. Step 3 - Add Part J
Make sure all bolts from previous steps are tightened securely.
Turn the table upright so it stands on its legs.
Place Part J onto the top frame and line up the edges evenly on all sides.
Secure the table top as shown (if pre-drilled holes are provided).
Check that the table is level and stable.
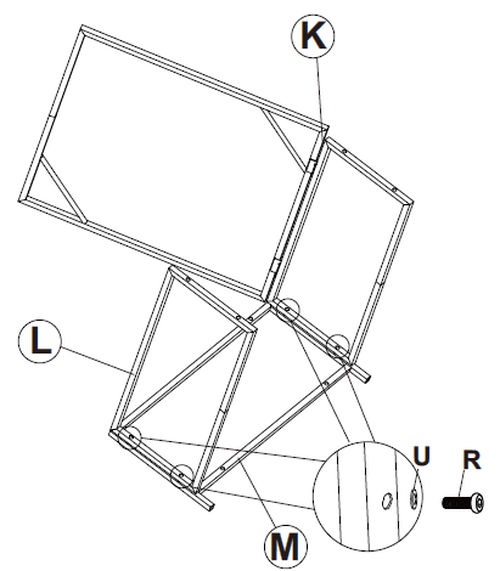
Steps For Assembling the Firepit Table
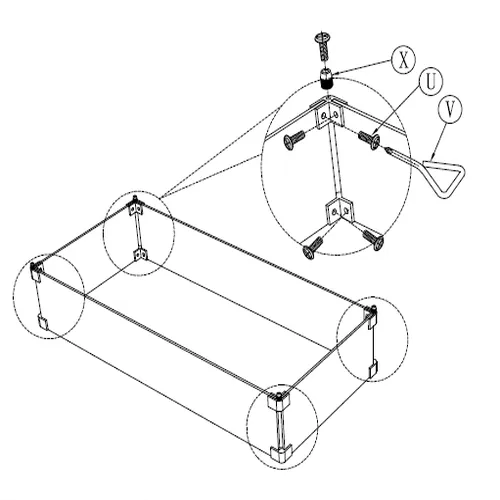
13. Step 1 - Assemble Part B to Part A
Lay Part A flat on the floor with the underside facing up.
Position Part B so it aligns with the central frame on Part A.
Use hardware parts R, N, and S to secure Part B.
Insert Part R through the pre-drilled holes in Part B.
Add Part N and then screw in Part S using the provided Allen key.
Tighten all connections securely but avoid over-tightening to prevent damage.
14. Step 2 - Attach Part C to the Frame
Take Part C and position them upright on the frame assembled in Step 1.
Align the bottom ends of Part C with the pre-drilled holes in the base frame (Part A).
Insert bolts through the holes in Part C and into the base.
Place a Part N on each bolt before tightening.
Secure all bolts firmly using the appropriate tool, but do not over-tighten.
15. Step 3 - Parts D and E
Position Parts D vertically between the upright supports assembled in Step 2.
Place Part E to fit snugly between the two side panels.
Align all panels with the pre-drilled holes on the side frames.
Secure each panel using Parts O, inserting them through the frame and into the panels.
Ensure all screws are tightened evenly and securely using the appropriate tool, but do not over-tighten to avoid damaging the panels.
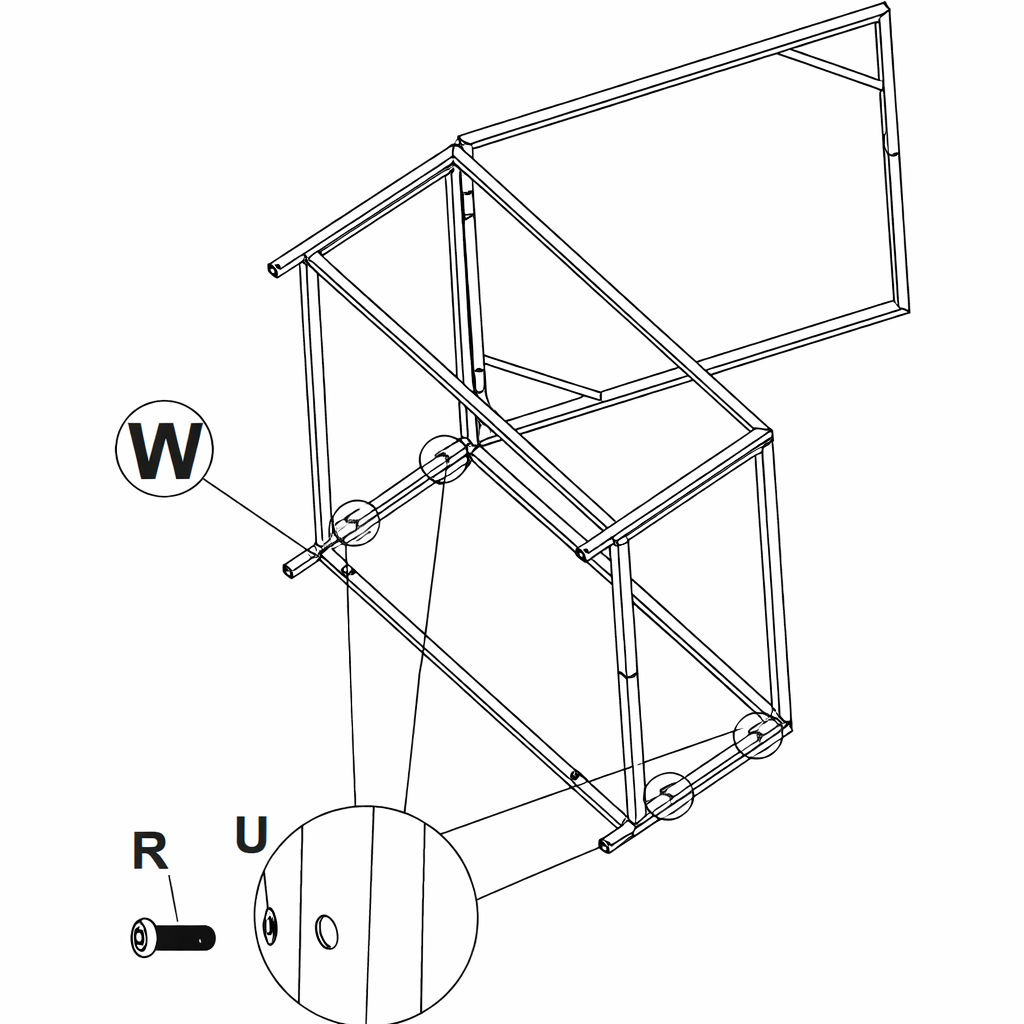
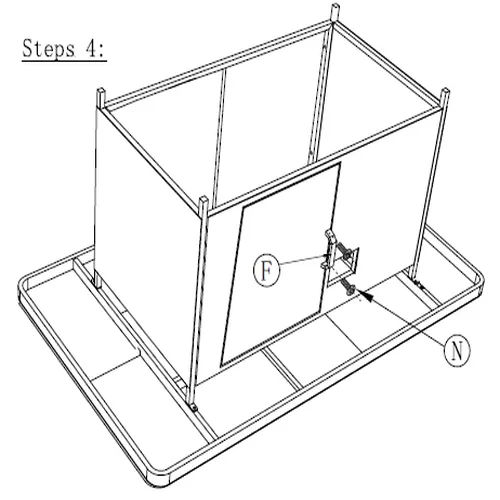
16. Step 4 - Install Part F
Take Part F and align it with the opening on Part E from Step 3.
Attach the hinges on Part F to the frame using the Part N.
Ensure the door opens and closes smoothly and is securely fastened.
Tighten all screws carefully, ensuring the door is level and not over-tightened to prevent hinge damage.
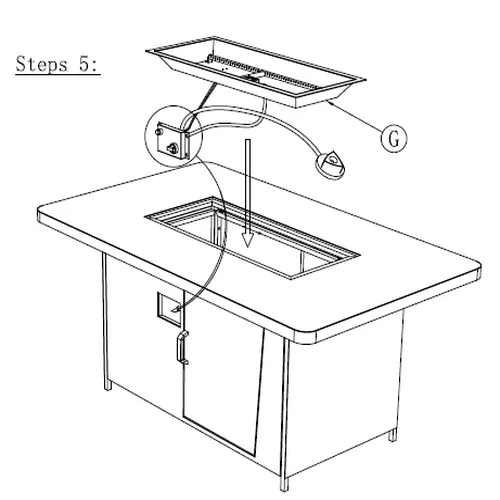
17. Step 5 - Install Part G and Connect Gas Supply Components
Carefully lower Part G into the centre opening of the tabletop, ensuring it is level and properly seated in the support frame.
Align the pre-attached gas hose and igniter wires from the fire pit tray with the internal connection points inside the table housing.
From underneath, route the gas hose through the designated access point and secure it using the fixings provided.
Use Part N, firmly attach the gas control box and igniter components to the frame, as shown in the detailed inset diagram.
Ensure that all gas hose connections are tight and sealed, and that electrical wires are connected correctly to the igniter switch.
Refer to the manufacturer’s instructions for the safe connection of the gas regulator (not shown) to the fuel source (e.g. propane tank).
Confirm that the gas hose is not kinked, pinched, or in contact with any hot or moving parts.
18. Step 6 - Installing the Volcanic Rock and Cover
Attach Part I to Part J using Parts Q, P and T.
Pour Part H into the burner tray.
Place Part J over the opening of the table.
Note: Ensure the cover sits flat and the fire glass does not block the burner ports.
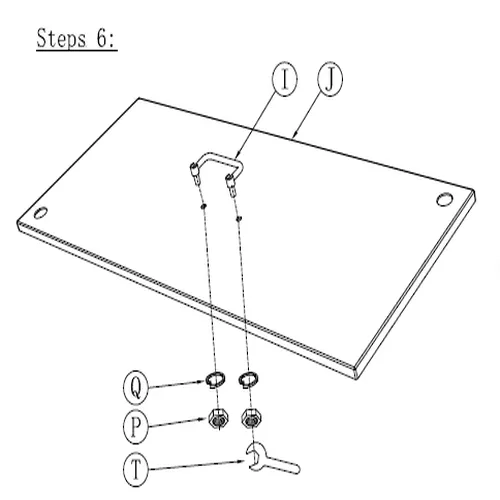
19. Step 7 - Assemble and Install The Glass Panels
Join Parts L and M using Parts K and W.
Secure each corner with Part X.
Tighten all fixings using Parts U and V.
Carefully place the assembled glass panels onto the top of the fire pit table, around the burner opening.
Note: Handle glass panels with care and ensure the wind guard sits evenly and securely.
Maintenance
20. Maintenance
Inspect all bolts, screws, and fixings every month and tighten as necessary to maintain structural integrity.
Check the frame regularly for signs of rust, corrosion, or fatigue, particularly at joints and load-bearing points.
Clean rattan surfaces using a soft cloth or brush and mild soapy water. Avoid pressure washers or harsh abrasives that may damage the material.
Avoid prolonged exposure to direct sunlight to reduce the risk of fading or drying out of the rattan weave.
During prolonged periods of non-use or adverse weather (heavy rain, snow, or frost), store the furniture under cover or indoors if possible.
Wipe down the glass table surface regularly with a non-abrasive glass cleaner. Avoid using rough cloths or scouring pads to prevent scratching.
Check the glass panel for chips or cracks before each use. Do not use the table if the glass is damaged.
Clean the firepit components regularly, removing any food residue, soot, or debris buildup, especially around the burner.
Inspect the firepit's gas regulator, hose, and connections before each use for signs of wear, cracking, or leaks.
Do not allow water to enter the firepit burner. Always use the supplied cover when the firepit is not in use.
Remove and wash cushion covers as needed using a gentle machine wash with mild detergent. Do not tumble dry or iron.
Allow covers to fully air dry before reapplying to cushions to avoid mould or moisture damage.
Troubleshooting
21. Troubleshooting
Please read through the guide below if you have any issues or faults with your device. The information covers and resolves the majority of frequently asked questions.
Q: There are parts missing from my order. A: If there appears to be any part missing from your package contact our Customer Support team via the details on the Contact Us page within 7 days of receipt.
For all other issues please contact our Customer Support department via the details on the Contact page.
Previous stepCopy link to sharePrint / PDFNext step