The T-MECH 3hp Scythe Mower is the ideal machine for tackling rough terrain and large areas with high grass. It excels in sloped orchards, spacious pastures, and uneven ground where ordinary mowers struggle.
Product Information
T-MECH 3hp Scythe Mower
Equipped with a high-quality cutting bar featuring both fixed and movable blades, the T-MECH 3hp Scythe Mower delivers exceptionally clean and effective cutting performance. Its robust power, combined with specially hardened blades, allows it to slice through long grass and thick weeds with ease. The mower also benefits from infinitely height-adjustable outsoles, giving you full control over cutting height for optimal results in any environment.
Weight
58.5KGS
SKU
40932
Cutting Width:
870mm
Cutting Height:
30-80mm
Engine Type:
OHV 4-stroke
Starting mode:
Recoil
Displacement:
159cc Loncin
Rated Engine Power:
3.0kW/3000/min
Fuel Tank Capacity:
1.2L
Oil Capacity:
0.55L
Fuel Type:
Unleaded Petrol 90# Or Above
Oil Type
SAE 15W-40 Or 10W-30
Gearbox Oil
L-CKE-/P-320
GPSR Information
UK
Manufacturer:
Monster Group UK Limited, Monster House
19-23 Alan Farnaby Way,
Industrial Estate Sheriff Hutton,
York
YO60 6PG
Person Responsible:
Rana Harvey, Monster Group UK Limited,
Monster House
19-23 Alan Farnaby Way,
Industrial Estate Sheriff Hutton,
York
YO60 6PG,
England,
+441347878880
EU
Manufacturer:
Monster Group BV,
Van Heemskerckweg 28A & B,
Venlo 5928LL
Netherlands
+441347878880
Person Responsible:
Rana Harvey,
Monster Group BV,
Van Heemskerckweg 28A & B,
Venlo 5928LL,
Netherlands,
+44134787888
Materials
Assembly
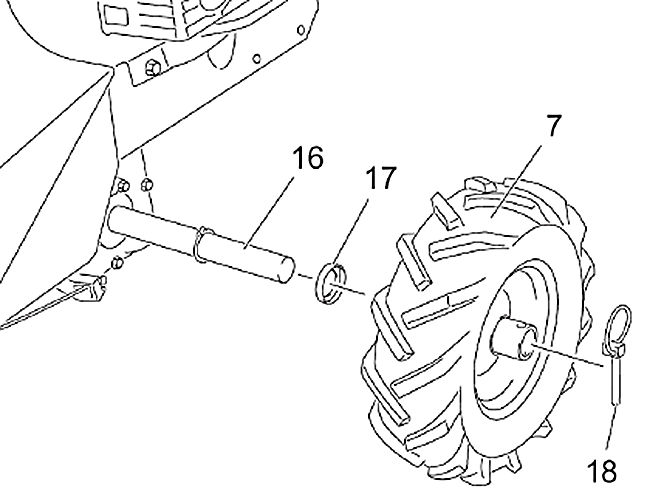
1. Mounting the Wheels
Push the protective cap (17) onto the drive
shaft (16).
Push the wheel (7) with the valve facing
outwards onto the drive shaft (16).
If
necessary, first remove the lynch pin (18) from
the drive shaft (16).
Push the lynch pin (18) through the holes in
the rim of the wheel (7) and the drive shaft
(16).
Close the lynch pin (18).
Repeat the procedure on the other side.
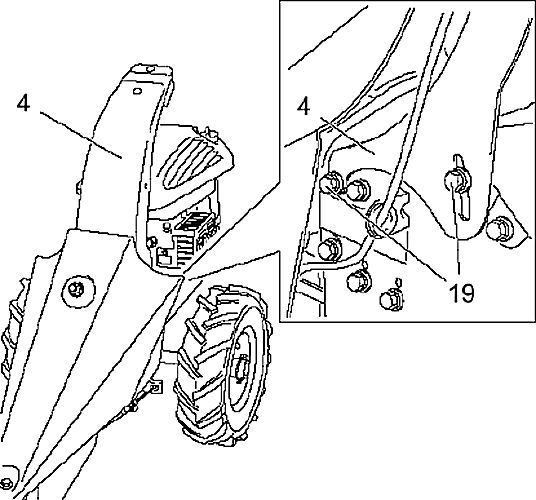
2. Mounting the Arm Housing
Unscrew the screws (19) with the circlip
and the washer on both sides of the product.
Place the arm housing (4) onto the
product and screw down to the product again
with the screws (19).
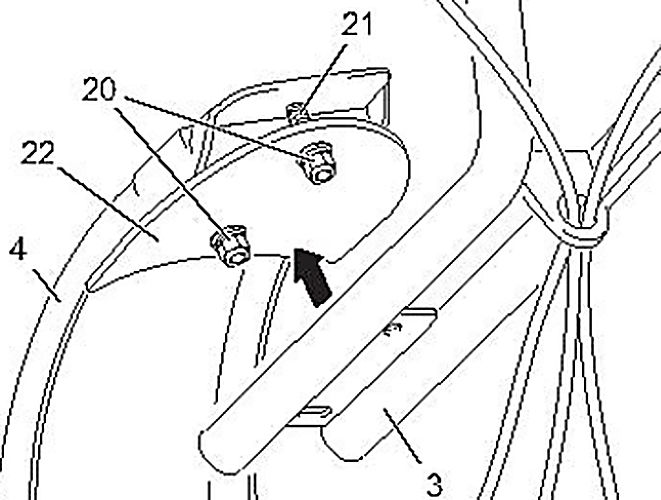
3. Mounting the Steering
Loosen the self-locking nut (20) with the circlip
and the washer from the round-head screw with
square neck (21).
Push the steering (3) onto the round-head screw
with square neck (21).
Screw the self-locking nut (20) with the circlip
and the washer onto the round-head screw with
square neck (21) and tighten it.
Note: Make sure that the vibration damper (22) between the arm housing (4) and the steering (3) is installed.
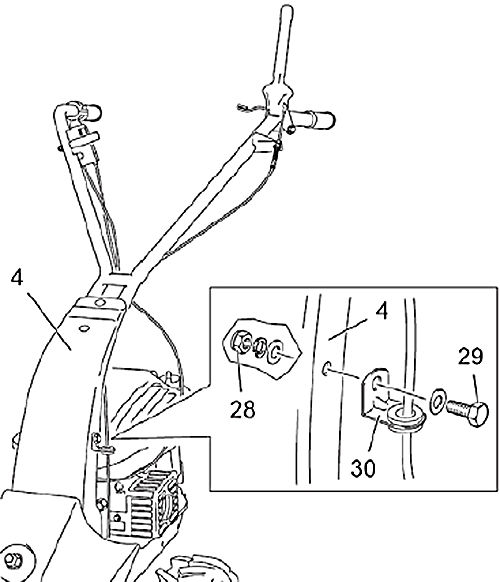
4. Mounting the Bowden Cable Guide
Loosen the self-locking nut (28) with the circlip
and the washer from the screw (29).
Push the screw (29) with the washer through
the hole in the bracket (30) and the arm housing
(4).
Screw the self-locking nut (28) with the circlip
and the washer onto the screw (29) and tighten it.
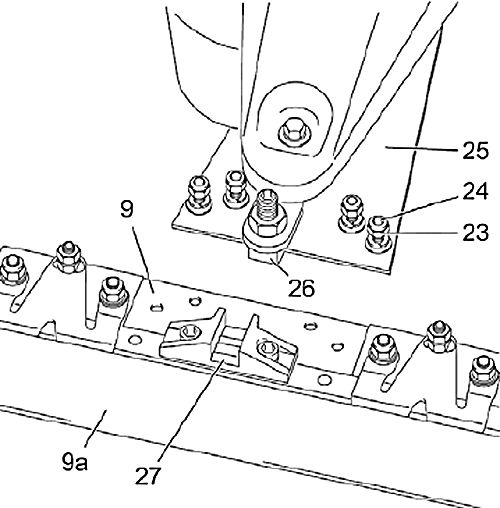
5. Mounting the Cutter
Make sure that the cutting tool guard (9a) is installed on the cutter (9).
Loosen the self-locking nut (23) with the circlip
and the washer from the screw (24) with the washer.
Place the base plate (25) onto the cutter (9).
Direct the sliding block (26) into the guide (27)
on the cutter (9).
Align the cutter (9) and the base plate (25) to
one another
Direct the screw (24) with the washer from below
through the cutter (9) and the base plate (25).
Screw the self-locking nut (23) with the circlip
and the washer onto the screw (24) and tighten it.
6. Setting the Steering Height
Slightly loosen the screws (19) with the circlip
and the washer on both sides of the arm housing
(4).
Set the desired steering height.
Tighten the screws (19) with the circlip and
washer again.
7. Adjusting the Sliding Block
Make sure that the cutting tool guard (9a) is installed on the cutter (9).
The sliding block (26) must always be correctly adjusted. An incorrect adjustment
can result in the cutter jumping out of the guide (27) or damage being caused to
the cutting tool (9).
Secure the adjustment screw (31) against
turning with a suitable tool.
Loosen the nut (32) with a suitable tool.
Change the height of the adjustment screw
(31) by turning.
Protect the adjustment screw (31) against
turning with a suitable tool and tighten the nut
(32) again using an appropriate tool.
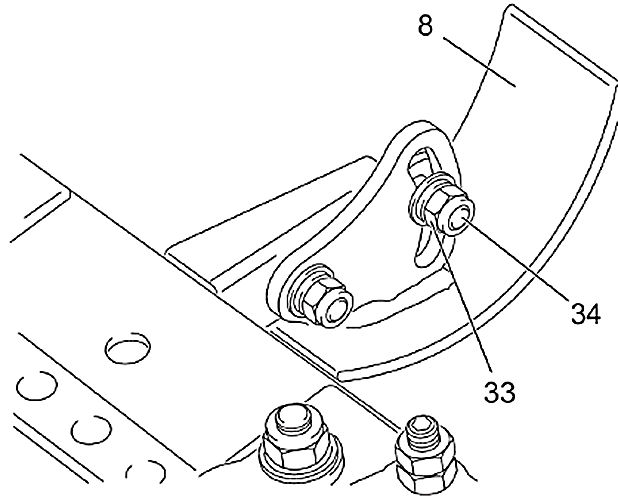
8. Adjusting the Cutting Height
Slightly loosen the self-locking nut (33)
with the circlip and the washer from the
screw (34).
Adjust the height of the ground sliders
(8).
Re-tighten the self-locking nut (33) with
the washer and the screw (34).
WARNING: Risk of injury!Never set the cutting height too low. The ground sliders (8) must still touch the ground. The cutter (9) could become caught in the ground and cause to product to suddenly come to a halt.
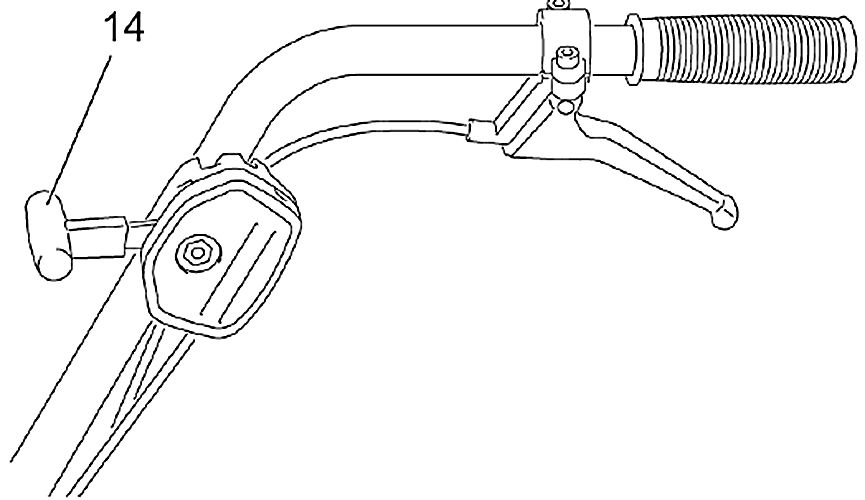
9. Throttle
Throttle (14) in STOP SYMBOL position = Motor off
Throttle (14) in TURTLE SYMBOL position = minimum motor speed
Throttle (14) in RABBIT SYMBOL position = maximum motor speed
Throttle (14) in DIAGONAL SYMBOL position = Choke
Note: if the engine is with petrol pump, it is without choke
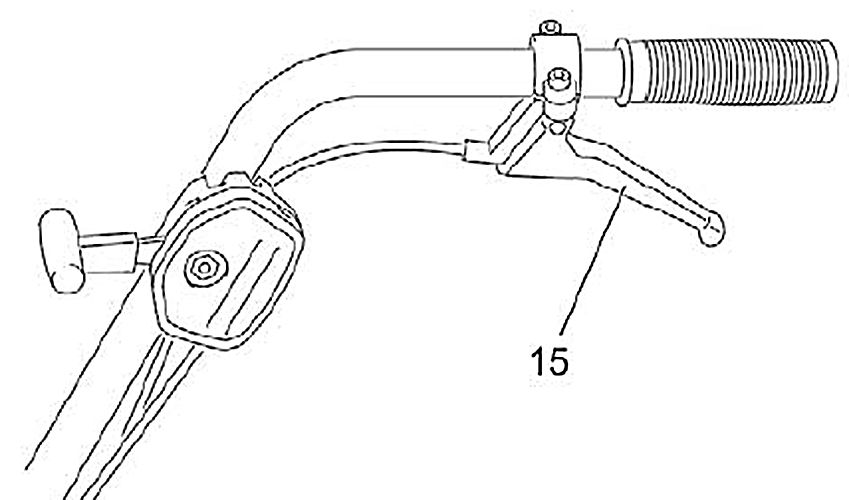
10. Coupling Handles
Coupling Handle for Wheel Drive:
When the coupling handle is released (15),
the cable pull must be completely relieved.
Coupling handle released (15) = product
standstill
Coupling handle (15) pulled = Wheels (7)
begin to move and the product starts
running.
Coupling Handle for Cutting Tool:
When the coupling handle (1) is released,
the cutting tool (9) must not move.
When the
coupling handle is pressed, the cutting tool
(9) must start to move.
The coupling handle
(1) can be locked using the latch (2).
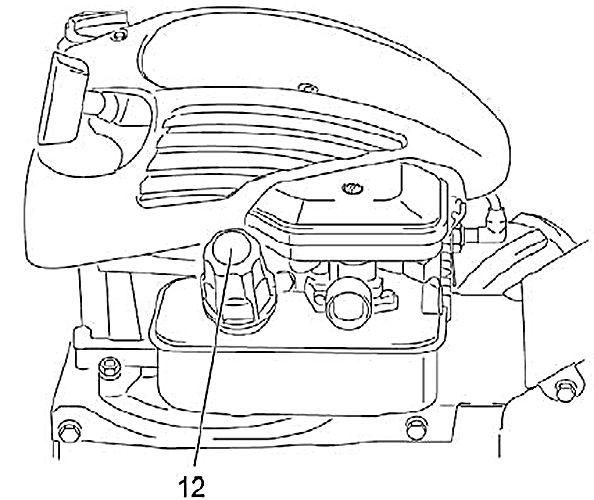
11. Filling With Petrol
DANGER: Risk of injury!Petrol is highly inflammable! Before refuelling, switch off the motor and let it cool down. Closely observe all safety information for handling fuel.
Only use appropriate petrol.
Switch off the motor.
Disconnect the spark plug.
Open and remove the tank cover (12).
Carefully top up the petrol. Do not spill!
– Check the seal in the tank cover for
damage and clean if necessary.
Replace a damaged seal immediately!
Re-tighten the tank cover (12) by hand.
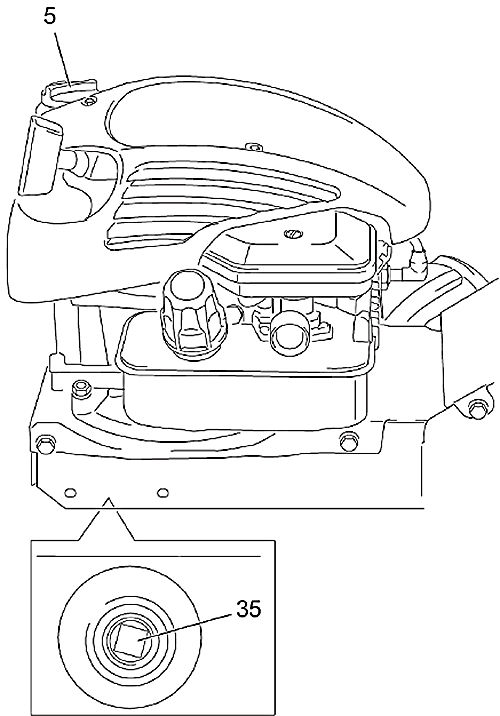
12. Filling With Motor Oil
Switch off the motor.
Disconnect the spark plug.
Unscrew and remove the motor oil filling plug
(5).
Carefully top up the motor oil. Do not spill!
Check the seal in the motor oil filling plug (5)
for damage and clean if necessary.
Replace a damaged seal immediately!
Re-tighten the motor oil filling plug (5) by
hand.
– Check motor oil level.
CAUTION: Product damage! The product is supplied without motor oil. Make sure it is filled with motor oil before using for the first time. The motor oil must be changed after the first five operating hours. The oil level must be checked and topped up refilled each time before using the motor.
13. Filling With Gearbox Oil
Switch off the motor.
Disconnect the spark plug.
Unscrew and remove the gearbox oil filling
plug (36) using a suitable tool.
Carefully top up the gearbox oil. Do not
spill!
Re-tighten the gearbox oil filling plug (36).
CAUTION: Product damage!The product is supplied without gearbox oil. Make sure it is filled with gearbox oil before using for the first time. Operating the gearbox with insufficient oil will damage the gearbox. Contaminated gearbox oil will reduce the service life of the gearbox. Use the specified gearbox oil.
14. Starting and Switching Off the Motor
Check motor oil level.
If the engine is with petrol pump: Set the throttle to the RABBIT SYMBOL position. Press the petrol pump (11)
a maximum of three times. If the engine is with choke then set the throttle to the DIAGONAL position.
Slowly pull the pull-starter (13) straight until you feel a resistance.
Let the pull-starter (13) run in again.
Keep pulling the pull-starter (13) until the motor starts.
If the motor does not start, repeat the starting procedure. After starting the motor, set the
required motor speed using the throttle (14).
To switch off the motor, set the throttle (14) to the STOP symbol position.
Note: Pull the pull-starter out by a maximum of 50cm and let it run back in slowly by hand.
15. Mowing
Start the motor.
Use the throttle to set the motor to the required speed.
Press the coupling handle (1) and keep it pressed.
Pull the coupling handle (15) and keep it pulled.
Switch off the motor after completing the work.
Cleaning and Maintenance
16. Cleaning and Maintenance
WARNING: Risk of injury!Before any maintenance or cleaning work:
Switch off motor.
Allow the product to cool down.
Disconnect the spark plug.
Perform only the maintenance work described here yourself.
Any other work, especially motor maintenance and repairs must be performed by
a trained professional. Improper work can cause product damage and hence
physical injury.
Before each use:
Check the screw connections are tight by hand tightening the screw connections using the appropriate tools.
Check the motor oil level.
Check the tyre pressure using an air pressure gauge.
Check the cable of the pull-starter for damage.
After each use:
Clean the product.
Lubricate the cutting tool with a little bit of lubricating grease.
After the first five operating hours:
Change the motor oil.
Every 25 operating hours or every 3 months:
Clean or replace the air filter.
Remove grass and dirt from rotating parts using a brush or another suitable blunt object.
Clean the covers by wiping down with a slightly damp cloth.
Every 100 operating hours or every 12 months:
Clean or replace the spark plug.
Change the gearbox and motor oil.
Cleaning the product:
WARNING: Risk of injury! Clean the cutting tool carefully. The cutting tool may still move even though the product is switched off.
Careful handling and regular cleaning ensure that the product remains functional and efficient for
a long time.
Clean the product immediately after each use. Dried-on grass is extremely hard and difficult to
remove.
Brush off coarse dirt.
Wipe down the product with a slightly damp cloth.
Never spray the product with water or expose it to water.
Never use cleaning agents or solvents.
Keep ventilation slots clean and free of dust.
17. Checking the Motor Oil Level
Switch off the motor.
Disconnect the spark plug.
Unscrew and remove the motor oil
filling plug (5).
The oil dipstick is fastened to the
motor oil filling plug (5).
Wipe the dipstick clean using a cloth.
Insert the motor oil filling plug (5) with
the dipstick again and screw in.
Unscrew the motor oil filling plug (5) again and pull it out.
Check the oil level.
The oil level should be at the top
marking (A) of the oil dipstick. If the oil level
is below the bottom limit mark (B) of the oil
dipstick, slowly top up with oil until the oil
level reaches the top mark on the oil
dipstick. Do not overfill the product.
Check the seal in the motor oil filling
plug (5) for damage and clean if
necessary.
Replace a damaged seal immediately!
Insert the motor oil filling plug (5) again
and tighten it by hand.
CAUTION: Product damage! The product is supplied without motor oil. Make sure it is filled with motor oil before using for the first time. The oil level must be checked, topped up and refilled each time before using the motor. Operating the motor with insufficient oil will damage the motor. Dirty oil or two-stroke motor oil reduces the service life of the motor. The motor oil must be changed after the first five operating hours. Use the specified motor oil.
18. Draining the Motor Oil
Switch off the motor.
Disconnect the spark plug.
Unscrew and remove the motor oil filling
plug (5).
Hold a collecting container below the
motor oil drain plug (35).
Unscrew and remove the motor oil drain
plug (35) using a suitable tool.
Allow the motor oil to drain completely.
Insert the motor oil drain plug (35) and
tighten using a suitable tool.
Top up motor oil before using again.
CAUTION: Product damage!The product is supplied without motor oil. Make sure it is filled with motor oil before using for the first time. The oil level must be checked and topped up refilled each time before using the motor. Operating the motor with insufficient oil will damage the motor. Dirty oil or two-stroke motor oil reduces the service life of the motor. The motor oil must be changed after the first five operating hours. Use the specified motor oil.
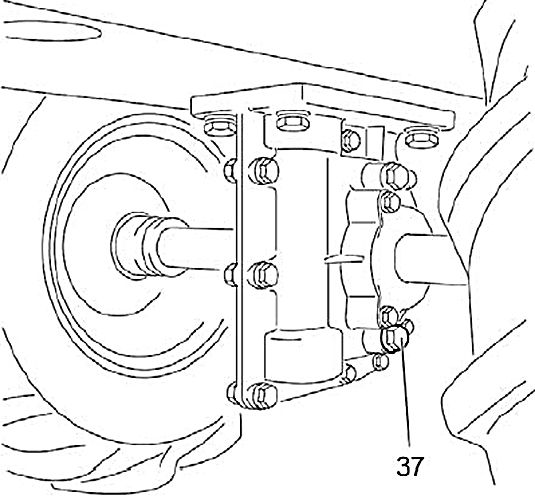
19. Draining the Gearbox Oil
Switch off the motor.
Disconnect the spark plug.
Hold a collecting container below the
gearbox oil drain plug (37).
Unscrew and remove the gearbox oil filling
plug (36) and gearbox oil drain plug (37) using a
suitable tool.
Allow the gearbox oil to drain completely.
Insert the gearbox oil drain plug (37) and
tighten using a suitable tool.
Top up gearbox oil before using again.
CAUTION: Product damage!The product is supplied without motor oil. Make sure it is filled with motor oil before using for the first time. The oil level must be checked and topped up refilled each time before using the motor. Operating the motor with insufficient oil will damage the motor. Dirty oil or two-stroke motor oil reduces the service life of the motor. The motor oil must be changed after the first five operating hours. Use the specified motor oil.
20. Cleaning / Replacing the Air Filter
Switch off the motor.
Disconnect the spark plug.
Remove the bolts and air filter cover. Be careful to prevent dirt and debris from falling into the
air filter base opening.
Remove the foam element or paper element.
Check, clean or replace the damaged air cleaner parts.
Reinstall the air filter parts, then bolt and screw down it.
CAUTION:The product must never be operated without the air filter, as this can cause damage to the motor. The air filter must be replaced if it is damaged or badly contaminated.
WARNING: Never clean the air filter element with gasoline or low flash-point detergents, or explosion may happen.
CAUTION:Clean the foam filter with soapy water, blow the paper element with compressed air or lightly tap off dust and never dry to brush.
21. Cleaning / Replacing the Spark Plug
Switch off the motor.
Pull off the spark plug connector (40).
Unscrew the spark plug (41).
Check the electrode for discolouration.
Standard colour: light brown
Check the electrode distance.
Correct distance: 0.7 mm to 0.8 mm
Cleaning the spark plug:
Remove rust from the electrode with a wire brush.
Replacing the spark plug:
Insert a cleaned or new spark plug and tighten by hand.
Tighten hand-tightened spark plug by approx. quarter of a rotation using the spark plug
wrench. Do not tighten spark plug too tight, otherwise the threads will be damaged.
Replace the spark plug connector (40) firmly on the spark plug.
CAUTION: Product damage! To clean the spark plug, use only wire brushes with brass bristles. Bristles of any other material will damage the electrode!
CAUTION:
Product damage!
Fit the spark plug only when motor is cold.
22. Storage and Transport
Storage:
Let the product cool before storing.
Store the product in a dry, well-ventilated place.
For longer downtimes (3 months or longer):
Always remove the petrol from the product before storing for longer periods.
Empty the tank.
Start the motor and let it run until the motor switches off by itself.
Transportation in a vehicle:
Allow the product to cool down.
Empty the tank.
Secure the product to stop it slipping and tipping over.
WARNING: Risk of injury! The motor must be switched off during maintenance and cleaning work and when transporting without its own drive!
23. Disposal
Disposing of the product:
Do not dispose of the product with the household waste! Proper disposal is mandatory. Information
can be obtained from the responsible waste disposal facility.
Disposing of packaging:
The packaging consists of cardboard and appropriately marked films, which can be recycled.
– Take these materials to a recycling facility.
CAUTION: Environmental damage, fire hazard! Avoid damage caused by leaking petrol, motor oil or gearbox oil: Remove all operating media before disposing of the product.
Troubleshooting
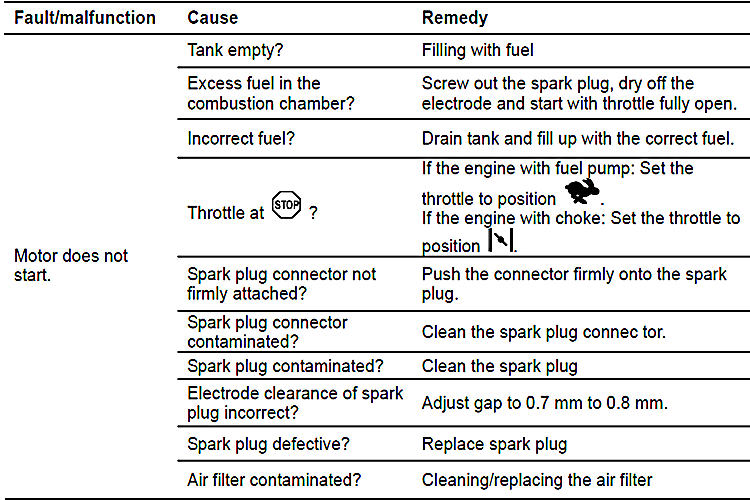
24. Troubleshooting
Malfunctions are often caused by minor faults. You can easily remedy most of these yourself.
Please consult the above table before contacting the dealer. You will save yourself a lot of
trouble and possibly money too.
WARNING: Risk of injury! Improper repairs can result in the product functioning unsafely. This endangers yourself and your environment.
Previous stepCopy link to sharePrint / PDFNext step