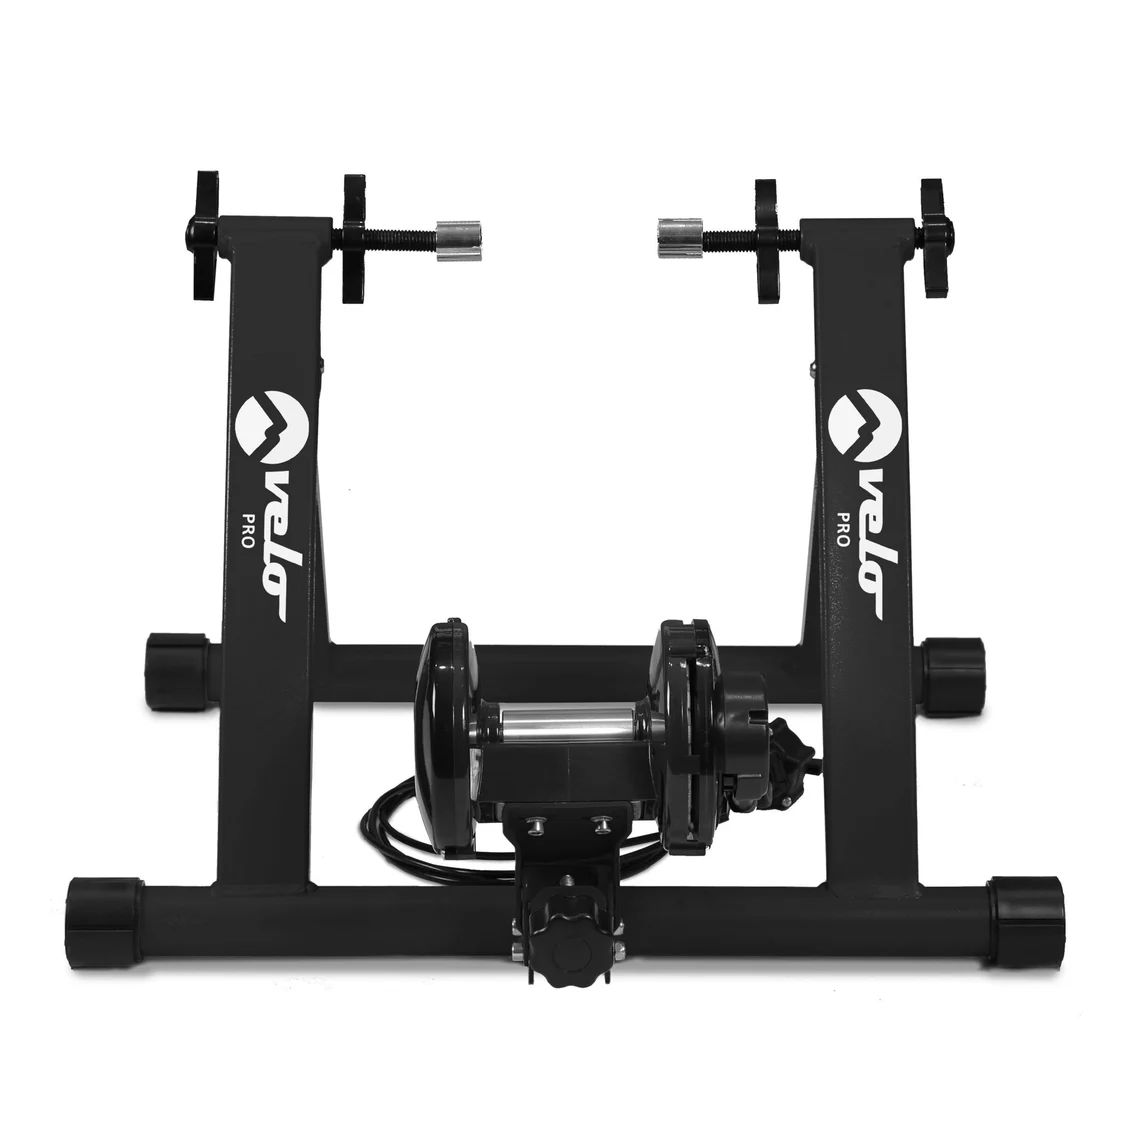
Take your cycling indoors with the Velo Pro Magnetic Turbo Trainer – a reliable and versatile training solution for cyclists who want to stay in peak condition all year round.
Product Information
Turbo Trainer & Mat Bundle
The Velo Pro Magnetic Turbo Trainer is the ideal solution for transforming your bike into a stationary exercise bike, allowing you to train indoors year-round. With 6 handlebar-mounted resistance settings, you can easily adjust the intensity to simulate challenging hill climbs or smooth country lane spins, giving you a customisable cycling experience.
Built with high-quality powder-coated steel and a heavy-duty magnetic alloy roller, this trainer is designed for durability and performance, supporting bikes up to 120kg. It's compatible with a wide range of bikes, including mountain bikes, road bikes, hybrid bikes, and gravel bikes with 26”–28” and 700C tyres.
SKU
30328 30329 30330 30331
Colours Available
Black, Red, Silver, White
GPSR Information
UK
Manufacturer:
Monster Group UK Limited, Monster House
19-23 Alan Farnaby Way,
Industrial Estate Sheriff Hutton,
York
YO60 6PG
Person Responsible:
Rana Harvey, Monster Group UK Limited,
Monster House
19-23 Alan Farnaby Way,
Industrial Estate Sheriff Hutton,
York
YO60 6PG,
England,
+441347878880
EU
Manufacturer:
Monster Group BV,
Van Heemskerckweg 28A & B,
Venlo 5928LL
Netherlands
+441347878880
Person Responsible:
Rana Harvey,
Monster Group BV,
Van Heemskerckweg 28A & B,
Venlo 5928LL,
Netherlands,
+44134787888
1. Maintenance Advice
Ensure you have read and fully understood the instruction manual and safety advice before using this product.
Inspect the turbo trainer for any visible signs of wear, damage, or corrosion before each use, including the resistance unit, frame, clamps, bolts, and adjustment mechanisms. Do not use the trainer if any damage is present.
Clean the frame and all metal components regularly with a soft, damp cloth and mild detergent. Do not use abrasive cleaners or solvents, as these can damage the surface and components.
Ensure that the magnetic resistance unit is kept free of dust, sweat, and debris. Use a dry cloth to gently wipe it after each session. Avoid spraying liquid directly onto the resistance unit or any electrical components.
Periodically check all bolts, screws, and fasteners to ensure they are tight and secure. Use appropriate tools and torque settings recommended in the instruction manual.
Examine the axle clamps or quick-release mechanisms for wear or misalignment. Ensure they are not deformed and that they securely hold the bicycle in place without excessive force.
Inspect the roller that contacts the rear tyre for flat spots, uneven wear, or embedded debris. Clean it with a soft cloth and rotate it manually to check for smooth operation.
Lubricate moving mechanical joints, hinges, and pivot points lightly using a bicycle-appropriate lubricant every few months or as recommended by the manufacturer. Avoid over-lubricating, as excess oil may attract dust and dirt.
Confirm that the resistance adjustment mechanism functions correctly, with no sticking, excessive noise, or slipping during use. If resistance fluctuates unexpectedly, inspect for loose cables, debris, or internal wear.
Always place the trainer on a level surface when in use and ensure the mat is flat and undamaged to prevent instability and vibration during operation.
Wipe down the mat after each training session with a damp cloth to remove sweat, dust, and grime. Allow it to air dry completely before storage to prevent mould and odour.
Store both the turbo trainer and mat in a cool, dry place away from direct sunlight, excessive humidity, or corrosive environments when not in use.
Do not expose the turbo trainer to rain or immerse it in water, as this may damage internal components and reduce product lifespan.
Avoid dropping or applying excessive force to the resistance unit, frame, or moving parts. Impacts can cause internal misalignment or performance issues not visible externally.
Regularly test the unit’s stability by gently rocking the mounted bike side-to-side to ensure the trainer holds firm and level. Adjust feet or stabilisers as needed.
Replace any worn or damaged parts immediately using manufacturer-approved components only. Do not attempt to modify the trainer or mat.
Schedule a full inspection and servicing of the turbo trainer annually if used frequently (e.g. more than 3 times per week), or as recommended by the manufacturer.
Keep children and pets away from the turbo trainer during and after use, especially while cooling down or during maintenance activities.
Dispose of worn components or the trainer itself in accordance with local regulations for metal, plastic, or electronic waste.
2. Troubleshooting
WHAT DO I DO IF THERE ARE MISSING PARTS FROM MY ORDER?
If there appears to be any part missing from your order, contact our friendly and helpful Customer Support Team within 7 days of receipt.
FOR ALL OTHER ISSUES, PLEASE CONTACT OUR CUSTOMER SUPPORT TEAM.
3. Installing Your Bike
Step 1 - Unfold the frame and place it on a level floor
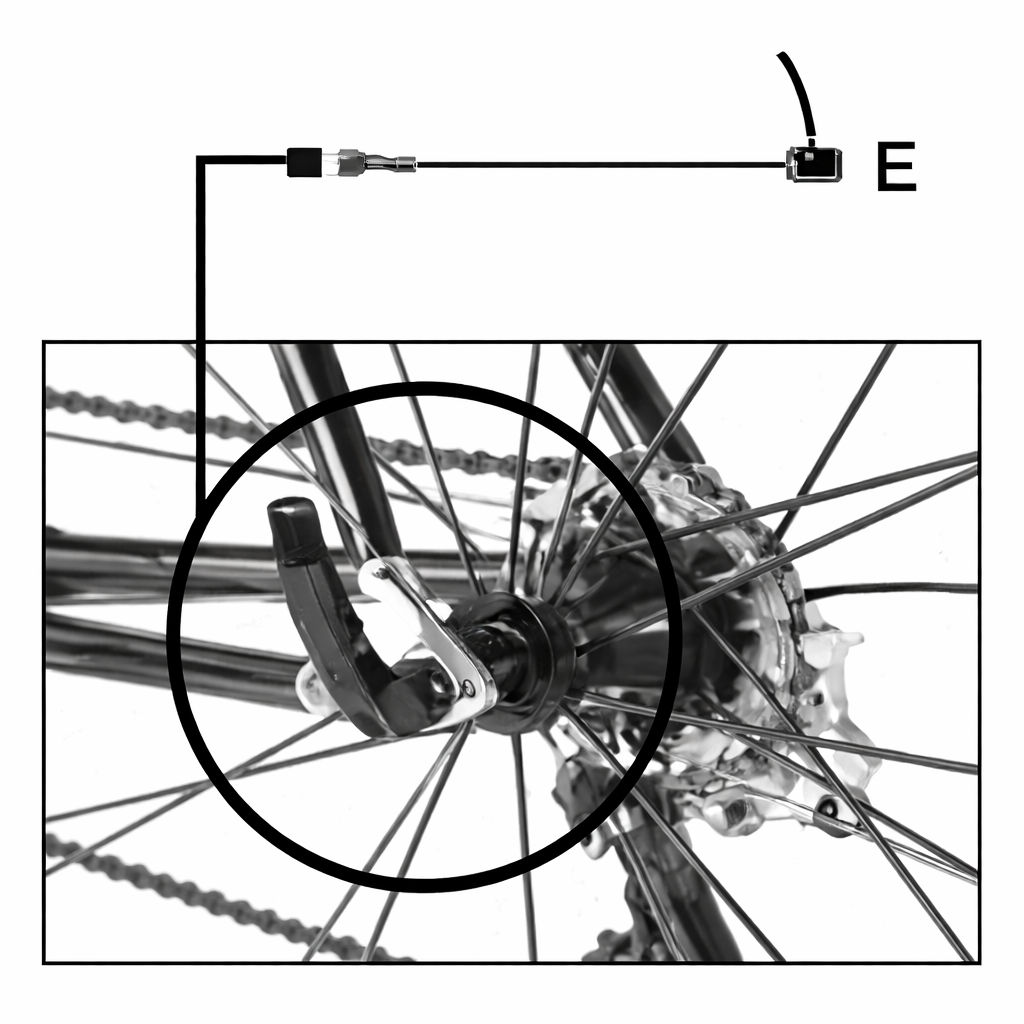
Step 2 - Replace the quick release skewer on the rear wheel of your bike with the skewer E included with the trainer. This assures ideal clamp fitting and stability.
Step 3 - Before placing the bike in the trainer, rotate the right side hub-clamp D and release the wing nut A or adjust the wing nut B on the left side to create a wide clearance between the couplings.
Step 4 - Install the bike's rear hub between the couplings and adjust wing nuts C and A to lock onto the rear hub. Then adjust wing nuts B to lock against the trainer.
Note- Do not over tighten!
Step 5 - Ensure knob F is fitted correctly as shown through the barrel bolt.
Step 6 - Adjust knob F to sit on the roller tightly against the tire to prevent the tire from slipping. Make sure that the tire is properly fitted.
Step 7 - Attach the speed controller G to the bike handle.
Note - The resistance controller is designed to fit different sized handlebars. Please remove packing pieces if not required. Please do not overtighten as this may result in breakage, the rubber inserts will prevent slippage.
4. Removing Your Bike From The Trainer
Step 1 - Firstly rotate the adjustable knob F to release the roller from the bicycle tyre.
Step 2 - Then pull the lever A up or rotate the wing nut A and loosen the wing nuts to draw out the bicycle.
Previous stepCopy link to sharePrint / PDFNext step