Introducing the Wall Mounted Cable Pulley Machine – a compact yet powerful solution for full-body strength training. Featuring an 80kg weight stack and a variety of premium attachments including D-handles, lat pulldown bar, bicep bar, tricep rope, and ankle strap, this machine is designed to support a wide range of exercises from upper body pulls to lower body kick-outs. Built with a sturdy steel frame and supplied with all necessary wall fittings and fixtures, it delivers gym-quality performance while maximising space and convenience in your home or studio setup.
To assemble the base and support structure of the Wall Mounted Cable Pulley Machine, follow these steps:
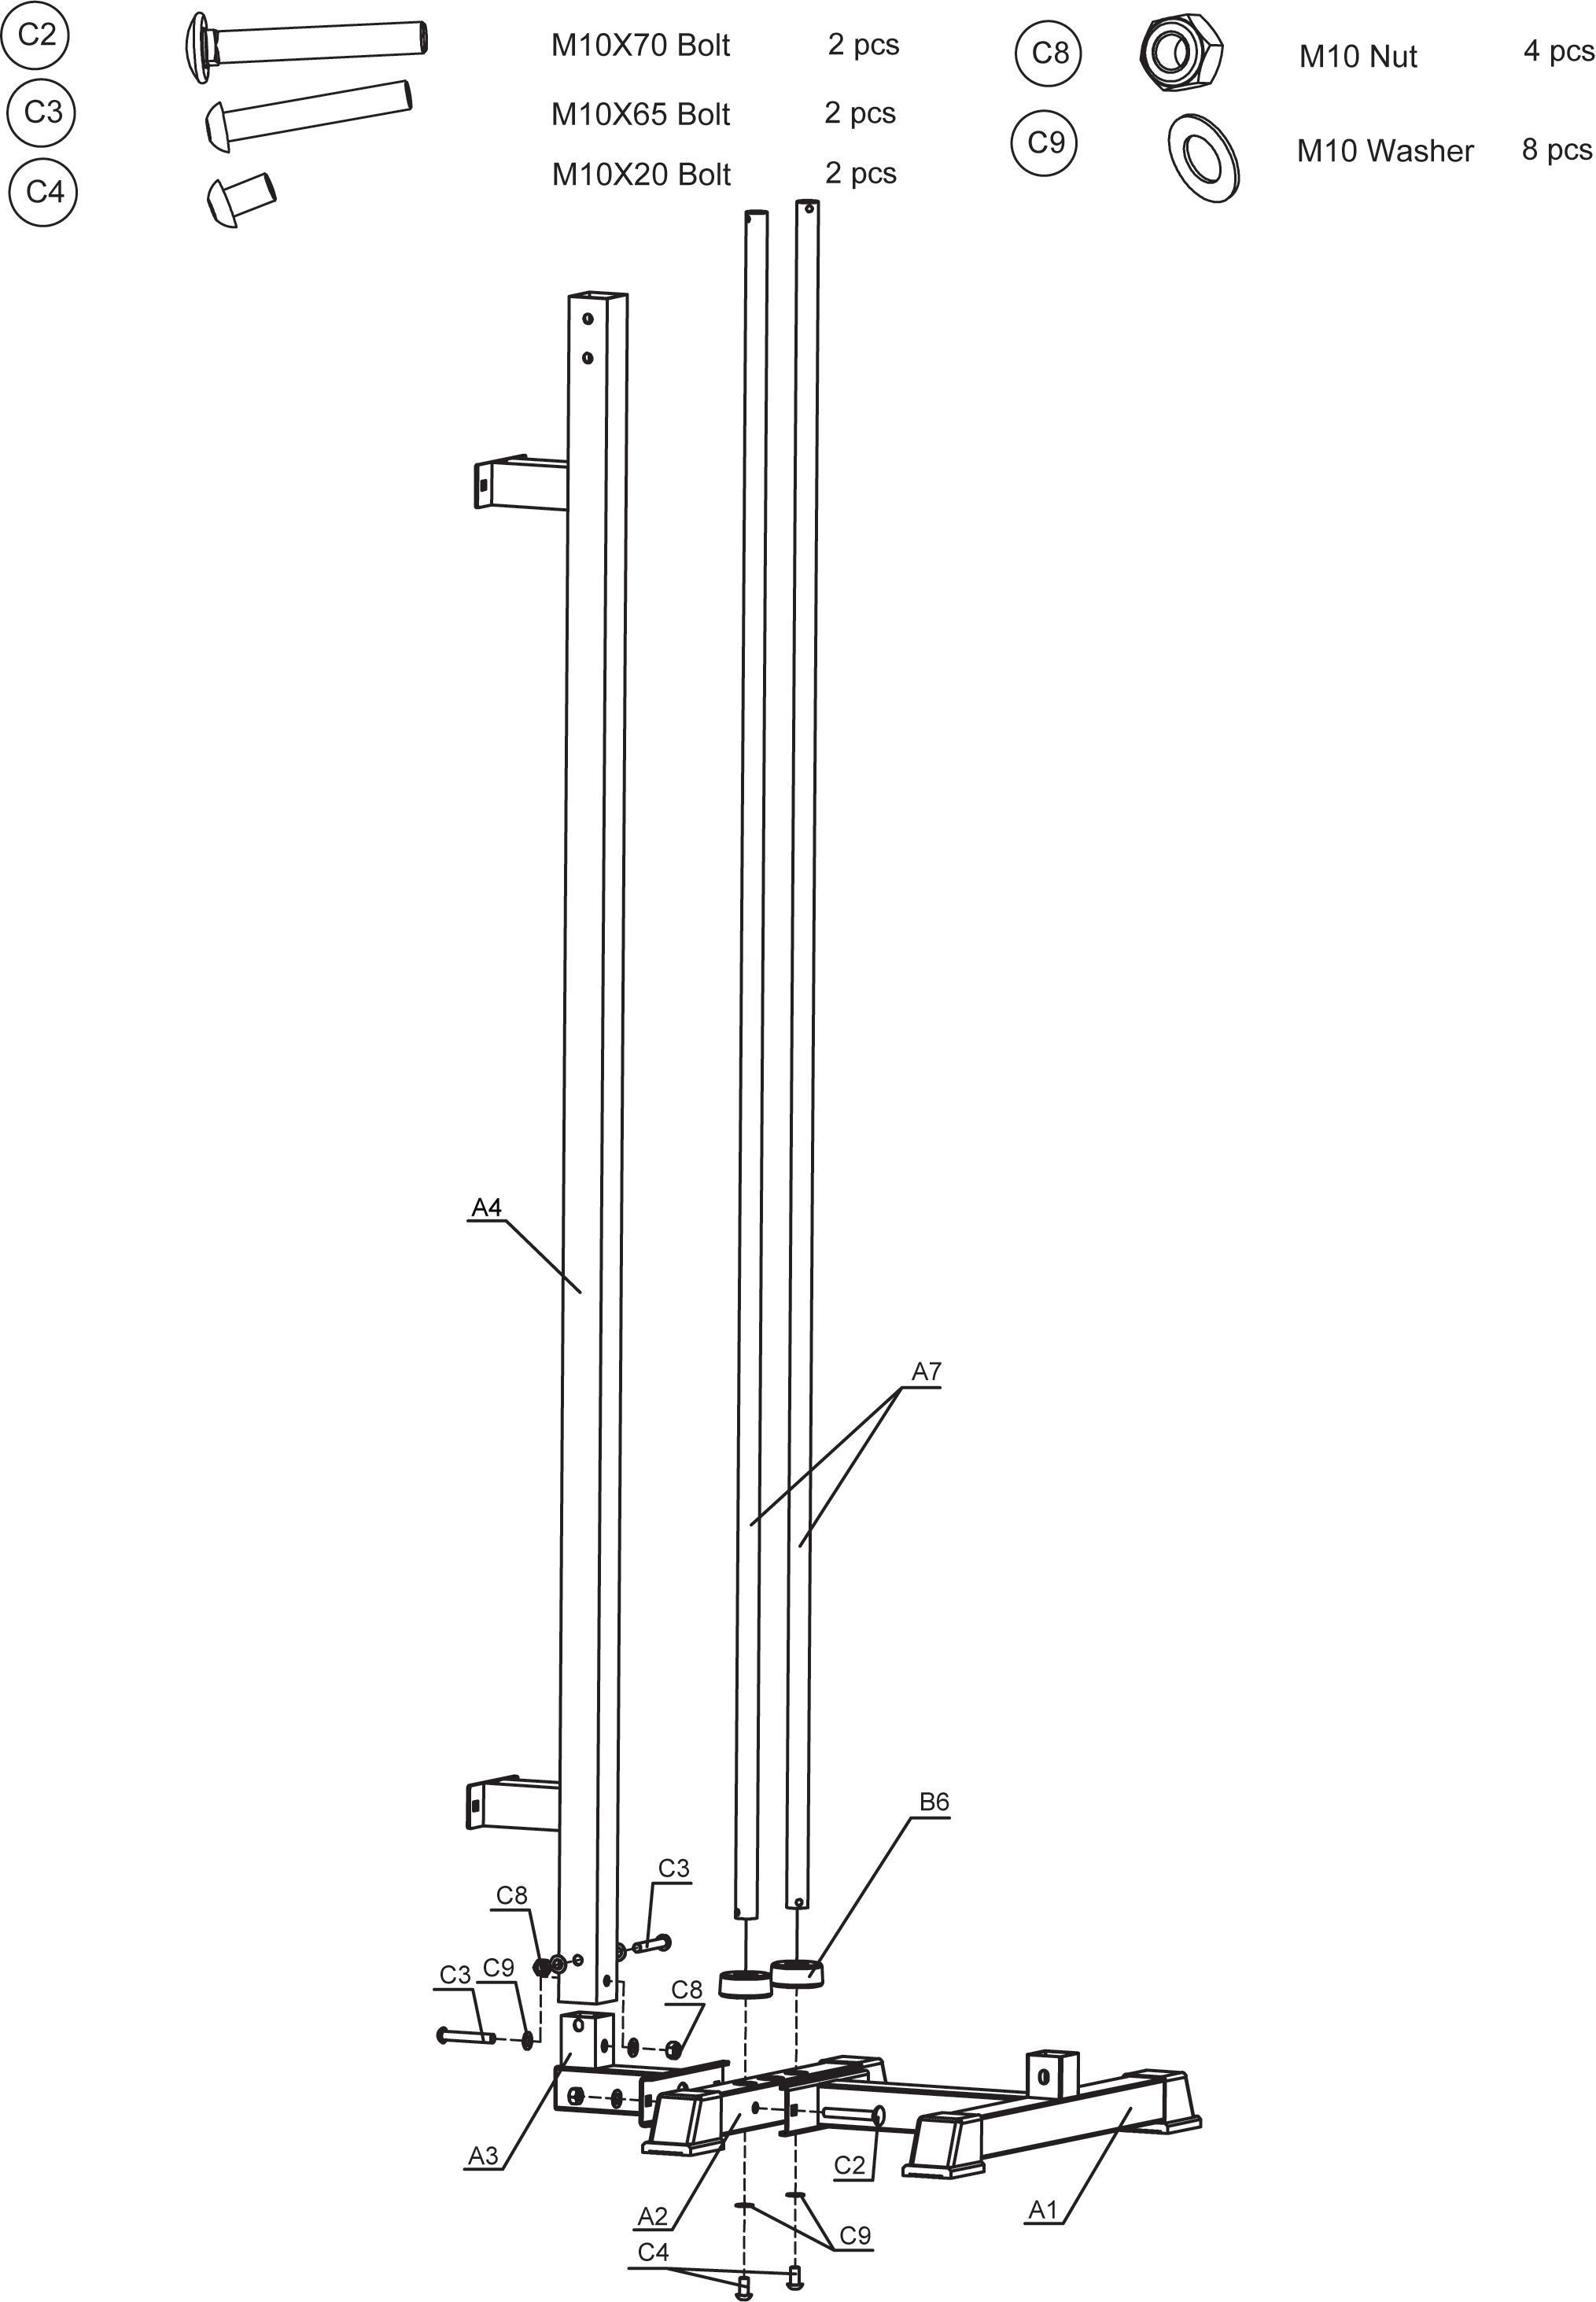
Attach the Feet (Part A1) to the Feet Connector (Part A2) using the M10X20 Bolt (Part C4), M10 Nut (Part C8), and M10 Washer (Part C9). Ensure all bolts are securely tightened.
Connect the Wall Mounting Pole (Part A4) to the Feet Connector (Part A2) using the M10X65 Bolt (Part C3), M10 Nut (Part C8), and M10 Washer (Part C9). Tighten the bolts to ensure stability.
Secure the Weight Poles (Part A7) to the Feet Pole Connectors (Part B6) using the M10X70 Bolt (Part C2), M10 Nut (Part C8), and M10 Washer (Part C9). Make sure the poles are aligned and firmly attached.
Ensure all components are properly aligned and securely fastened to maintain the stability and safety of the machine.
2. Assembly of Cable Pulley System
To continue assembling the Wall Mounted Cable Pulley Machine, follow these steps:
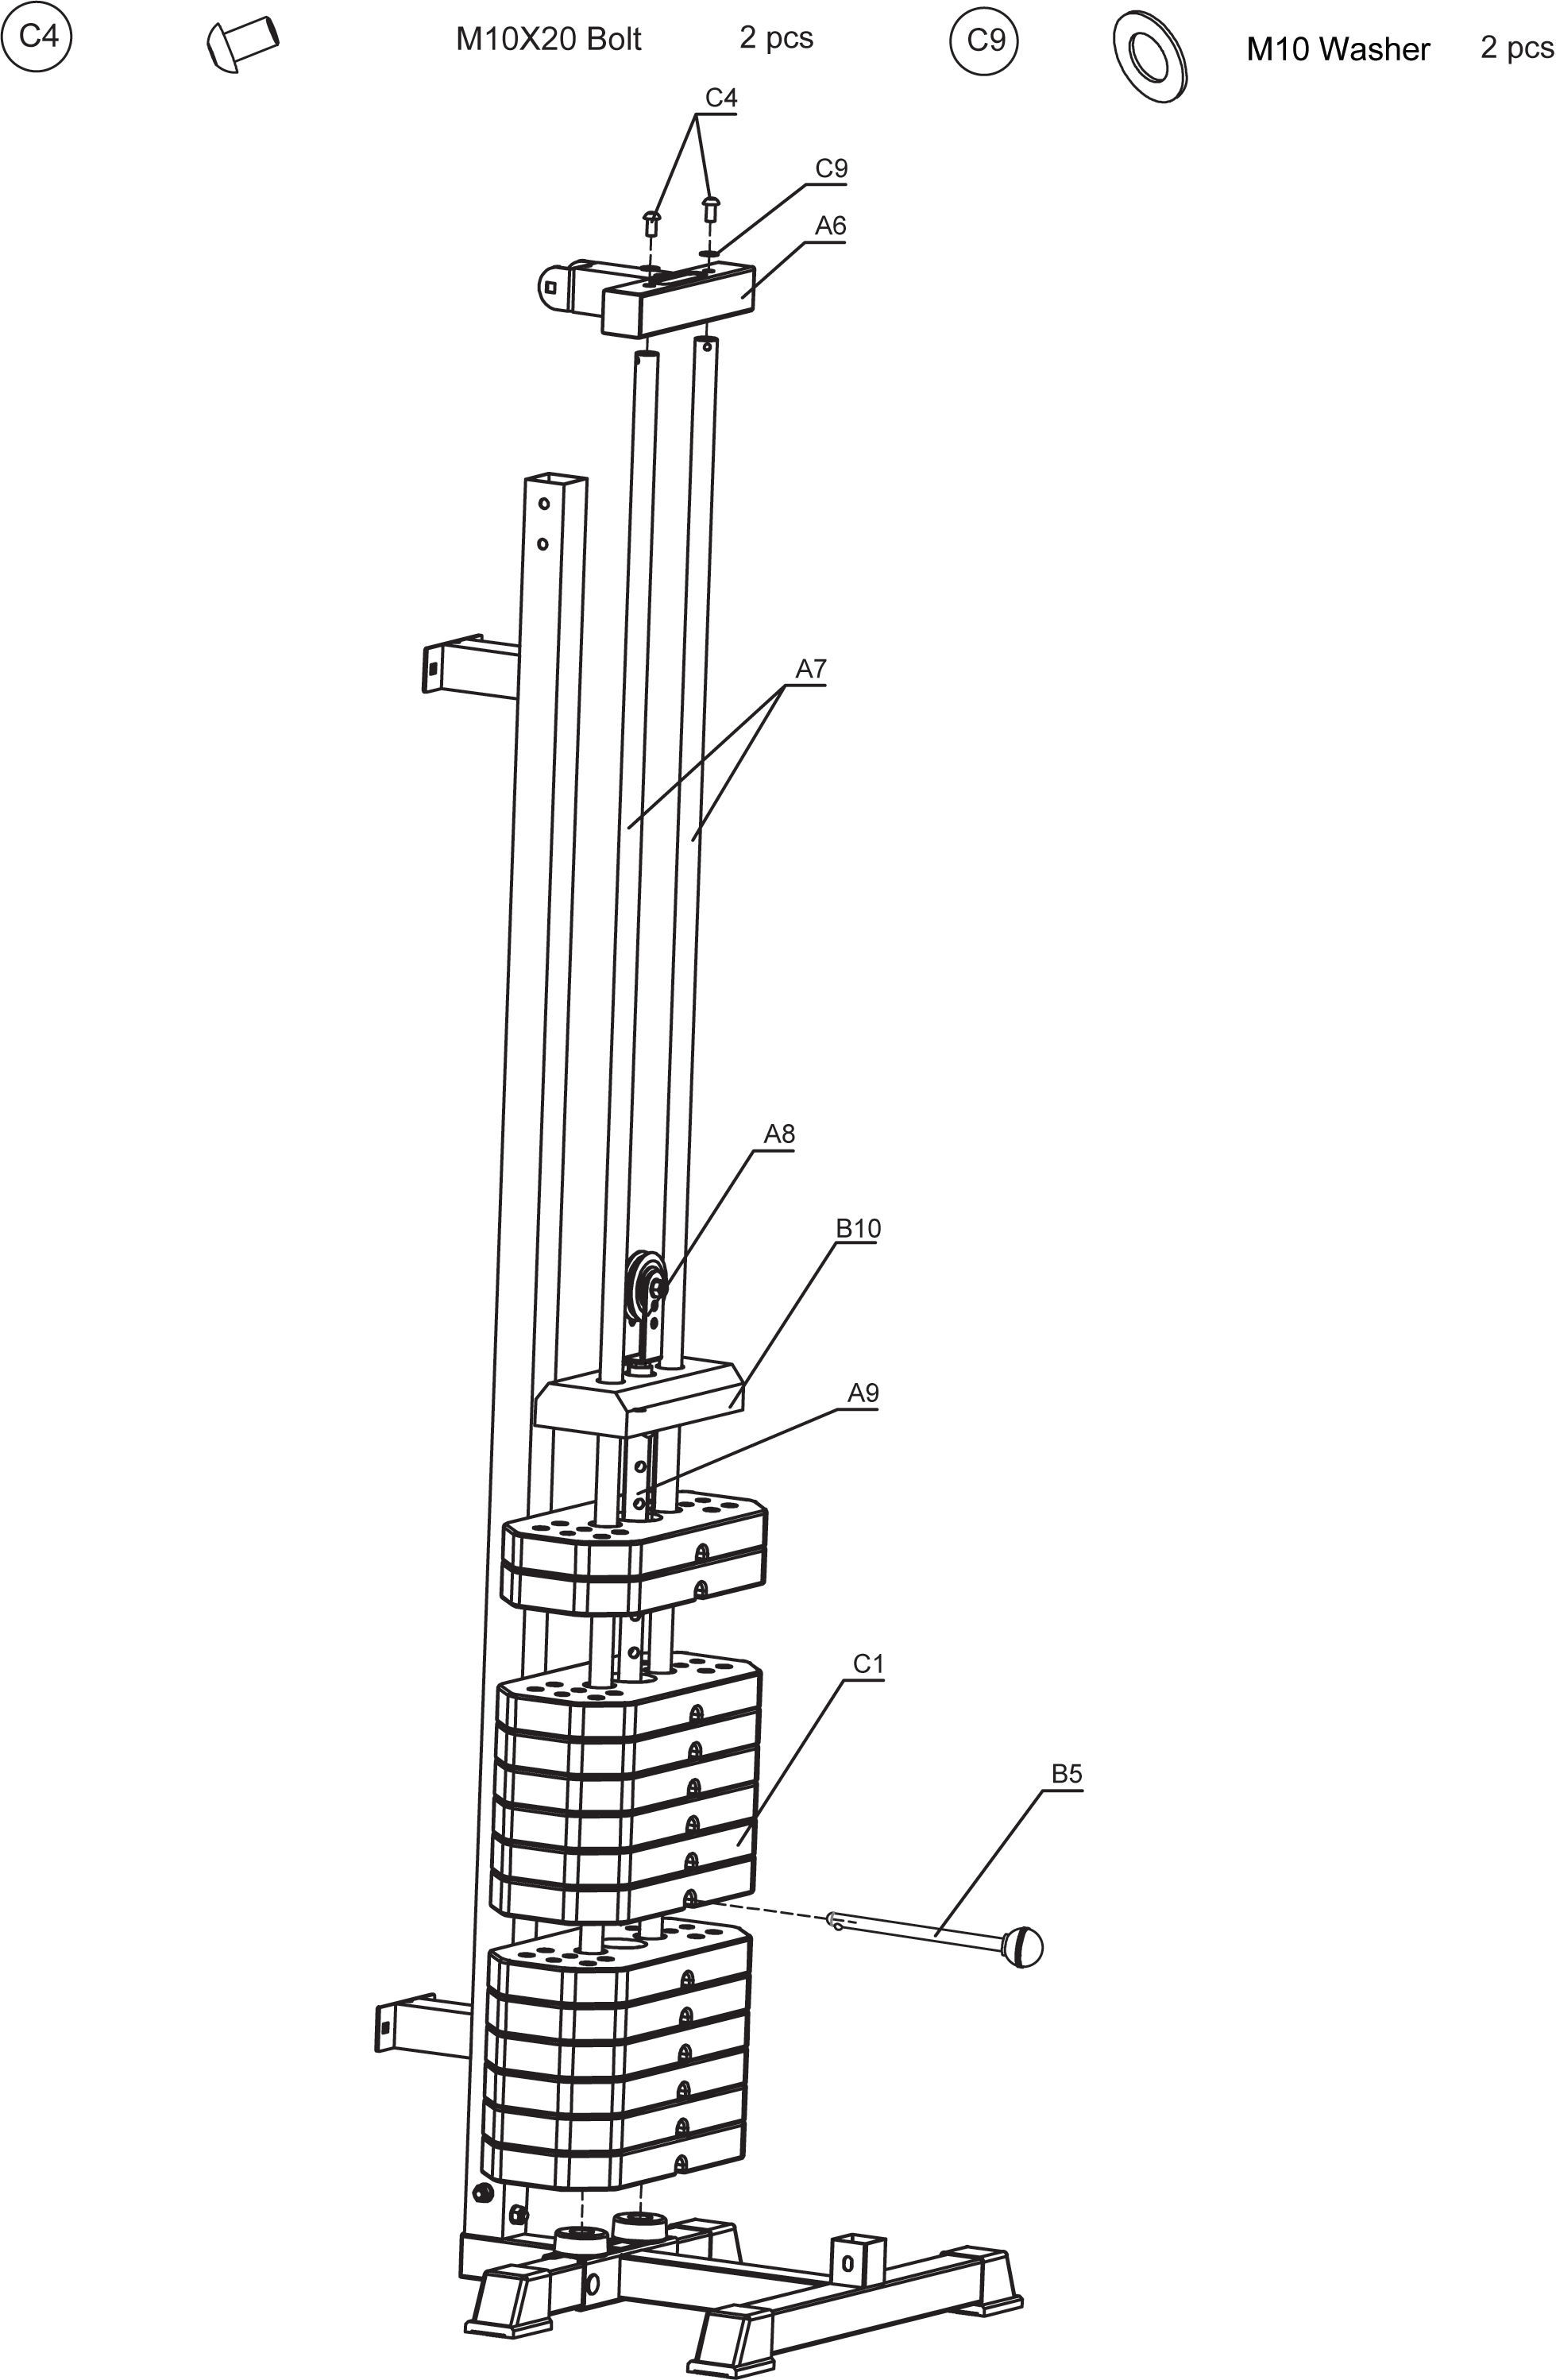
Attach the Weight Pole Bracket (Part A6) to the top of the Weight Poles (Part A7) using two M10X20 Bolts (Part C4) and two M10 Washers (Part C9). Ensure the bolts are securely tightened.
Install the Rope Pulley (Part A8) onto the Weight Pole Bracket (Part A6).
Place the Top Weight (Part B10) onto the Pole (Part A9) and align it with the Weight Plates (Part C1).
Insert the Weight Pin (Part B5) into the desired weight plate to select the appropriate resistance level.
Ensure all components are properly aligned and securely fastened to maintain the stability and safety of the machine.
3. Wall Mounted Cable Pulley Machine Assembly
To continue assembling the Wall Mounted Cable Pulley Machine, follow these steps:
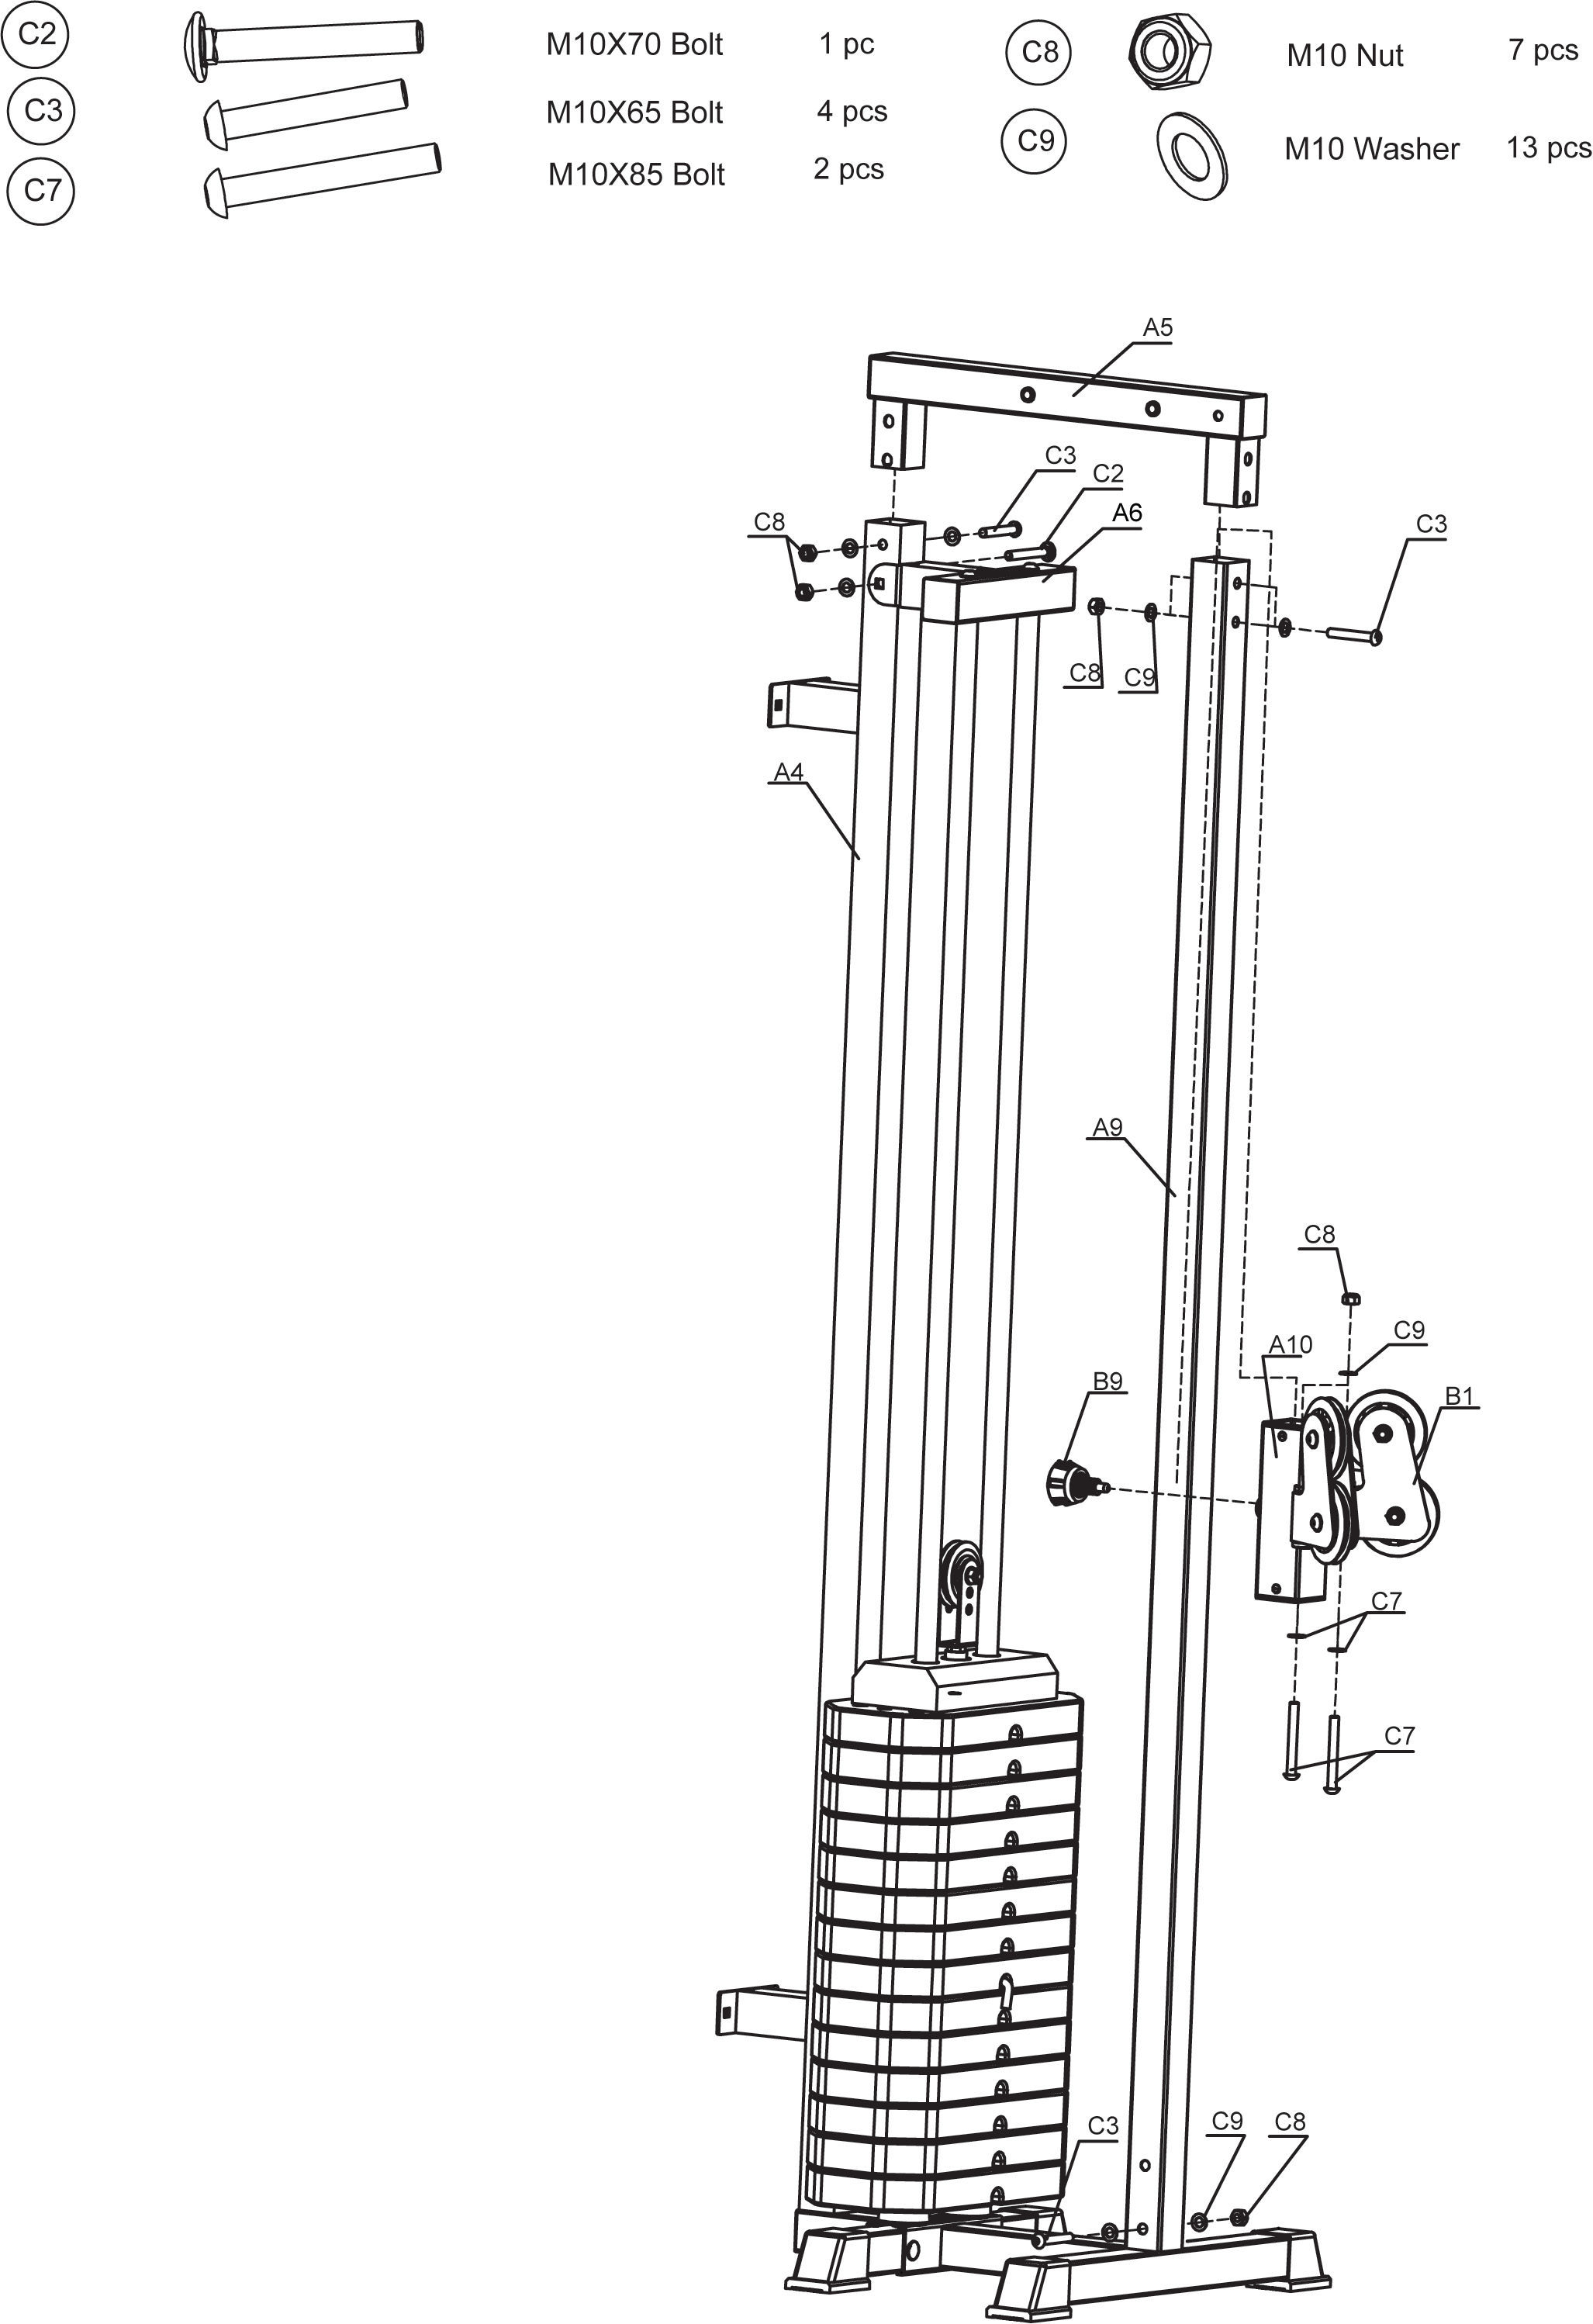
Attach the Machine Top (Part A5) to the Wall Mounting Pole (Part A4) using the M10X65 Bolt (Part C3), M10 Nut (Part C8), and M10 Washer (Part C9). Ensure all bolts are securely tightened.
Secure the Pulley Housing with Two Pulleys (Part B1) to the Pole (Part A9) using the M10X85 Bolt (Part C7), M10 Nut (Part C8), and M10 Washer (Part C9). Tighten the bolts to ensure stability.
Attach the Pulley Connector (Part A10) to the Pole (Part A9) using the M10X85 Bolt (Part C7), M10 Nut (Part C8), and M10 Washer (Part C9). Make sure the connector is aligned and firmly attached.
Insert the Screw Knob (Part B9) into the Pole (Part A9) to secure the assembly.
Ensure all components are properly aligned and securely fastened to maintain the stability and safety of the machine.
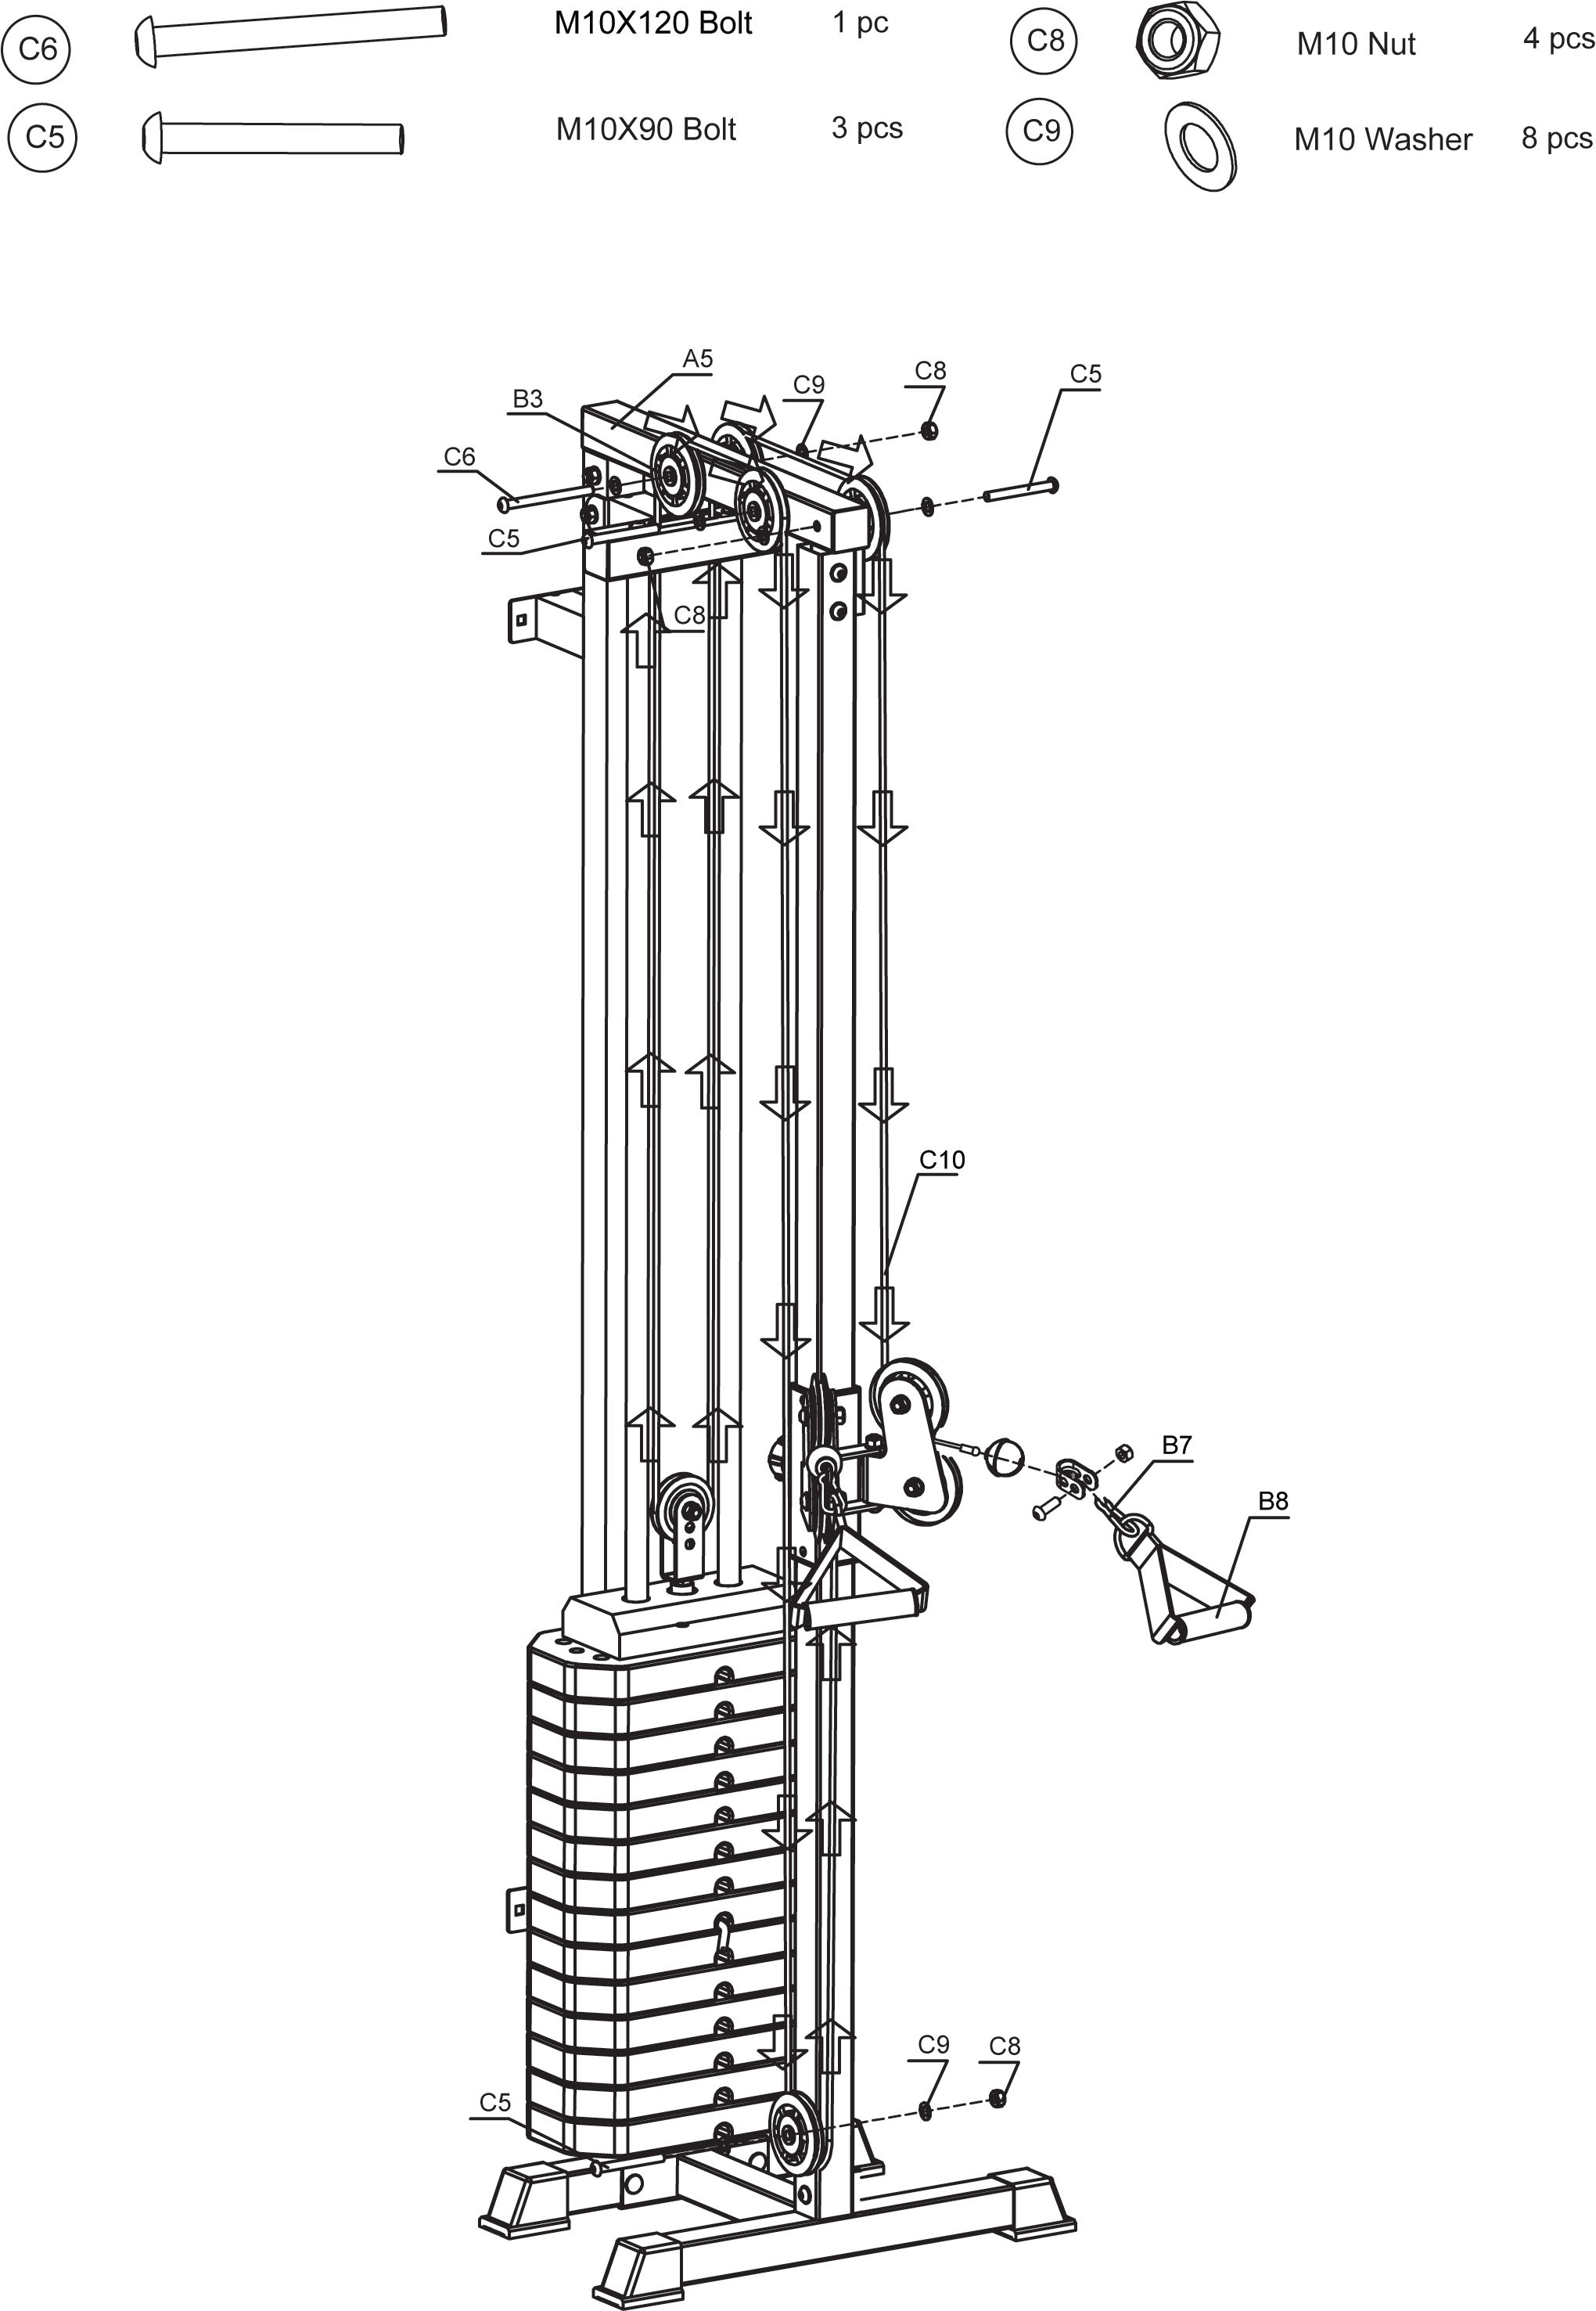
4. Assembly of Cable Pulley Machine
To finalise the assembly of the Wall Mounted Cable Pulley Machine, follow these steps:
Attach the Large Pulley (Part B3) to the Machine Top (Part A5) using the M10X90 Bolt (Part C5), M10 Nut (Part C8), and M10 Washer (Part C9). Ensure the bolt is securely tightened.
Secure the Small Pulley (Part B4) to the lower section using the M10X90 Bolt (Part C5), M10 Nut (Part C8), and M10 Washer (Part C9). Tighten the bolt to ensure stability.
Connect the Carabiner (Part B7) to the cable and attach the Handle (Part B8) to the carabiner. Ensure the carabiner is securely fastened.
Ensure all components are properly aligned and securely fastened to maintain the stability and safety of the machine.
5. Maintenance
Use a soft, damp cloth with mild detergent to wipe down all metal surfaces, including the frame, pulleys, and weight stack. Avoid abrasive cleaners that may damage the finish.
Clean rubber and plastic components, such as grips and cable coatings, with a damp cloth and mild soap. Ensure they are thoroughly dried to prevent deterioration.
Wipe down cables regularly to remove dust, sweat, and debris. Avoid using excessive water to prevent moisture damage.
Lubricate pulleys and moving parts with a silicone-based lubricant as recommended by the manufacturer to maintain smooth operation. Do not use oil-based lubricants, as they may attract dirt.
Inspect and clean weight pins and locking mechanisms to ensure they are free from dust and debris, allowing them to function correctly.
Regularly check and wipe down the wall-mounted areas to prevent dust buildup that could affect the stability of the fixings.
Store attachments in a clean, dry area when not in use and wipe them down periodically to maintain hygiene and longevity.
Never use harsh chemicals, bleach, or solvent-based cleaners, as they may damage coatings, rubber parts, or metal surfaces.
Regularly inspect all cables, pulleys, and attachments for signs of wear, fraying, or damage. Replace any worn or damaged components immediately.
Check wall fixings and bolts periodically to ensure the machine remains securely mounted. Tighten any loose bolts as necessary.
6. Troubleshooting
WHAT DO I DO IF THERE ARE MISSING PARTS FROM MY ORDER?
If there appears to be any part missing from your order, contact our friendly and helpful Customer Support Team within 7 days of receipt.
FOR ALL OTHER ISSUES, PLEASE CONTACT OUR CUSTOMER SUPPORT TEAM.
Previous stepCopy link to sharePrint / PDFNext step