 Instructions by time4sleep Wilson Upholstered Ottoman Bed Frame Assembly instructions for Wilson Upholstered Ottoman Bed Frame by Time4Sleep. -
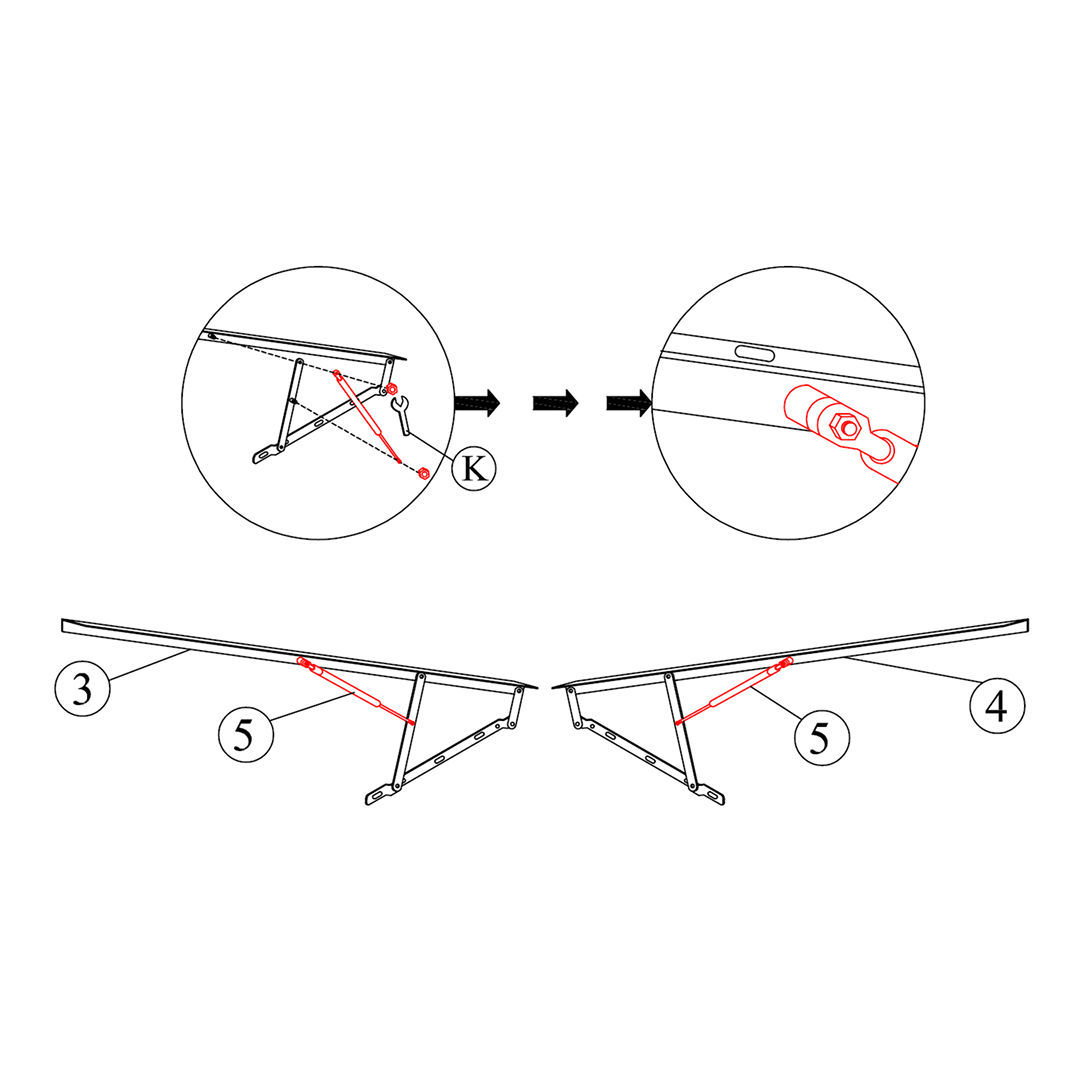
1. Attach Gas Lift Machines to Lift Frames
- Position the Left Gas Lift Frame (3) and Right Gas Lift Frame (4) on a flat surface.
- Align the holes on each frame with the Gas Lift Machine (5).
- Using the M8 Spanner (K), secure the Gas Lift Machines to the Lift Frames with the pre-attached bolts and nuts (already included on the Gas Lift Machine).
- Ensure both sides are firmly attached and the piston arms move smoothly when lifted.
Tip: Don’t over-tighten the bolts. The arms should move with controlled resistance, not stiffness.
-
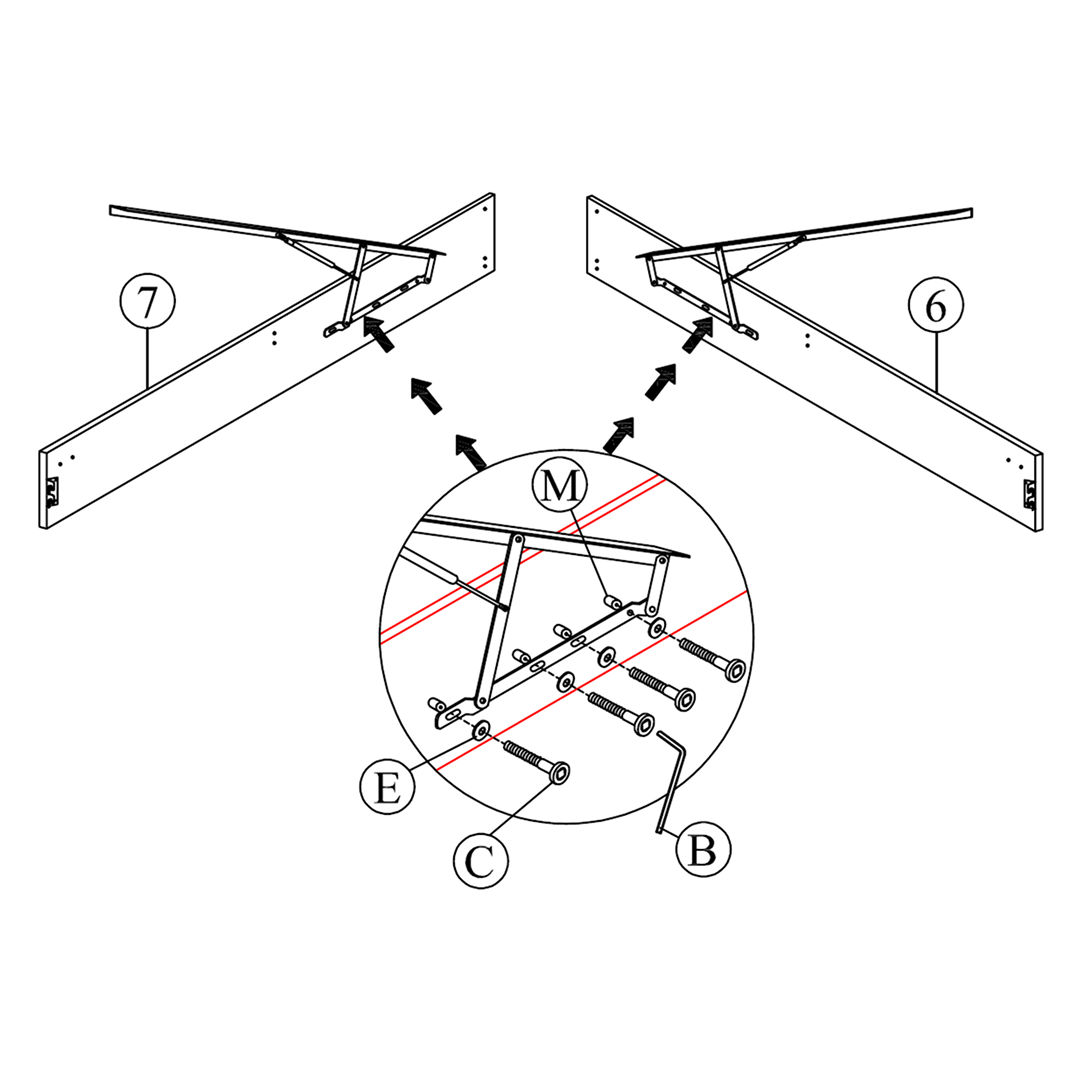
2. Fix Lift Frames to Side Rails
- Align the Left Gas Lift Frame (3) with the Left Side Rail (7) and the Right Gas Lift Frame (4) with the Right Side Rail (6).
- Secure each lift frame using M8×30 Bolts (C) 4 per side and Spring Washers M8 (F) and Flat Washers M8 (E) 4 of each per side
- Use the M5 Allen Key (M) to tighten the bolts and ensure a snug fit
-
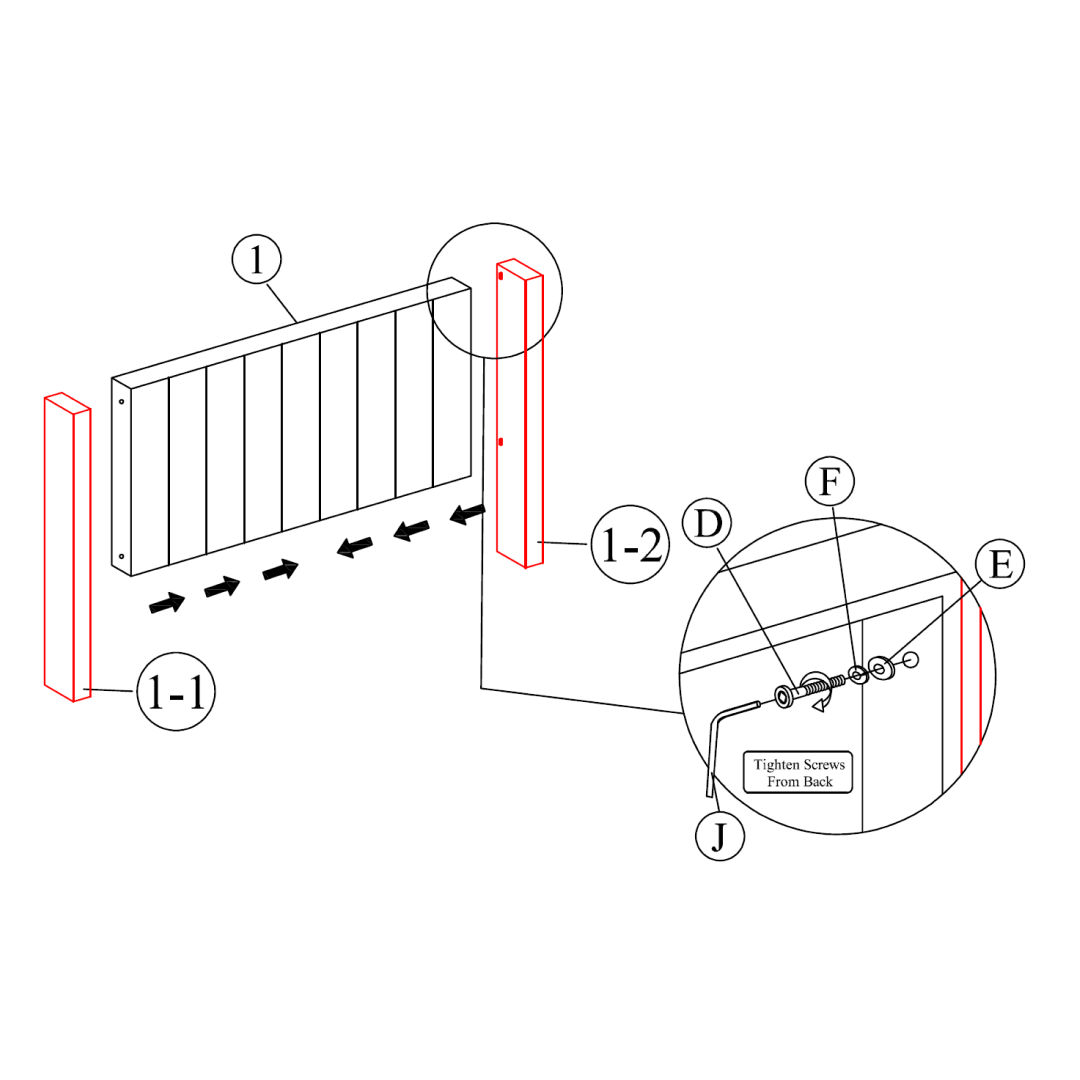
3. Assemble the Headboard with Wing Panels
- Place the Headboard (1) upright, ensuring stability.
- Align the Right Wing (1-1) and Left Wing (1-2) with the edges of the headboard.
- Attach each wing using M8×50 Bolt (D), Flat Washers M6 (G) Spring Washers M8 (F) and Flat Washers M8 (E).
- Tighten from the back using the M4 Allen Key (J).
-
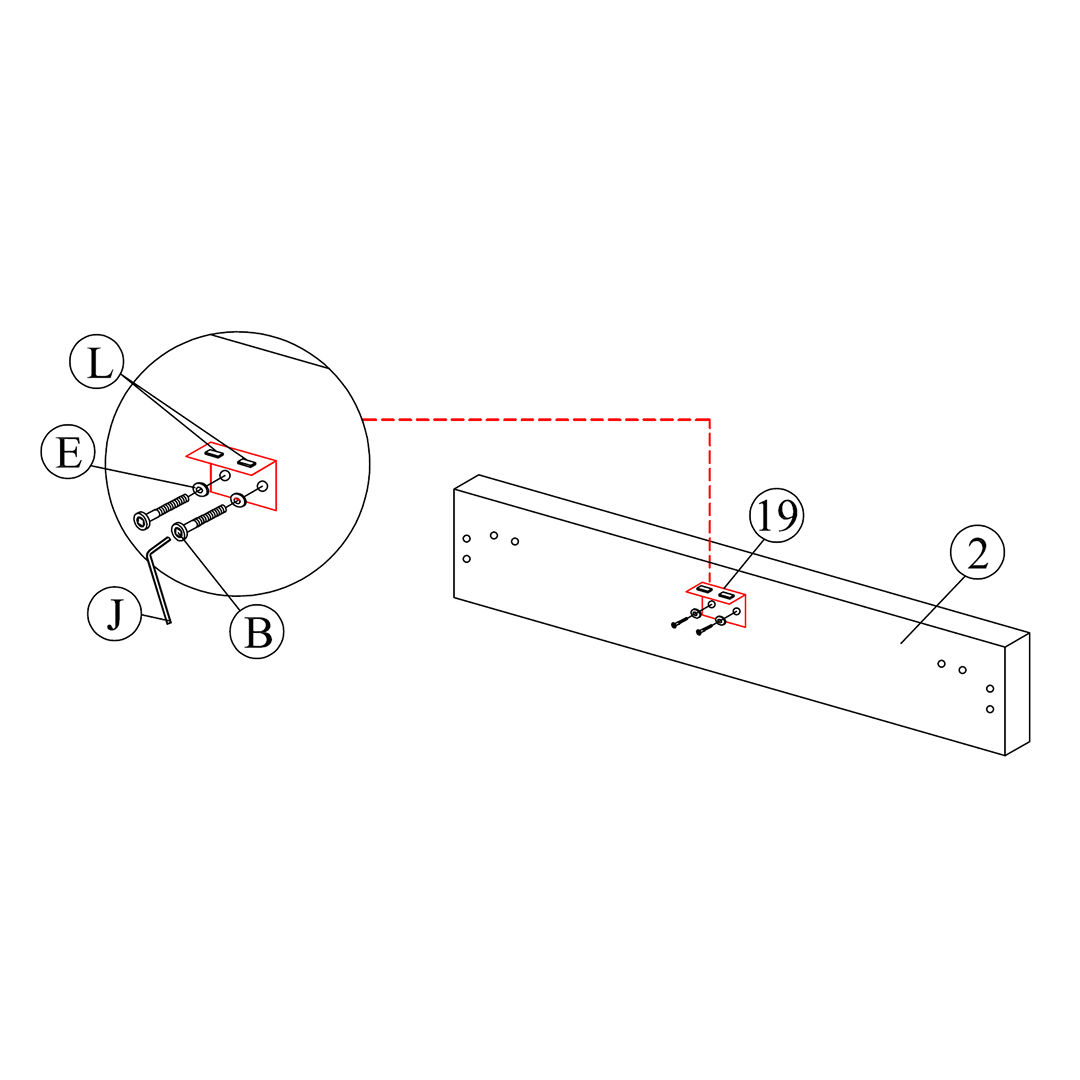
4. Attach the Back Plate to the Footboard
- Position the Footboard (2) on a stable surface with the inner side facing up.
- Align the Black Back Plate (19) with the pre-drilled holes on the footboard.
- Fix it in place using M8×20 Bolts (B) and Flat Washers M8 (E)
- Tighten everything securely using the M4 Allen Key (J).
- Add a Protective Pad (L) to the plate.
-
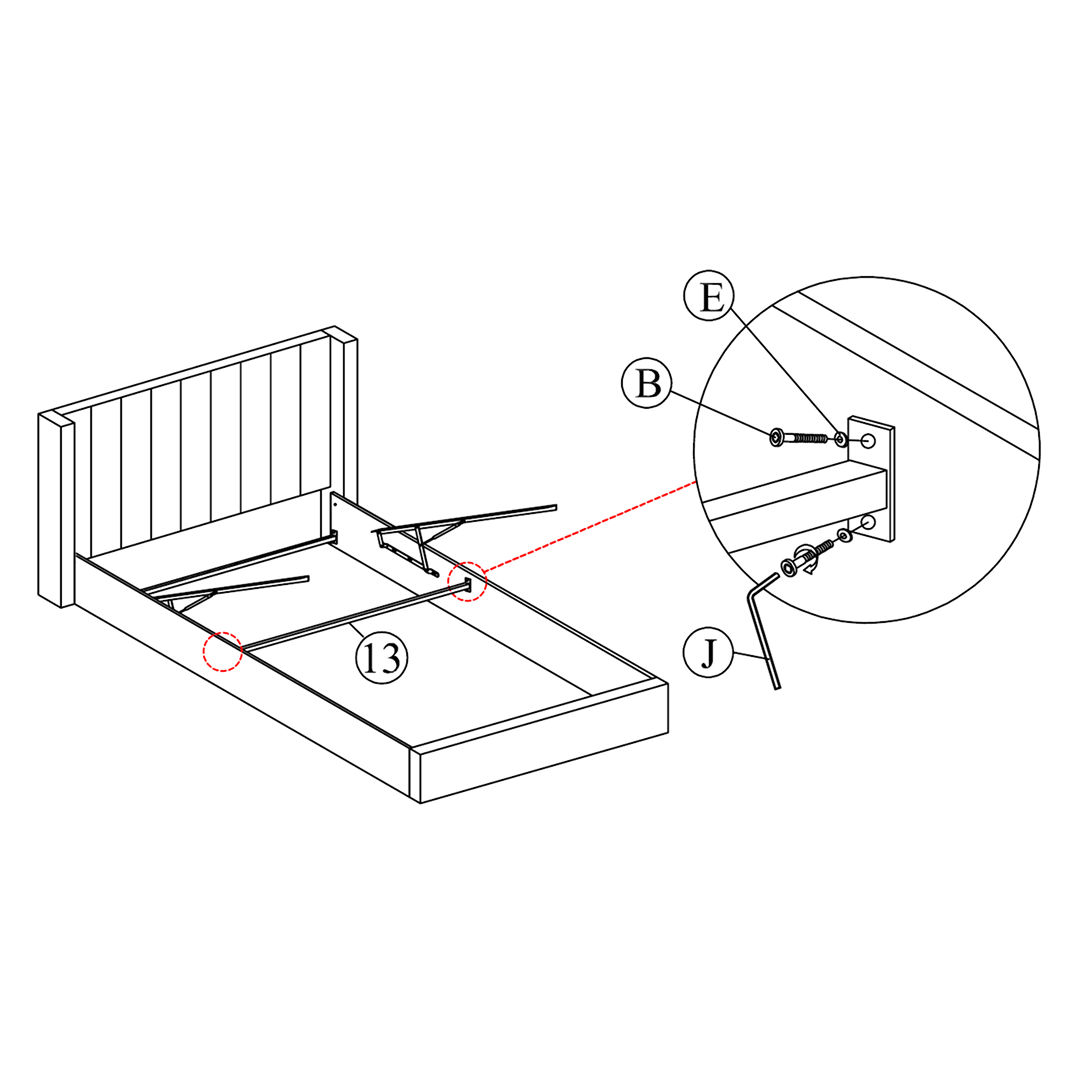
5. Connect Side Rails to the Headboard
- Bring the assembled Headboard (1) with wings into position.
- Align the ends of the Left Side Rail (7) and Right Side Rail (6) with the corresponding brackets on the headboard.
- Secure both side rails using M8×50 Bolts (D), Flat Washers M8 (E), Spring Washers M8 (F) and Nuts M8 (H).
- Use the M4 Allen Key (J) and a spanner to tighten the bolts firmly.
- Insert the Side Rail Connector Metal Bars (13) to reinforce the structure from the inside.
-
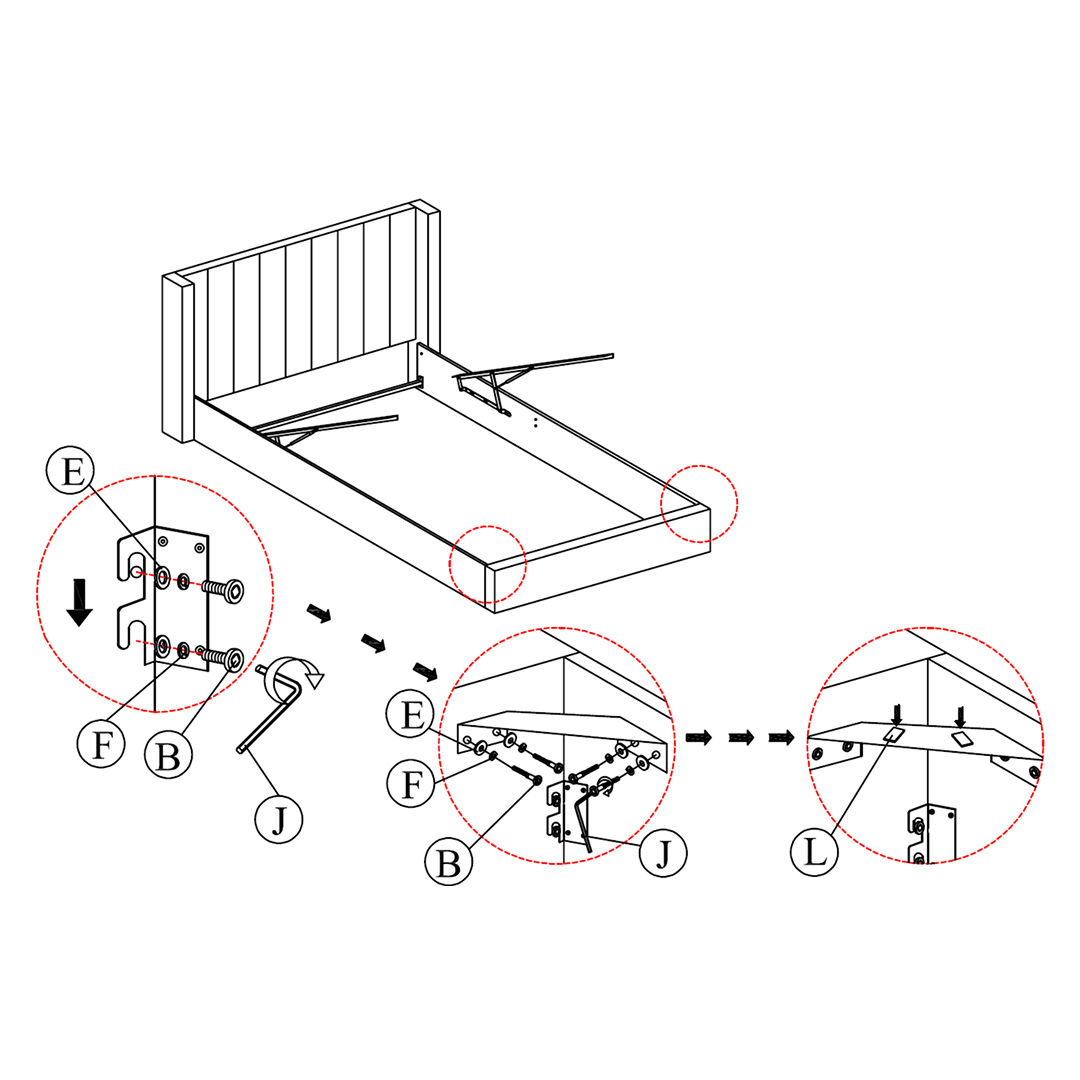
6. Attach the Footboard and Reinforce Frame with Gold Corners
- Place the Footboard (2) between the Left (7) and Right (6) Side Rails.
- Align the inner brackets and attach the footboard using M8×20 Bolts (B), Flat Washers M8 (E) and Spring Washers M8 (F)
- Tighten everything using the M4 Allen Key (J).
- Next, fix the Gold Corners (17) at the internal corners of the bed frame using M8×20 Bolts (B), Flat Washers M8 (E) and Spring Washers M8 (F)
- Secure with the M4 Allen Key (J).
- Finalize this step by placing the Protective Pads (L) on top of each Gold Corner to prevent damage to the lift frame.
-
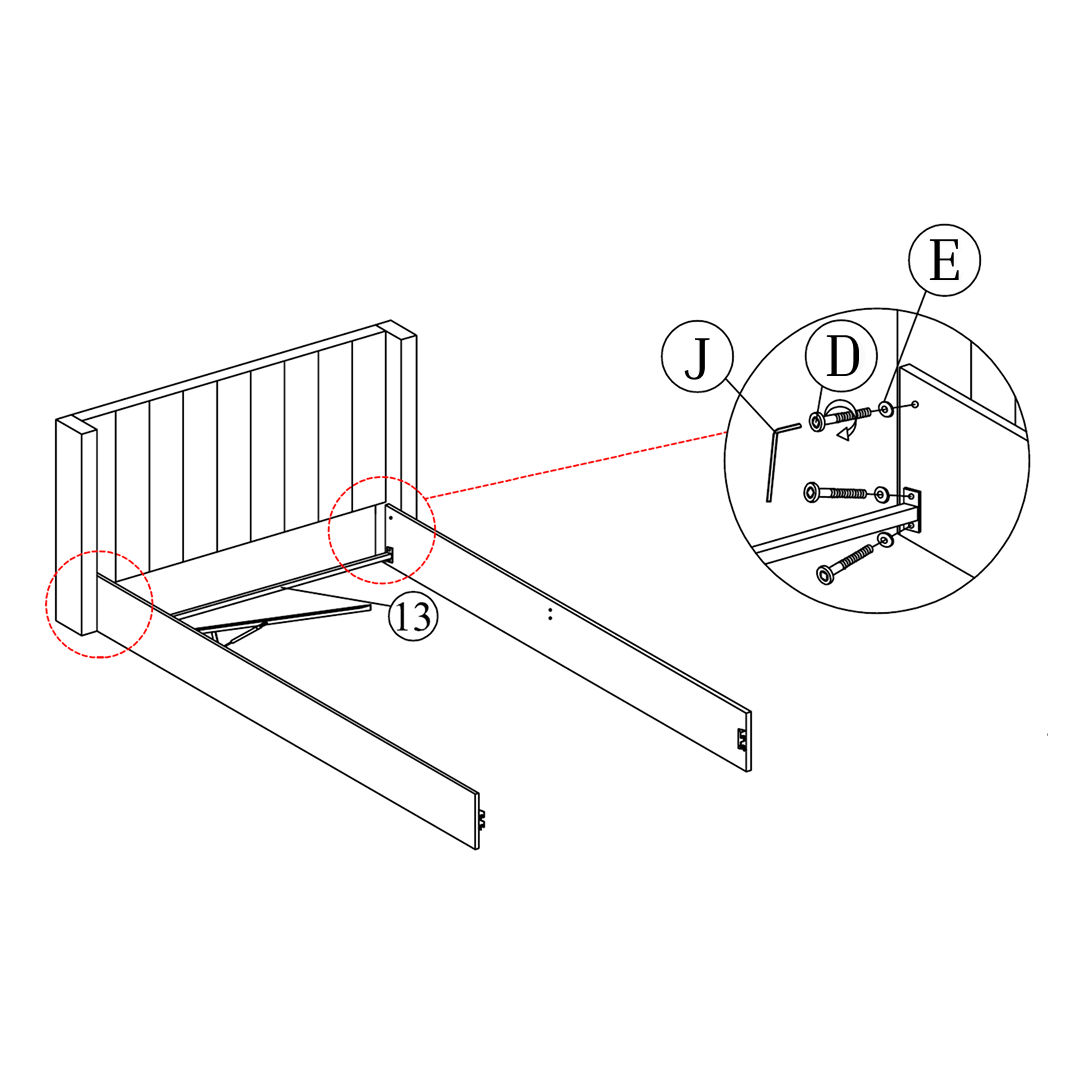
7. Secure Side Rail Connector Bars
- Locate the Side Rail Connector Metal Bars (13) and position them between the Left (7) and Right (6) Side Rails, near the footboard end.
- Secure each end of the bar using M8×20 Bolts (B) and Flat Washers M8 (E).
- Tighten all bolts firmly with the M4 Allen Key (J) to ensure structural support across the bed frame.
-
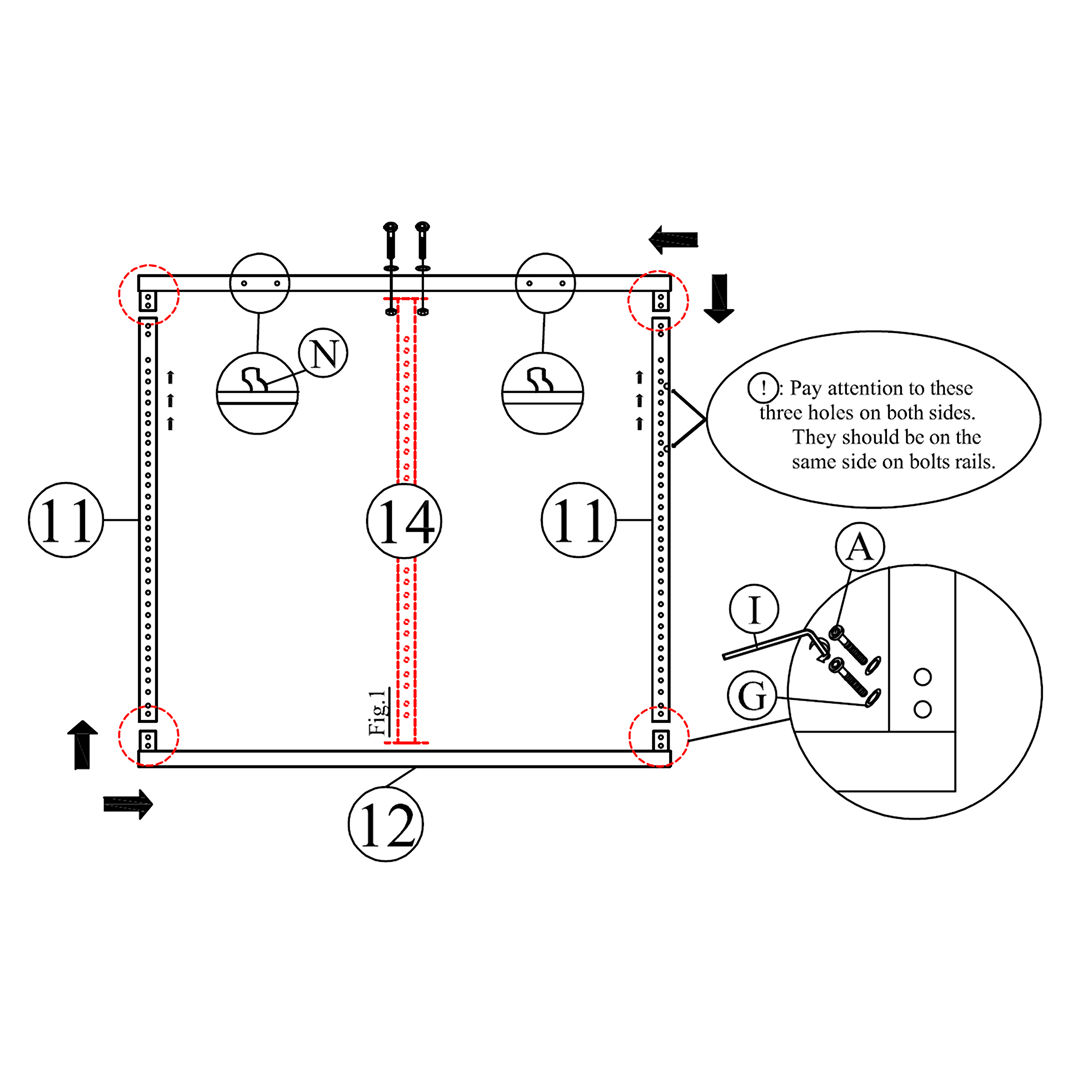
8. Install Metal Support Bars and Mattress Stoppers
- Attach the Side Rail Metal Bars (11) to the inner side of both side rails. Ensure the three-hole pattern is facing the same direction on both sides (as shown in the diagram).
- Fix them in place using M6×20 Bolts (A), Flat Washers M6 (G) and tighten with the M4 Allen Key (I).
- Secure the Headboard and Footboard Metal Bars (12) horizontally between the ends of the side rails.
- Fix the Middle Metal Bar (14) vertically between the center points of the head and foot bars using M8×50 Bolts (D), Flat Washers M8 (E), and Nuts M8 (H) as shown in the image. Tighten securely with the M5 Allen Key (J).
- Finally, place the Mattress Stoppers (N) on the center bar and secure them by twisting them into position (no hardware needed).
Important: Double-check that the hole alignment on the metal bars is consistent on both sides to avoid issues when installing the slat frame.
-
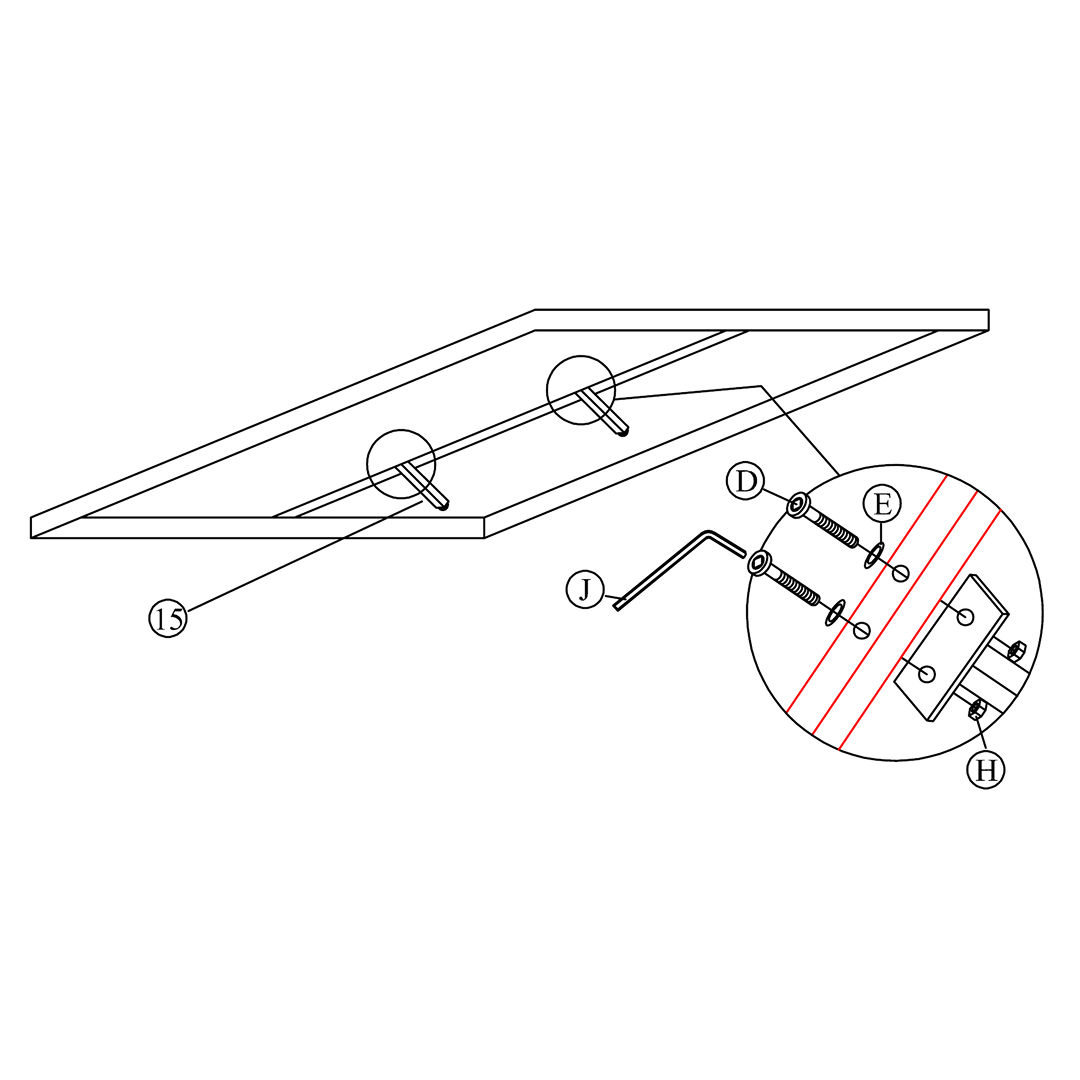
9. Attach the Support Legs
- Align the Support Legs (15) with the holes at each end of the bar.
- Secure each leg using M8×50 Bolts (D), Flat Washers M8 (E) and Nuts M8 (H)
- Tighten securely using the M4 Allen Key (J).
-
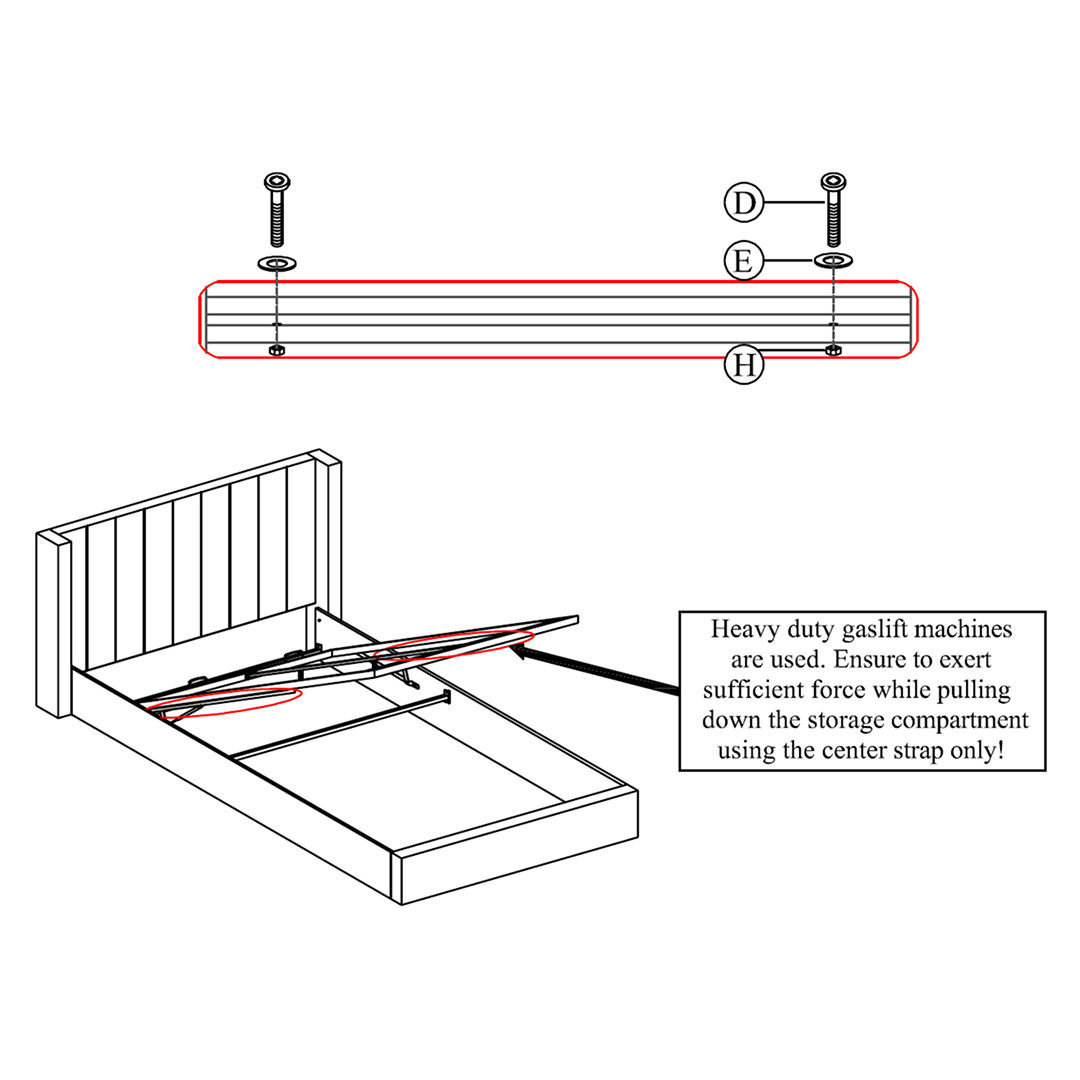
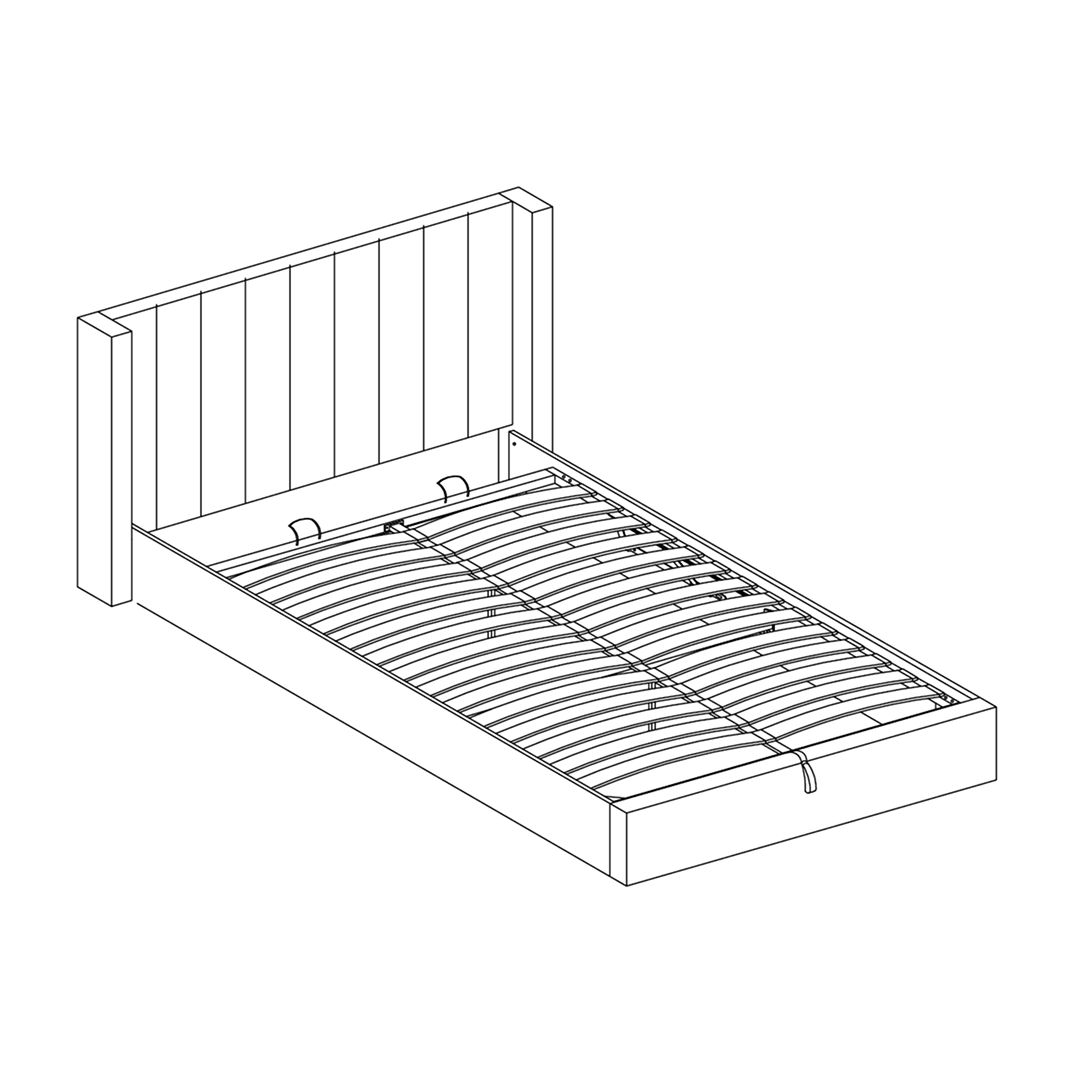
10. Attach the Slat Frame to the Bed Assembly
- Carefully lift the metal slat frame (already connected to the gas lift machines).
- Using the pre-installed hinge points, secure the frame in place with M8×50 Bolts (D), Flat Washers M8 (E), Spring Washers M8 (F) and then tighten everything with the M4 Allen Key (J).
- Once secured, test the opening and closing motion of the slat frame to ensure the gas lift mechanism operates smoothly.
Important: The gas lift mechanism is heavy-duty. When lowering the base, apply firm pressure and always use the center strap to avoid damage or injury.
-
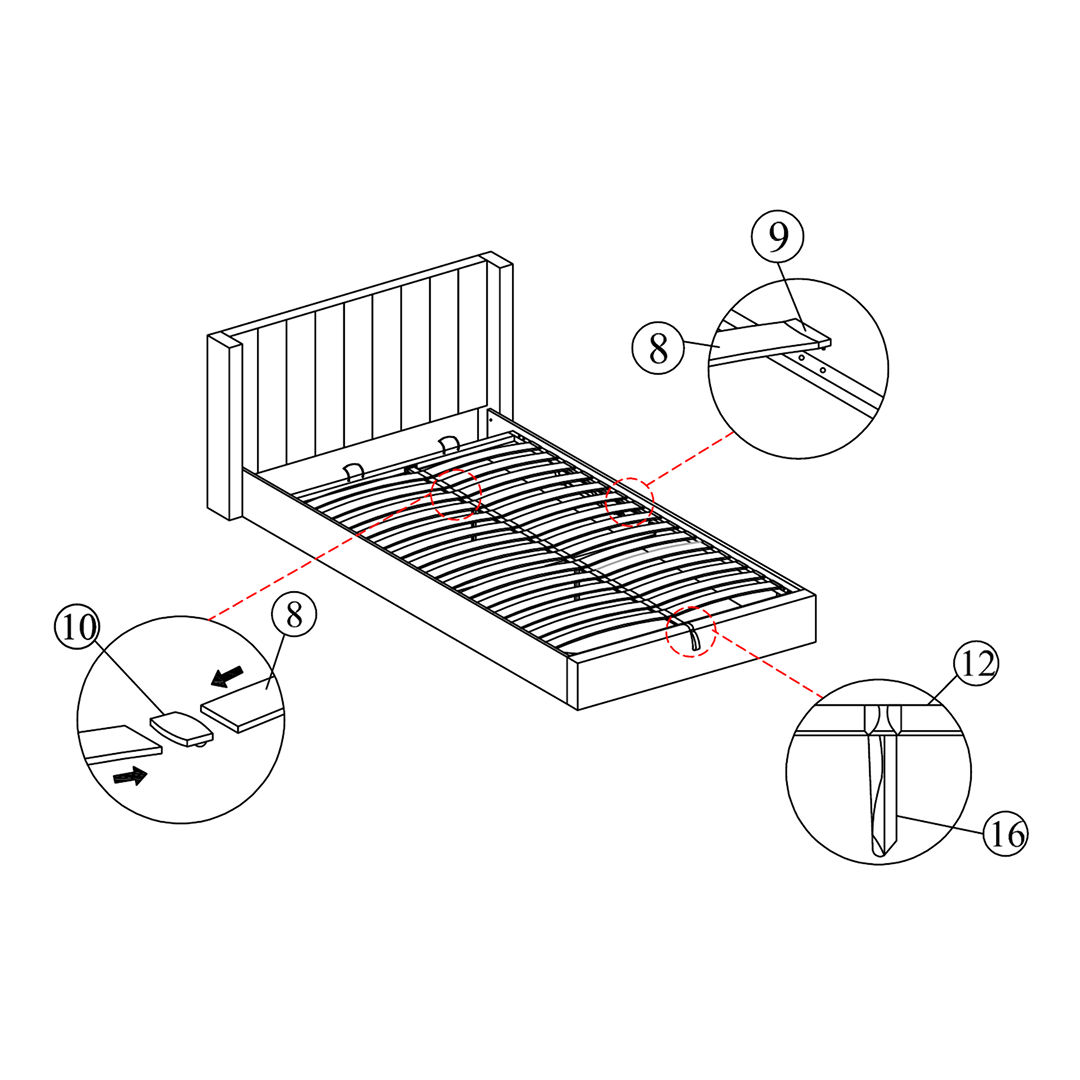
11. Install the Slats
- Insert the Wood Slats (8) into the Single Close Ended Clips (9) on both sides of the slat frame.
- For the central section, connect slats using the Double Open-Ended Clips (10). Slide the clips over two slats to link and stabilize them in the middle.
- Press down firmly until each slat clicks into place
- Locate the Gas Lift Strap (16) and securely attach it to the Middle Metal Bar (14) using the preinstalled fitting on the bar.
Number of slats and caps per size:
- Double: 28 Wood Slats / 28 Single Close Ended Clips / 14 Double Open-Ended Clips
- King: 30 Wood Slats / 30 Single Close Ended Clips / 15 Double Open-Ended Clips
-
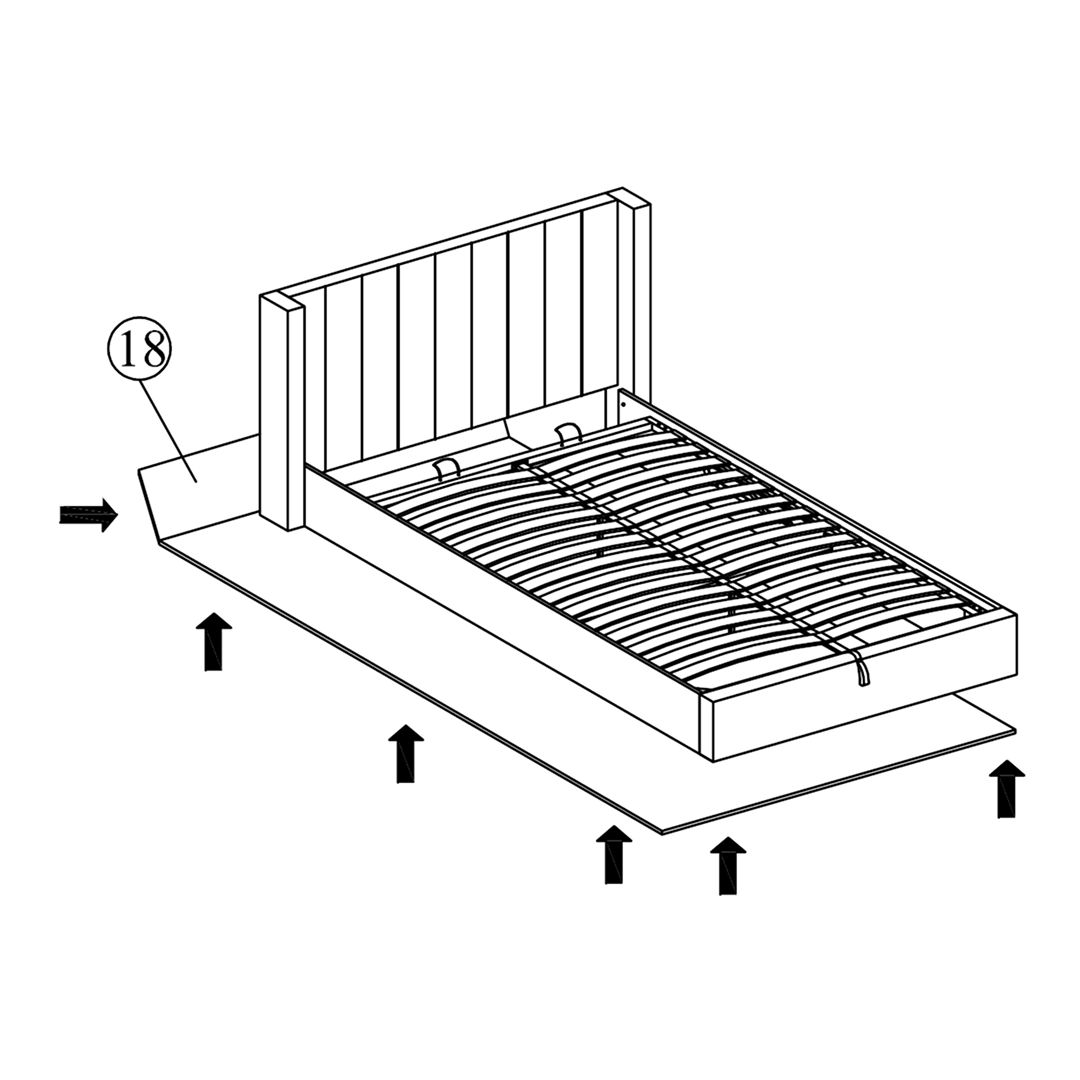
12. Insert the Fabric Base Cover
- Open the ottoman frame using the Gas Lift Strap to reveal the under-bed storage space.
- Slide the Fabric Base Cover (18) into the bottom of the storage area.
- Adjust and flatten it so that it fits neatly within the frame, fully covering the floor.
-
13. Final Check
- Verify that all slats are securely fastened and evenly spaced.
- Check for any loose connections and tighten the screws if necessary
|